• Welcome to the new NAXJA Forum! If your password does not work, please use "Forgot your password?" link on the log-in page. Please feel free to reach out to [email protected] if we can provide any assistance.

The Nail Salon

Well I dropped the Tera60 off with Darrell at KNA for some refreshing. The pinion nut had backed off, which in turn toasted the pinion bearing, and pinion seal.

I got a call from Darrell a few days later with an update. The drivers side carrier bearing showed signs of wear so it was replaced. I guess on the 60's the ring gear is spaced so far to one side, the torque has a tendency to wear drivers side carrier bearings faster. Interesting.

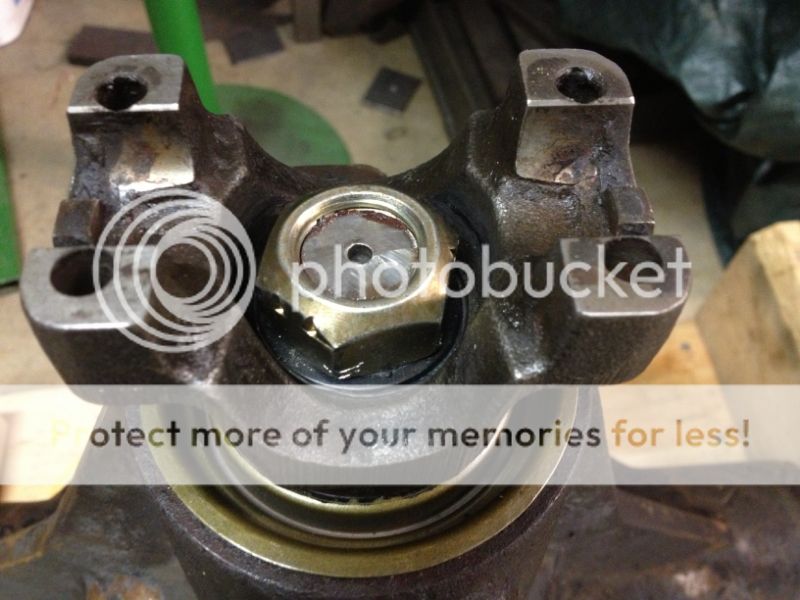
Darrell also discovered why the pinion nut had backed off. At some point in this axles life, the pinion was hammered into the housing, which knurled the end threads on the pinion shaft. So when the pinion nut was impacted on it stripped the threads enough to back off over time. Rather than scrap the gear set, Darrell chopped the boogered threads off the pinion shaft. This means the pinion nut is a few threads short of engaging the lock nut, but he thread locked the nut real good and torqued to spec. I don't see this being an issue, but it's something I'll mark and routinely check.

Lastly, the oil slingers were oriented wrong. Oil slingers are placed on the pinion shaft to keep oil on the pinion bearings to prevent them from running dry from take off, and to sling oil onto the bearings during use. In the case of my 60, the slinger was actually wearing down releasing metal shavings in the oil. This is likely what caused the pitting in the pinion bearings. So Darrell made the decision to just do a complete bearing overhaul, new pinion and carrier bearings.

7E195E8C-49B2-4582-B6E5-A69A54F51647.jpg


Preload and backlash feel right, and no more end play in the pinion.
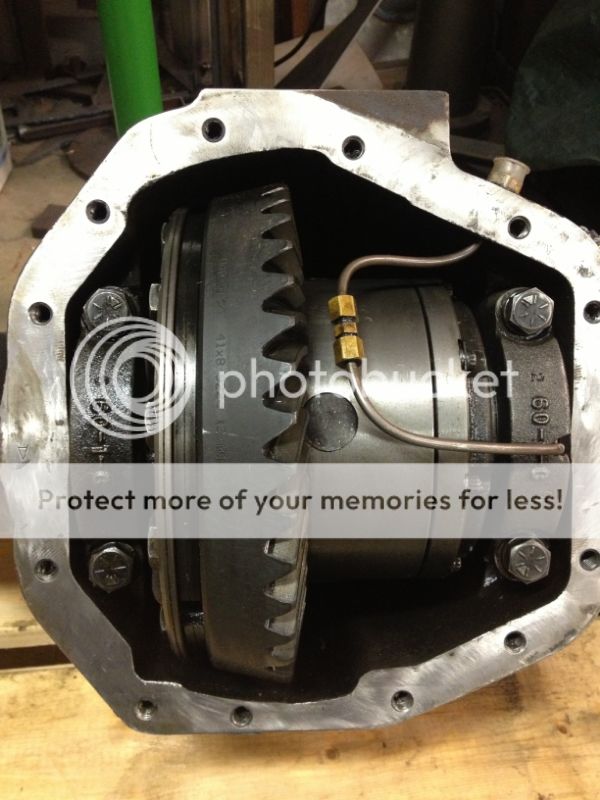
2D14A58A-4AB5-480B-854C-AE1EC79809B1.jpg
 
In the spirit of adventure I decided to dust off the Nail Salon, and drive it 2100 miles roundtrip to Johnson Valley and back for this years King of the Hammers race.

Since I hadn't driven it much since Moab last October I set aside a day to do a thorough once over of the rig.

-Checked all fluids
-Changed the oil
-Checked all suspension bolts
-Checked the axle/driveline u-joints
-Greased suspension/steering
-Checked wheel bearings
-Checked and adjusted alignment

I surprisingly didn't find anything too surprising. Feeling good about it's road worthiness I loaded it up with a weeks worth of supplies, and hit the road.

1FFDF3AC-484B-475A-A985-299B2503E84A.jpg


F9268A78-3B19-46BE-A9F5-6B2142DE5C8B.jpg


IMG_0260.jpg


Seeing the other EMC XJ's definitely got the wheels turning. :gag:
IMG_0250.jpg


JV was a beautiful area. I'd love to get back down there to just explore, and do some fun rec wheeling.
IMG_0067.jpg


Read the TORXreport HERE.
 
After getting back from Johnson Valley I felt the need to get out in the snow. This would be the first snow run for the lame winter we had this year. Ruger81, Icemans, and a few others all headed up into the Gifford Pinchot on a Friday evening.

Conditions were okay.
83ACBE0B-BFDD-4440-B76B-7DA56F6B2479.jpg


Pretty good sized wash out due to run off.
BE528C45-4724-41E5-B9BD-B5A32D5C43BF.jpg


Scott depth checked the snow here with his antenna and averaged about four feet. We we're floating pretty good.
F9B173A3-873D-45F5-BAC9-51C10973EA47.jpg


The Nail Salon managed to get along fine running third in the pack. I was quickly denied if I ever got out of the tracks, and running second behind Scott's 39.5's I could definitely feel the weight piling up in front. It was kind of depressing knowing I had the smallest tires in the group. All this road tripping is definitely wearing down the Cooper's. :laugh:

None-the-less, snow wheeling is always a good time!
 
For the past few months I've been going back and forth on what to do with my motor mount situation. Under hard load, I've noticed my fan occasionally contacts my fan shroud. This means my motor is flexing, no good.

I know the Brown Dog mounts are tried and proven, but I just couldn't bring myself to spend that kind of money on something I could build. After months of procrastination I finally gathered the materials to build some TORXfab Motor Mounts.

Using some old motor mounts I had laying around (probably could have just swapped these in), I reverse engineered them to suit my needs and design. I will say I overlooked the lower bolt offset. They are not centered with the mount.
D3835E92-927A-4A86-A4F4-22C5E58480BB.jpg


I ordered up some RuffStuff Specialties bushings and DOM sleeves. 3" wide poly bushings, 1.75x.120 wall DOM, 1/2" ID inner sleeve.
D27B5DC2-E428-4C70-9F38-3B18AAF30861.jpg


Had some scrap 4x2x.125 tubing laying around. Cut two pieces to 4.625".
5502E46D-161B-42B0-8A14-0236ACCF3EB8.jpg


Spent some time laying out my hole location, and then chucked up my 4x2 piece in the drill press. With a 1.75" hole saw you're going to want to crank the RPM's way down. I ran about 200 rpm, and used plenty of cutting oil. Also, be sure to secure your work piece real good. Lots of force going on.
AEAF32F2-C30A-4BE9-A3B3-8D0AFE81C712.jpg


End result, tube passes through easily.
507F2201-0F1E-4FF6-872C-C0817848784F.jpg


Layed out, and then drilled the bottom bolt holes. I use a countersink on the holes after drilling to debur the edges.
CCC843FD-8DFE-4D06-97E7-D60BCCF449FC.jpg


After some cutting action.
E25D9D6A-E91B-475C-BFFF-8F7AB7C0C22F.jpg


With all the pieces prepped, it was time to weld. I've learned like anything else prep work goes a long way. Use a flap disc to remove any mill scale on the metal, and you'll have a clean spatter free weld.
897E03E9-75F5-4858-8537-8536521902B0.jpg


Last step, paint. I put a small coating of white lithium grease on the bushings before installing them.
337B3C85-5C17-4C9D-A281-706FCC58C280.jpg


As the paint dried I began removing the stock mounts. With a 4x4 under the oil pan I jacked up the motor to take up the slack in the mounts. Remove the 18mm through bolts, and the two bottom 15mm's.

Yup, well there's your problem.
D23D8E51-A6A2-4E9F-A7FC-16C46E7DA989.jpg


Install in reverse order. I've heard mixed reviews of poly motor mounts transmitting excessive vibrations. I made sure not to over tighten the through bolts, just enough to make contact with the bracket.

Initial impressions: Wow! You can definitely feel the difference. The drivetrain seems much more solid, but not in a bad way. I really didn't notice any more vibrations than before. I put it in low range, and power braked, and couldn't get the motor to budge.

I have a poly trans mount on order from 4WD Hardware (thanks, Don!) to complete my poly conversion. I've also noticed on steep climbs my t-case knocking around under the rig, a sign of a bad trans mount.

The Nail Salon sadly gets neglected these days, but surprisingly it always seems ready for action. I got some wheeling trips planned for upcoming weeks though. Time to bring it out of it's winter hibernation, and stretch it's legs!
 
I must have done something wrong. After installing my home made poly mounts my jeep vibrates like hell! Everything on it shakes even the frame for the soft top makes noise.
 
I must have done something wrong. After installing my home made poly mounts my jeep vibrates like hell! Everything on it shakes even the frame for the soft top makes noise.
Well there's your problem, Dave, ditch the frame. :D

I'd try loosening the bolts through the bushings. From what I've read a lot of vibration can be transferred through the bushing if they're over torqued. I basically tightened up the lock nuts until they contacted the bracket.
Hey those look really good Dustin! Hey what kind of drill press do you have? I wish mine could get down to 200rpm haha
Thanks, I believe its made by Pittsburgh. Speed adjustability is definitely nice. I've read about people adding pulleys to their drill presses just to get the speed down for hole saw projects.
You made...your own.. motor mounts...

You're like the Betty crocker of the NWC..
I take pride in building my own junk. Bolt on stuff is lame. It's not for everyone though, some people prefer to take the "ThoseGuys" route instead. :laugh:
 
I take pride in building my own junk. Bolt on stuff is lame. It's not for everyone though, some people prefer to take the "ThoseGuys" route instead. :laugh:
Well I just recently built a shackle relocator.... So I'm like 50/50 "those guys" and "built" lol
 
Went up in the snow this past Friday with a few NWC members.
FB1175B4-4B32-4534-9C0F-CE8E851C694B.jpg


Early the next morning I rolled out to Kingsley Reservoir with Piston's Wild. It's always fun wheeling new trails, and checking out different areas. Check out the Trip Report forum for more pics.
EB8E5EFD-0EBF-4680-8953-EDA77CA3FB2B.jpg


Pic borrowed from PW.
1904072_10152313419069841_829683962_n.jpg


Pic borrowed from PW.
1531686_10152313442224841_1103293212_n.jpg


I also managed to lose a coil spring while making my way through the rock garden. After all the trails this thing has seen, I've never dropped a coil. I'm still not sure how it happened, but apparently I need to look at getting some limiting straps. Big thanks to everyone who helped in reinstalling my spring.
1509938_10152313550619841_103764101_n.jpg


Nail Salon wheeled like a champ all weekend, and never needed the winch. I did manage to add a few new dents, and tweak my rear bumper pretty good. I also don't think there's any paint left underneath.

I really never should have washed it after returning. It really set in just how much I've put this thing through over the past few years. Looking back through this thread it was so clean! Good times though.
 
I recently ordered a Daystar poly trans mount to go along with my new poly motor mounts. I've heard it's wise to use like material on the motor mounts and trans mounts. After receiving it last week I went to install it. Unfortunately, the mount I ordered didn't quite fit.

After some research I found there's two types of transmission mounts. A 1.5" centered mount, and a 3" offset mount. You can see the two different mounts here.
5508159D-0C14-4D59-800B-DE526F5A3193.jpg


Side profile.
26DF9862-BAB8-4A9A-B12F-F9B259ADFECC.jpg


I was prepared to just make the centered mount work by fabbing up an adapter plate. However, I just so happened to run across an offset mount at the 4500 MJ shop. Thanks, Winton!

To install it, I started by removing the stock transmission mount. Support the drivetrain with a jack under either the trans or transfer case. Then remove the cross-member, and transmission mount nuts. Last step is unbolting the mount via the two 18mm bolts.
3429BFB4-B262-4640-BF23-37B604BD99AF.jpg


My stock mount was pretty worn, and about to crack in half. I guess that's what a few years of good wheeling will do.
DDFAADA1-A4ED-4786-96FD-863A03CE8059.jpg


Bolted the new poly mount into place.
AD9C745C-F9B3-4D07-A615-0480DCB077DD.jpg


The poly mount doesn't offer much give, so getting the cross-member bolted back up was a chore. I finally gave in, and used the Dellstopjeep come-a-long method to get it to line up.
92F1F582-E7B2-4E84-8F02-77A0889D88DB.jpg


The new mount is a tad taller than the OEM, so I actually gained some clearance with my skid.
9EFED407-78EB-452C-B325-EF4F61163D27.jpg


With the poly motor mounts and trans mount I do now notice a lot more vibes from inside. I'll be curious if they reduce over time after things settle in, but they aren't bad in my opinion.

One thing I did notice was before when I put it in reverse I could feel my suspension suck down. With the poly mounts, this is now pretty much eliminated. I'm surprised how much give the OEM mounts really had.
 
Last edited:
I forget which trip it was, (Moab?) but at some point I managed to mangle the corner of my front bumper pretty good. Apparently the whole "lets use 1/8" to save weight" idea is biting my ass. Yes, my header panel self clearanced itself too (thank you, Cliff Hanger).
919C5DDF-10EB-469F-9DC3-2AD241EA54E0.jpg


I started by cleaning up the cracked metal, rewelded the corner, and then flap disked smooth. Funny, I kept smelling tree bark when welding.
BBD5ADE3-2A80-4DFF-9CF3-F1927872B6BA.jpg


I knew if I left it like this history would repeat itself, so it was fish plate time. Layed out and cut some pieces out of some 1/8" plate.
401BFA00-8C5B-47DF-813A-ED00FE89BA96.jpg


I then tacked the plate to the bumper, kicked up the heat, and bent it around the corner.
C32769E5-600B-47D5-BD75-773A262ED61C.jpg


Burned on.
A10C244A-9AC8-4855-BFE0-4C2CBD89DF46.jpg


The added fish plates make the corner material 1/4", and help tie all the pieces together. Should take a little better beating now. I'm always up for a new challenge.

Last project for the day was fixing the tweaked rear bumper from Kingsley Reservoir. I will admit, I did hit a few trees that day, and one of those hits must have tweaked the side angled part of my bumper.
5349ECED-2CE0-43C3-AAB8-A8BE09A655DA.jpg


Yanked the bumper off, and found the paint around the weld all flaked off. A sign of stress in the steel. The bottom of the rectangular tube was also bulged out.
7F50C7AA-4B59-477C-805A-D95BABA4A0A4.jpg


I ground down the weld, and made a cut through three sides of the bumper. Since the angle had to be opened up a single cut would work.
96759CAC-4993-4703-955C-402A2E08EBB5.jpg


I opened the angle up, and reset to the original angle. Test fit it on the jeep. Then I asked myself, "how can I prevent this from happening again?" Answer: Gusset added from the angled tube to the mounting bracket, and fish plate on the bottom where the original metal was deformed. The flat bar could have used a few speed holes.
6D09AEC9-FB9C-4233-A3A4-017D52927C84.jpg


I'm kind of curious to see what I'll bend next. :laugh:

I still need to paint both bumpers a little better. Perhaps when the weather gets better I'll pull them off and repaint them. All of my armor is looking pretty tetanus worthy these days.
 
Back
Top