• Welcome to the new NAXJA Forum! If your password does not work, please use "Forgot your password?" link on the log-in page. Please feel free to reach out to [email protected] if we can provide any assistance.

The Nail Salon

^^^^ yep, the only con is if you haven't done it already, you have to pull everything apart and take them out
 
So ditching the dust shields does it have any Con's to it ? I get not ditching becausethere wont be rocks and mud catching in it and sqweeling like poo.


strangely, I have noticed on my dd that removal of the dust covers requires you to ride the brakes a little before you have consistent stopping power. This only happens when its raining hard, and I assume its because extra water and road grime gets on the inner rotor surfaces. most noticeable at highway speeds.
 
So done in a week huh.....sounds like plenty of time for a shakedown run to Moab! Looking Sharp Dustin.
Funny how that worked out. Who knows, maybe I'll surprise you guys and knock on your Tuff Shed one night. :D


So today Dellstopjeep and I road tripped in the Nail Salon to Puyallup for the Moonshiners Swapmeet.

Picked up a 33x12.5 for a spare mounted on a wheel for, $25.
P1060911.jpg


Even had great tread too.
P1060913.jpg


After getting back, I brewed up some motivation and officially start Build Week. Snagged some 6ton jack stands from Dellstopjeep. Having the right tools for the job makes life easier. I got the body on the stands, tires off, and let the axles droop.
P1060914.jpg


I decided to start with the front first. Task for the night was yarding out the two-wheel drive beam axle, and front suspension components. I gave everything a good shot of PB-Blaster to aid in fastener removal. Front shock bolts are a 13mm, use a deep throat socket to get to the bottom nuts.
P1060918.jpg


LCA bolts are going to be torqued pretty tight. I'm anti-impact so I prefer to use a breaker bar.
P1060919.jpg


Had to double down on the UCA frame side bolts, 15mm. Chrysler put some goofy anti spin bolt in the frame, so you can't just ratchet them off from the frame side. Those will be getting replaced with new 10.9 hex's.
P1060923.jpg


Two-wheel drive blaster did it's job well, and prevented down time. Huge thanks to MoneypitK5 for loaning it out to me!
P1060922.jpg


Anyone need any stocker stuff? It's getting scrapped if not (sway bar is staying).
P1060925.jpg


Where I left off tonight, front end gutted and ready for the front lift components and D30 install tomorrow.
P1060926.jpg
 
I'm way behind on updates. Internet is not cooperating with picture uploads, so I'm a few days behind.


Monday's task was getting the D30, and new suspension installed. I'll be reusing my old RE arms, RE HD Trackbar, and installing some new BDS 4.5" springs.
P1060932.jpg


Removed stock brake lines, and installed the new Chevy C1500 lines. Use a flare wrench to prevent rounding the flare nuts.
P1060930.jpg


My RE uppers are adjustable, so I set the lengths to 15.25" based on a few charts I found in the mod tech forum. I figured it would be a good start, and I can dial in the caster later if needed.
P1060937.jpg


I got the 30 rolled under the front, and started bolting on the control arms first. Usually I'll bolt on the frame side first, then start on the axle side. Be careful when pulling the socket out of the frame rail for the UCA bolts. Jeepforceone went to the scrapper with a few sockets in the frame.
P1060936.jpg


Installing control arms can go either way. Fortunately this time the lowers went on pretty easy, and the uppers werent too far out of alignment. For the final upper arm to be installed the axle needed to rotate back. I use a floor jack on the opposite side of the axle (in this case I put the jack under the track bar bracket) to twist it into place.
P1060940.jpg


Control arms and springs installed, starting to come together (keep in mind this is at full droop).
P1060941.jpg


Almost every bolt I install gets the Never Seez treatment. Track bar bracket bolts are one exception, these get the Locktite treatment.
P1060942.jpg


Got the steering put on, and track bar bolted up. If the track bar doesn't line up, wait till the tires are installed, then turn the steering wheel to move the body in order to line up with the track bar. I lucked out and got mine to align early on.
P1060948.jpg


With the axle pretty much done, I moved onto shock install. I had to transfer the bar pins from the stocker shocks to the new shocks.
P1060949.jpg


Got out my Harbor Freight ball joint press. I've used this for everything but ball joints. In this case it's bar pin press.
P1060950.jpg


Got the bar pins pressed out, and cleaned up. I then pressed the bushings out of the Bilstein's, and installed them onto the bar pins. Last step was to install the bushing/pin combo back onto the shock. A 21mm impact socket apparently has multiple uses.
P1060953.jpg


I installed my TORXfab upper shock adapters after, and then installed the front shocks.
P1060958.jpg


With the front axle basically complete, I installed my RuffStuff cover. I'll eventually make the transfer to Lube Lockers, but for now RTV works fine.
P1060963.jpg


Completed front end.
P1060964.jpg
 
looks great Dustin. Cant wait to see this thing finished. your doing a great job, and way cleaner than I have ever been haha. im gonna have to practice that in my next garage.
 
With the front end basically done, I moved onto the transfer case. Goal was to yard it out from the Jeep, and install the AA SYE and Teraflex 2Low. The install can be done with it under the vehicle. I've done them both ways, and prefer to pull them. It's only six extra bolts, and gives you plenty of work space.

I started by draining the fluid. It was was definitely due for a change, and smelled horrible.
P1060967.jpg


Pulled the rear drive line. Late models use these goofy boots on the slip yoke, which need to be removed to pull the shaft.
P1060969.jpg


Disconnect the linkage at the transfer case, 9/16 nut.
P1060970.jpg


Working around my old manual trans was a breeze compared to the automatic and all the junk that goes along with it. After the sensors, linkage, and vent hose are disconnected from the transfer case, remove the tranny to t-case nuts. There's six toal, and they're a 9/16. The very bottom one was completely blocked by the tranny mount, so off came the cross member and mount.
P1060974.jpg


Gotta get creative.
P1060976.jpg


Eventually the case was out from the vehicle.
P1060978.jpg


I started to tear into the case, but broke my cheap set of snap ring pliers on the first snap ring (they lasted through a few t-case tear downs so I can't complain too bad). I tracked down a loaner set for the next day, and put the t-case project on hold.

I moved onto removing the 8.25 and rear suspension.
P1060991.jpg


Disconnect the soft line at the body.
P1060996.jpg


Removed the e-brake cables by loosening the linkage. To get the cable retainers off I use an end wrench to press the tabs down. In this case I used a 13mm.
P1060999.jpg


With the brake line, vent hose, and e-brake cables disconnected I removed the u-bolts and sway bar. Axle was now full float.
P1070002.jpg


Jeremy, come get your $hit. :D
P1070003.jpg
 
Last edited by a moderator:
Last project for the night was gutting the stock rear suspension, which traditionally has a reputation for rusted/seized bolts (think BPB's Stocker Build). The Nail Salon must have been a West Coast only rig, since I never encountered a single rusted/seized bolt.

Front leaf spring bolts require some extra muscle for removing. 21mm, and a breaker bar got the job done. I was pleased to see them come out easily.
P1070006.jpg


Moved onto the rear shackle bolts. For some reason the factory installs the rear leaf eye bolts to where you have to pull the shackle to remove them. Didn't matter to me since it was all coming out anyway.
P1070008.jpg


Scrap pile was growing.
P1070009.jpg


Got my JKS shackles, and pre-lubed the bushings.
P1070012.jpg


The rear suspension bolts tend to get some corrosion built up on them over time. I like to run a thread file over them, and clean them up before install.
P1070017.jpg


Never Seez treatment.
P1070018.jpg


Got the BDS 3" packs, and JKS shackles installed. First impressions are the springs need to be longer (why aftermarket companies can't understand this is beyond me). The shackle doesn't have the greatest angle. It will improve more as the springs break in though. Also, before anyone says it, I refuse to run relocation brackets, unless someone's paying me.
P1070022.jpg


Transferred the bar pins from the stocker shocks to Red Mustache Ride's old 5125's.
P1070023.jpg


Between the front axle/lift install, transfer case removal, and rear axle/suspension removal that was it for day one of Build Week.
 
looks great Dustin. Cant wait to see this thing finished. your doing a great job, and way cleaner than I have ever been haha. im gonna have to practice that in my next garage.
Having a clean work space is where it's at!

I can't stand having a dirty floor, or a pile of tools laying out. Soon as I'm finished with a project (removing the transfer case for example), I'll put the tools away, and sweep the floor.
Dang, all those black suspension parts look sexy!
I figured I may as well paint everything while I can, because it's certainly never going to get painted or touched up again.

I also can't stand suspension components being painted some gaudy color.


Hopefully by tomorrow Tuesday's pictures will be uploaded. :rolleyes:

I won't spoil this thread, and jump to today's update. ;)
 
Plan for Tuesday was finish the transfer case SYE and 2Low install. Went outside, and was surprised to find a few inches of fresh snow. My Jeep didn't even have a transfer case so it didn't really matter to me.
P1070024.jpg


Tracked down my loaner set of snap ring pliers. These are pretty trick, and make snap ring removal/install a breeze.
P1070025.jpg


I began disassembling the case. For the most part the 97+ cases are like the earlier models. The biggest difference is in the tail housing. Early models are a breeze to remove, late models have about a dozen parts holding it on.

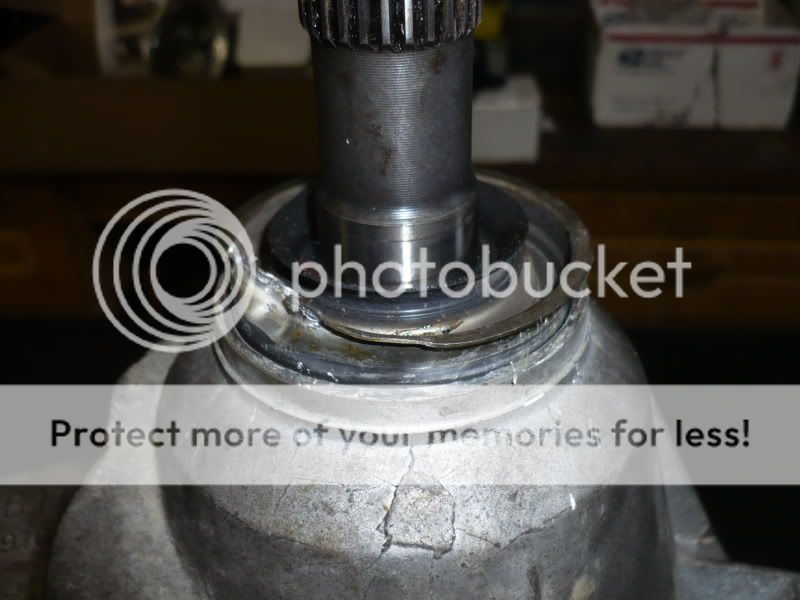
First thing that had to go was a pressed on "slinger" on the tail shaft. AA recommends using a long two jaw puller. I chose the die-grinder method. Since I wouldn't be reusing these parts, I took a cut off wheel and slowly cut away the pressed on sleeve part to relieve the stress. Then I took a chisel and "peeled" away the sleeve. At this point I could remove it by hand.
P1060986.jpg


Beneath the slinger I found another pressed on retainer. I'm sure there's another tool for this, but I used a pry bar to walk it off.
P1060989.jpg


Beneath that I found an external snap ring.
P1060990.jpg


With the snap ring removed the tail housing still wouldn't budge. So I continued to dig deeper. Out came the seal (I wouldn't be reusing this).
P1070026.jpg


Not surprising, I found another snap ring under the seal (you'll want to remove the external one on the shaft).
P1070027.jpg


Finally I got to a point where I could remove the tail housing. It's held on with six 10mm bolts. Be careful when prying it off since the case is cast aluminum. Also, remove the speedometer gear prior to removal. The retainer is a 13mm hex, and then you can pull the speedo gear assembly out.
P1070028.jpg


Next step was removing the front output yoke. Use a 1-1/8 socket (preferably an impact socket), and an impact wrench. If you don't have an impact you'll have to get creative.
P1070029.jpg


At this point you're ready to split the case. Remove the case bolts, and use the designated pry points on the corners to split it. Also, note the oil pump is positioned on the outside of the back half of the case.
P1070030.jpg


Case split in half. Mine must have gotten some water inside, there's some strawberry milk looking sludge around the case.
P1070033.jpg


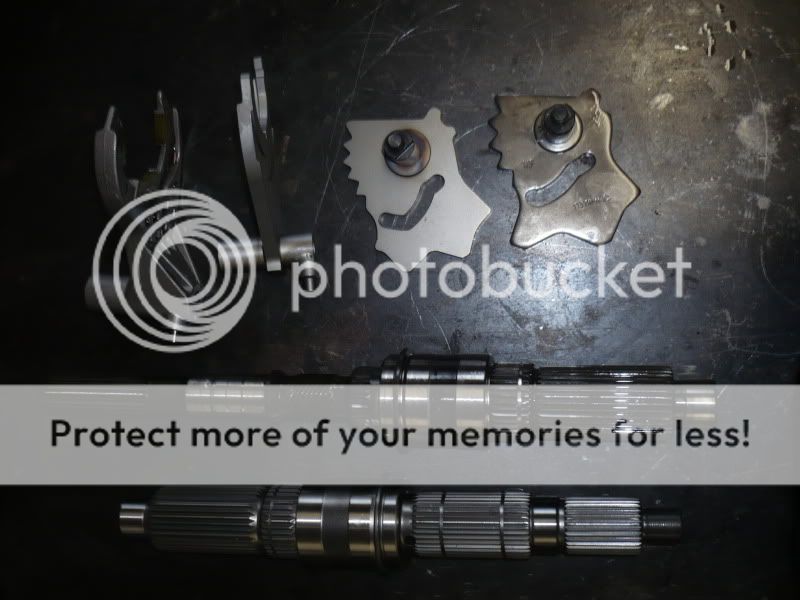
Push the front output shaft up, and remove the chain. Then remove the mode spring, shift fork, and main shaft. Keep everything oriented to how it's been removed. Organization is key.
P1070036.jpg


Remove the 7/8 bolt off the bottom of the case. This holds in the shift detent pin (careful it's spring loaded), and lets you install the new 2Low shifter.
P1070037.jpg


On the main shaft you'll need to transfer the main drive sprocket to the new SYE shaft (again pay attention to it's orientation). It's held on with a large snap ring. Some of the earlier models will require you to press off some needle bearings. Find an appropriate size object and tap them out.
P1070042.jpg
 
Comparison between old and new. I took this time to flush out the case halves, and remove the strawberry sludge.
P1070041.jpg


First install the new 2Low hardware. I like to pre-lube everything with ATF during install, seems to make everything go together a bit easier.
P1070043.jpg


Make sure the shift fork is aligned with the shifter rail hole.
P1070044.jpg


Install the new main shaft, shift rail, and remember the mode spring.
P1070046.jpg


Install the chain and front output yoke.
P1070047.jpg


Take the oil pump, and clean off the filter screen. Don't blow from the outside in, I like to use compressed air from the pickup tube out.
P1070048.jpg


At this point I've learned my lesson to assemble the rear case half with out sealer first, just to make sure you didn't miss a step. I put the back half of the case on, and made sure the oil pump was located on the outside, and the pickup tube was seated correctly. Then with the case locked in four wheel drive (both outputs should be locked), check how far the shift rail protrudes from the case. If it's over an inch, it will need to be cut. 97+ took care of this for you.
P1070050.jpg


Also, while you're at it, grab a 3/8 and bench test the case. Make sure you can get into each gear.
P1070052.jpg


With everything working like it's suppose to I took the case apart, and prepped the surfaces for RTV. Don't go overboard.
P1070053.jpg


Once the cases are bolted together, you can install the speedo drive gear on the main shaft. It's held on with two snap rings. Apply RTV for the tail housing.
P1070056.jpg


Install the new SYE tail housing. With some of the brands you need to pay attention to the clearance around the shift rail. I've had housings bind up on the shift rail before preventing the case form going back into 2wd. This AA housing seemed to fit pretty tight.
P1070058.jpg


Install the speedo assembly. You'll see numbers on the outside, these correspond to the tooth count of the speedo gear. Position accordingly.
P1070059.jpg


Install new supplied yoke seals, and yokes. Make sure to pre-lube the output seals with some ATF before sliding the yokes on.
P1070063.jpg


Install the yokes, and admire your new transfer case.
P1070065.jpg
 
Got the case yarded back under the Jeep, and everything reinstalled.
P1070067.jpg


Teraflex recommends adjusting your linkage for the new 2Low. Loosen this 1/2 bolt on the linkage.
P1070122.jpg


Then with the transfer case in 2hi, move the shifter all the way to the front of the gate, and then back it off an 1/8". Tighten back down the linkage bolt, and test to see if you can hit all the shifts.
P1070123.jpg


With my linkage adjusted, I then did the Dick Breakey Shifter Gate Delete Mod. I think the factory adds the little notch as a safety feature so you can't grab 4Low at 35mph. I like it a lot more, since it's a straight back shift into low (make sure you're stopped).
P1070124.jpg


Installed the 8.8 drive shaft flange on the rear drive line.
P1070068.jpg


Picked up new drive shaft bolts. Fine thread 5/16 x 1.5".
P1070069.jpg


It then came time to roll the 8.8 under the Jeep for the first time. Started by hooking up the drive shaft. I was really hoping a factory front would have worked (carry one spare), but it looks like I'll need a longer drive line.
P1070072.jpg


Next task was setting perch to perch distance. I measured from the leaf perch to the axle flange. Perch to perch distance came to be right around 43.5" if I remember right.
P1070076.jpg


Then I jacked up the axle to take up the weight of the Jeep. Placed my highly accurate Harbor Freight Angle_Meter on the drive line to get it's angle, 19 degrees. Then I moved it to the 8.8 pinion flange to get it's angle, 4 degrees.
P1070083.jpg


You want to shoot for the pinion angle to be two degrees below the drive line angle (basically looking at the t-case output). I put a bottle jack under the pinion, and rotated the axle until my magic 17 degrees came into range. Then I tacked on the perches (I check my numbers probably a dozen more times).
P1070077.jpg


Went ahead and installed other junk. It looked like my brake lines were actually going to work.
P1070085.jpg


Got the shock mounts tacked on after test fitting the shocks.
P1070086.jpg


Pulled the 8.8 back out, stripped it down, and prepped it for the Hobart treatment.
P1070088.jpg
 
Turned up the heat, and starting burning everything on.
P1070090.jpg


P1070094.jpg


I thought I lit my axle on fire from the smoke billowing out of the tubes. Talk about a foul smell.
P1070091.jpg


With no going back, I shot some paint at the housing.
P1070095.jpg


Got the axle back on the bench and started final assembly. In order to remove the cross pin from the Detroit you have to remove the right bearing cap to get the retaining bolt out.
P1070100.jpg


Slid the axle in, and installed the C-clip.
P1070103.jpg


With both axles installed, I applied thread locker to the cross pin retaining bolt, and torqued to spec.
P1070104.jpg


Looked up bearing cap specs, and re-torqued both caps to 60ft/lbs.
P1070106.jpg


Finished off Tuesday with installing the RuffStuff cover.
P1070107.jpg
 
Wow torx awesome write up. Your not doing you Tera low kit? I pulled my new case apart and found this when I was installing the 2low kit.

2012-03-14_20-13-48_350.jpg


I called Teraflex and they are looking into it to see if it's rebuildable and if they can help me. Thanks for the write up I'm looking forward to wheeling with you again.
 
Back
Top