• Welcome to the new NAXJA Forum! If your password does not work, please use "Forgot your password?" link on the log-in page. Please feel free to reach out to [email protected] if we can provide any assistance.

Rear Bumper Thread...

I like the use of what ever steel you had. Judging from the amount of rust on the steel it looks like you used what ever was free or on hand. You may want to make an extra mounting point on the out side of the existing bumper mount. I did that on mine to help support the outer corners of the bumper when the bottom of the corner bumper slams on a rock. I am also going to add new brackets that attach to the unibody insides and add Drings that will go inside the unibody tube at least that is what is in my mind at the moment. Other things on my mind are back up lights, cb antenna mount, and possible compressor. I am debating the compressor tank thing because I dont want my bumper to rust inside out.
 
One the final product, a peice of 2"x3"x1/4" tube comes out to meet the bumper on each mount.

The white tube was either a soccer goal or a trailer tougne. The ends were made out of 1/4" sidewalk trim.
 
After reading all the posts on this thread, as well as others on NAXJA
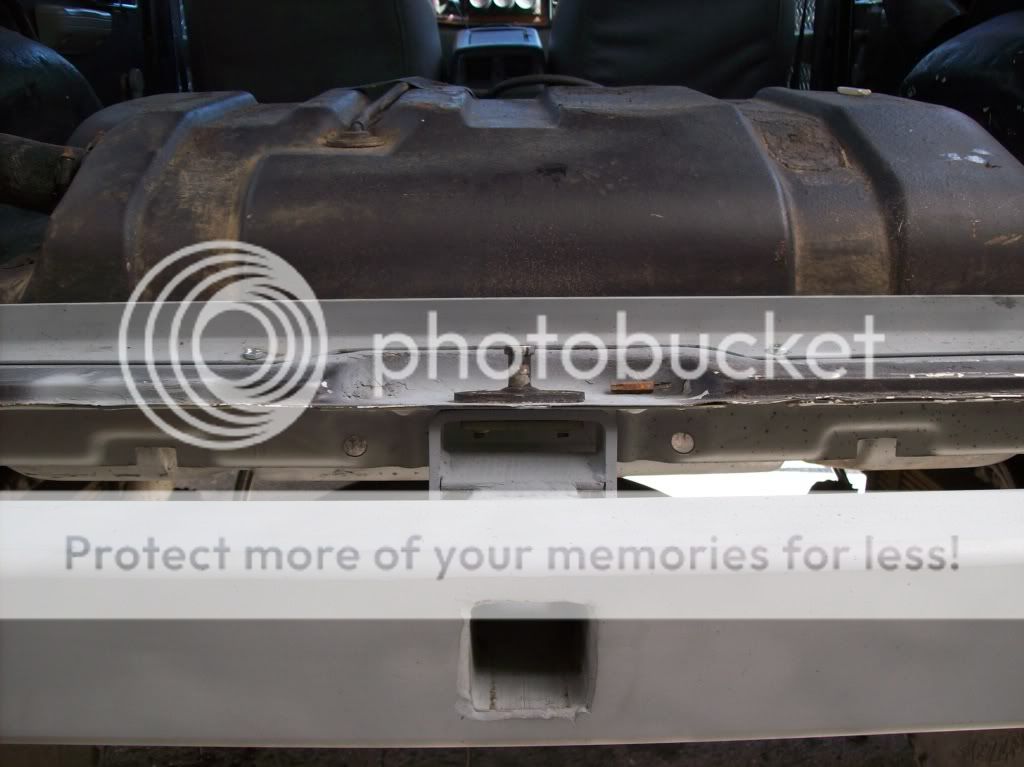
's web site, I realized that my suspicions were correct about the rear mounting points, utilized for mounting the stock rear bumper to the uni-body, definitely needing to be re-enforced by a nutsert-style re-enforcement plate of some kind, in order to prevent the weld-nuts at the stock mounting locations from pulling out, especially when mounting ANY aftermarket rear bumper, including mine from Warrior Products.

I'm thinking that, in the case of my rear bumper, a piece of 2"x4"x1/4" L-bracket steel of appropriate length, welded to a 1/4" plate of appropriate length and width, being then drilled in the appropriate locations on the frame-rail and back-plate sides, and then being bolted in place with the appropriate hardware, would be sturdy enough to take almost any abuse one might throw at it, with the bumper bolted to the assembly. Of course, I'd have weld-nuts put on the frame-rail side of each re-enforcement mount before installation, as I'll probably have someone with good welding skills assemble the mounts for me, seeing how my welding skills suck at best. Just My-Two-Cents-Worth...
 
My new bumper before paint
Made with 1.75x.120 wall dom, mounts with 2 factory bolts and 3 1/2" bolts per side.
DSC01218.jpg


my old bumper
Made with 2"x4"x.120 wall tube, mounts with 2 factory bolts, 1 3/8" bolts, and 2 1/2" bolts per side.

DSC01213.jpg
 
getting ready to build a swingout soon and have a few questions.

which side did you guys find more convenient to mount the tire? ive seen alot of people mount it behind the driver and others on the passenger, or even right in the middle. im thinking the middle is out of the question because i would have basically no visibility.

so. left or right?
 
slcpunk, I really like the tube bumper. Looks real clean.


Here's mine I did a couple weeks ago on the wife's rig.

It's 2x6x1/8, so it's a bit big with the 31s on it, but the tube was a VERY good price. Hacked off the rear lower quarters to build it, tack welded then Bondoed them up to seal.

Straightforward mounts. I'll also tie into the hitch mount underneath.
original.jpg


Lovely grinder work. Have I mentioned I REALLY want a plasma?
original.jpg


original.jpg


I formed the bumper around the hatch to give it a better finished look.
original.jpg


original.jpg


Starting to look like a rig I would wheel. :)
original.jpg
 
Looks nice, I run the HF plasma and so far I love it.
 
Click free...

Looks good.

Here's my bumper. It's made of 1/4 inch 2x6 tubing. It necks down to 4 inches at 1 1/2 inches past the furthest edge of the XJ then I ran 1/4 2x4 tubing to edge of old fender flare line. I add a reciever and two d-rings. I also used 14 guage as a filler to fill the body gaps.
It didn't turn out to bad.

000_0010-1.jpg


000_0026.jpg


000_0028.jpg


000_0029.jpg


000_0035.jpg


000_0036.jpg


000_0037.jpg


000_0038.jpg


000_0039.jpg


000_0040.jpg
 

Yeah man that looks clean.

Noticed you don't have any box tubing that runs through the rear frame, howcome you didn't do it? I've noticed most bumper builds on here, people usually do that.
 
My new bumper before paint
Made with 1.75x.120 wall dom, mounts with 2 factory bolts and 3 1/2" bolts per side.
DSC01218.jpg


my old bumper
Made with 2"x4"x.120 wall tube, mounts with 2 factory bolts, 1 3/8" bolts, and 2 1/2" bolts per side.

DSC01213.jpg

Do you have any more pics or a build up on that tube bumper? That is super clean and simple. Thats what Im going for. Although I would love to have a tire carrier i think this style would suit me better...
 
So I after a long process of cutting filling in holes grinding, sanding ect. I was able to save my bumper and build a new swing out. The swing out I had before did not work out the way I had expected and I was not happy with the results. So I set out to build something different and better. I have always hated relocating the liscense plate and tail lights that were covered up by latches or trailer spindles. Most all of the steel I used this time is 3/16" verses the .120 wall I used before. The problem I had before with .120 was flex. The previous swing out gate was .120 wall and it flexed so much that the gate would actually hit the tail gate of the XJ. I attempted to reinforce the old swing out gate with plate steel and applied to much heat the gate warped and was no longer usable thus I had to build a new one. I did not do a write due to time restraints but wanted to show off what I did and maybee it will give some of you ideas for your future builds. I also had a Sheriff check the bumper and everything is leagal.


picture.php


picture.php


picture.php

picture.php


picture.php
 
Last edited:
Here is mine:

Picture054.jpg

It bolts to the hatch latch:

and to the unit-body:

Do you have any more pics of the rear header there? Having just worked on kind of fabbing a rear bumper this weekend, I've started to wonder how much of this is structural and what can be cut. The gas tank straps attach back, not that its an issue for you anymore.
 
Just as an update:

this is my bumper.... note the single shear action on the trailer spindle.

DSC00019.jpg


DSC00020.jpg


:fuse: i have discovered that this is not a good plan. i know many people have heard of the problems with the trailer spindles, and mine was no exception. i had it break off right at the base of the spindle with a single catastrophic failure. luckily this occurred while offroad on a farm, and not on the highway. ever since hearing about the failures of these items i attached a peice of climbing rope from my roof rack to my tire whenever i was on the road just so if it did fail it would not become a lethal missile on the highway. i would suggest that anyone with the same design with a trailer spindle do the same. my next set up is going to be a swing down carrier with 4 mount points... i will keep this thread posted on progress
 
do you think that the mounts being so close together may have had something to do with the failure? it would seem that with them so close together that the whole carrier would wiggle more and cause more stress.

maybe it was a contributing factor as well?
 
I started on my rear bumper this last week. I am going to cut out along the body line on the rear quarter panels and run the bumper all the way to the inside if the fender well.

I am building the rear to look similar to the front. Except its made from 2x5 by 3/16" square tube instead of 2x3 by 1/4". I will be going through the unibody as well as using the stock eight holes. I will be adding some weld on D rings soon to.
XJbumper.jpg


XJB2.jpg


Here is the front.
DSC_0128.jpg


DSC_0127.jpg
 
Just as an update:

this is my bumper.... note the single shear action on the trailer spindle.

DSC00019.jpg


DSC00020.jpg


:fuse: i have discovered that this is not a good plan. i know many people have heard of the problems with the trailer spindles, and mine was no exception. i had it break off right at the base of the spindle with a single catastrophic failure. luckily this occurred while offroad on a farm, and not on the highway. ever since hearing about the failures of these items i attached a peice of climbing rope from my roof rack to my tire whenever i was on the road just so if it did fail it would not become a lethal missile on the highway. i would suggest that anyone with the same design with a trailer spindle do the same. my next set up is going to be a swing down carrier with 4 mount points... i will keep this thread posted on progress

Did you have any support under the latch area? After I heard about them breaking I added a peice of angle iron to my bumper for the swing out to rest on when closed. I figured it would help support the weight from all hanging off the spindle.
 
Back
Top