Kingkong0192
NAXJA Forum User
- Location
- New Milford, CT
Whoops. Wrong section. Could someone please move this into the correct section on the forum? Thanks a bunch.
This forum along with many others have taught me so much about jeeps and everything in general, i figured it'd be a good time to give back to it. Thanks to everyone on this forum for their vast knowledge they're willing to share.
Here is my own writeup on how to build a Leak Down Tester. I had all the parts laying around my house, so i figured i'd go ahead and build one myself.
Feel free to re-design this to all 1/4" piping. I only had 3/8" laying around, so i had to use reducers, etc etc. 1/4" is plenty for this. Also feel free to use galvanized or what not. I just happened to have stainless steel laying around.
I'm going to dummy this down as much as possible so that anyone can follow it. That's the point of a write-up after all.
Building A Leak-Down Tester:
Parts List:
Quantity, Size, Material, Pattern (Tee, 90, etc etc.)
NPT - National Pipe Thread.
S.S – Stainless Steel.
Nipple – A short piece of pipe (Normally 1'- threaded on both ends.)
2x - 3/8” S.S Tee
4x – 3/8” Male NPT x 1/4” Female NPT Bushing.
1x – 3/8” S.S Coupling.
1x – 1/4” Male NPT Air Coupling.
4x – 3/8” S.S 2” Long Nipple
1x – 3/8” Pressure Reducer.
1x – 3/8” NPT Ball Valve.
1x – 1/4” Female Air Quick Disconnect.
2x – 1/4” 100 PSI Gauge. (Male Threads.)
1x – 1/4” S.S Nipple. (As Short As You Can Buy.)
Other Materials:
1x – Tube Of Epoxy or Other Glue.
1x - .040 Drill Bit.
1x – Roll Of Teflon Tape.
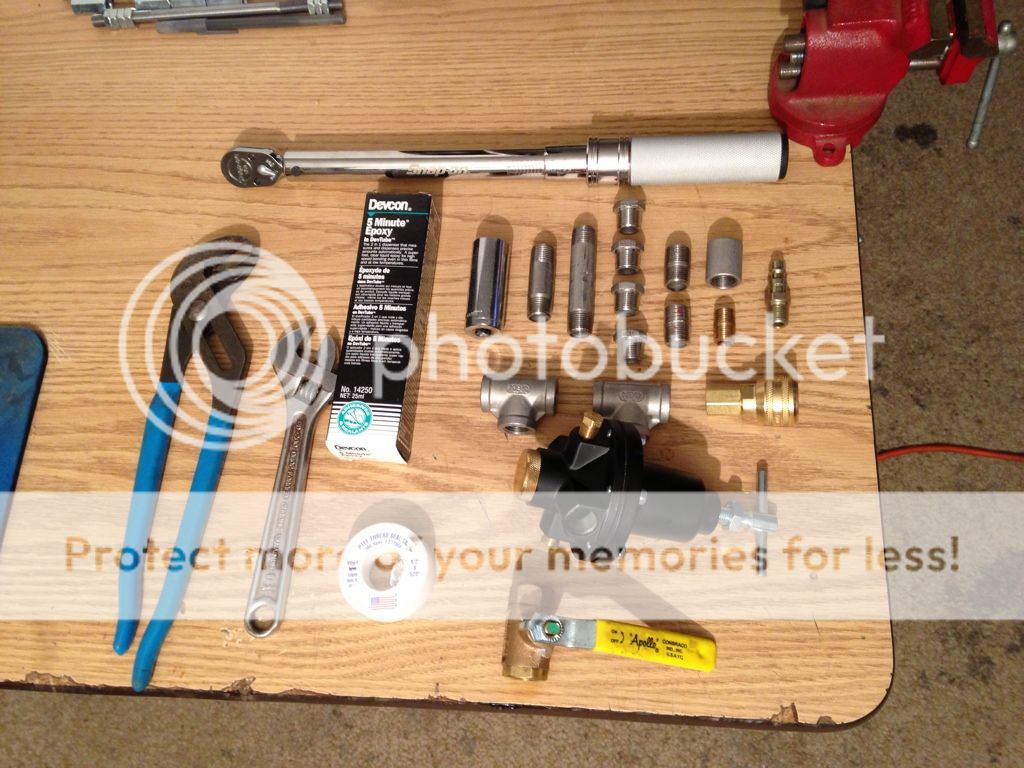
Tools Required:
Teflon tape is NOT a sealant. Many believe it is, but it is not. Teflon tape is a lubricant. It makes the pipe capable of screwing farther into the fittings. Anyone who tells you different is LYING to you.
When applying Teflon tape the “rule of three” applies. Apply the tape to the first three threads, and wrap it around the pipe three times. Keep it as tight as possible. Don't slop it on. You can put it on all the threads, but you're wasting it. Try not to get the tape over the opening of the pipe because it can flake off and go into the piping system when you screw it all together. On gas piping, this can clog the orifices and create a problem.
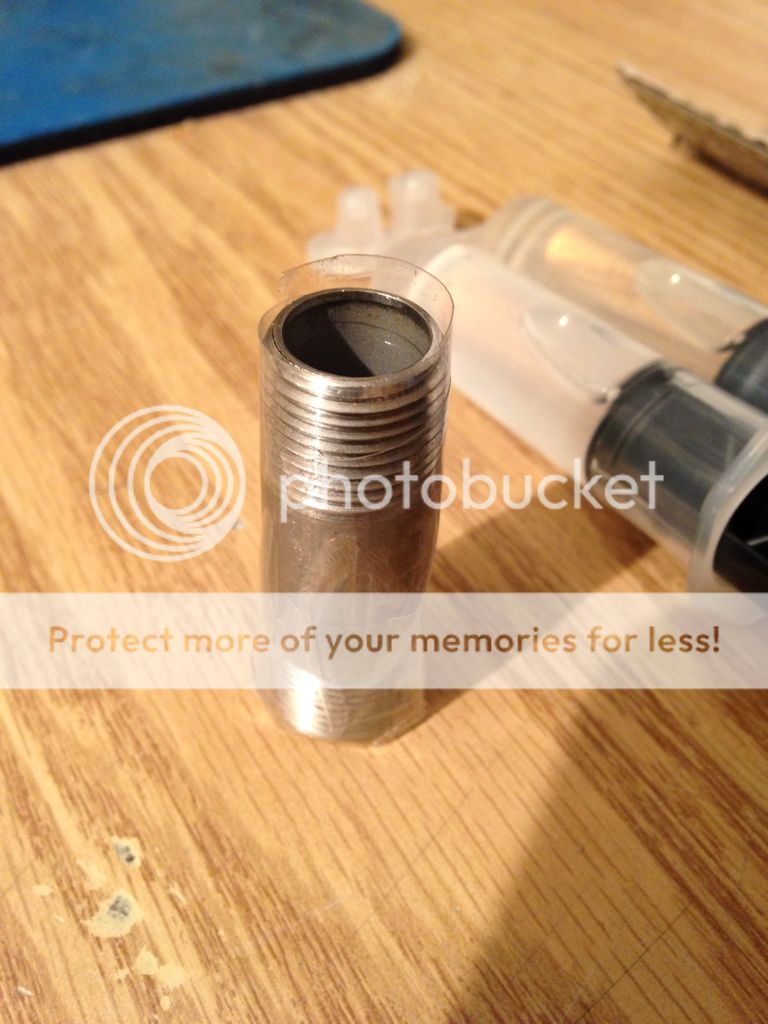
I personally put Teflon up the entire thread, and technically i'm wasting it, but I like doing it. This picture shows what a good Teflon job should look like;
Note; Instead of using the epoxy method to block one of the nipples before drilling a .040 hole into it, you can tap out the inside of the nipple with a tap and then drill the .040 hole into a plug and then screw the plug into internals taps on the nipple. Either way works. The plug method though is ideal, but there is nothing wrong with epoxy.
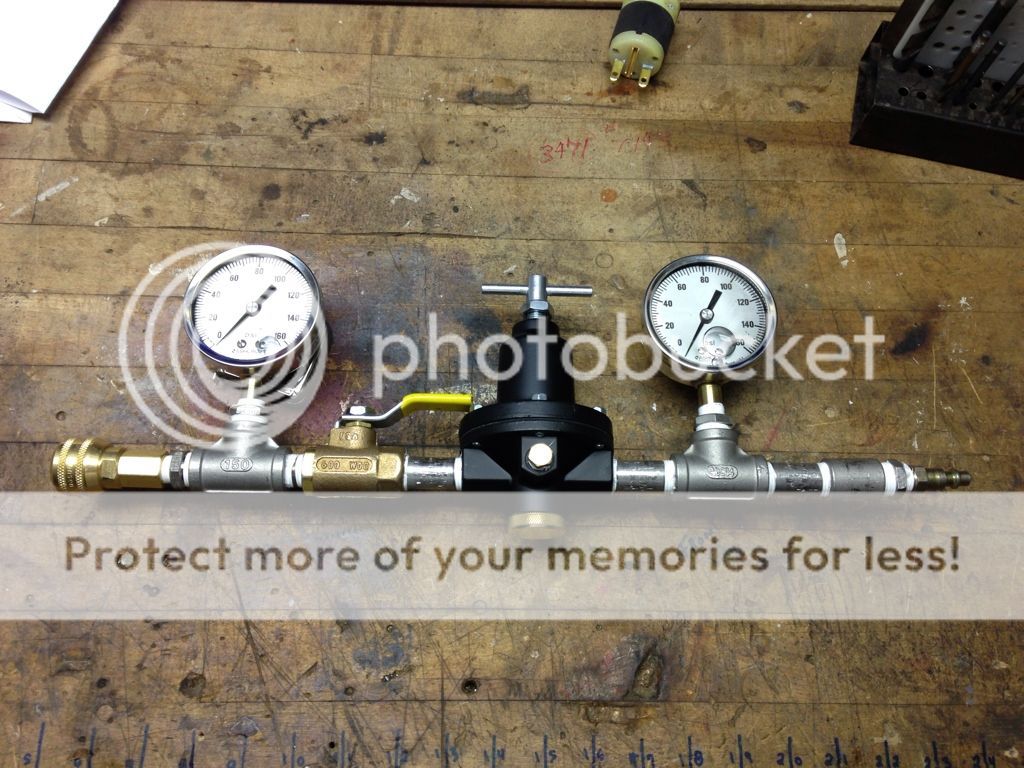
This picture shows everything you're going to need to create it, and then the following picture shows the finished product so you can see how you need to pipe everything together. I didn't take pictures of me going piece by piece. (If you can't build it by looking at my picture you shouldn't be building it.)
Process Of Creating Leak Down Tester:
This is the damper valve. Take your nipple and tape off the threads. Mix epoxy and pour it into the nipple and let it setup. I used tape and taped the bottom of the nipple off so the epoxy couldn't run out of the bottom. Let the epoxy set up and cure for a while. Once it's cured, get your .040 drill bit and drill a hole right through the epoxy. Picture show me doing this.
Note; Instead of using the epoxy method to block one of the nipples before drilling a .040 hole into it, you can tap out the inside of the nipple with a tap and then drill the .040 hole into a plug and then screw the plug into internals taps on the nipple. Either way works. The plug method though is ideal, but there is nothing wrong with epoxy.
That's it. You have now created the same thing I created. Now you're probably wondering how to get this to go into the spark plug hole. Let me explain that.
You can probably buy a compression tester adapter and use it on this, but we are making things here, so why not make that as well?
Building Adapter To Go Into Spark Plug Hole.
Will post more pictures of it when I get them, but that's pretty much it. Feel free to ask any questions or give me your input. Hope this was easy enough to follow.
This forum along with many others have taught me so much about jeeps and everything in general, i figured it'd be a good time to give back to it. Thanks to everyone on this forum for their vast knowledge they're willing to share.
Here is my own writeup on how to build a Leak Down Tester. I had all the parts laying around my house, so i figured i'd go ahead and build one myself.
Feel free to re-design this to all 1/4" piping. I only had 3/8" laying around, so i had to use reducers, etc etc. 1/4" is plenty for this. Also feel free to use galvanized or what not. I just happened to have stainless steel laying around.
I'm going to dummy this down as much as possible so that anyone can follow it. That's the point of a write-up after all.
Building A Leak-Down Tester:
Parts List:
Quantity, Size, Material, Pattern (Tee, 90, etc etc.)
NPT - National Pipe Thread.
S.S – Stainless Steel.
Nipple – A short piece of pipe (Normally 1'- threaded on both ends.)
2x - 3/8” S.S Tee
4x – 3/8” Male NPT x 1/4” Female NPT Bushing.
1x – 3/8” S.S Coupling.
1x – 1/4” Male NPT Air Coupling.
4x – 3/8” S.S 2” Long Nipple
1x – 3/8” Pressure Reducer.
1x – 3/8” NPT Ball Valve.
1x – 1/4” Female Air Quick Disconnect.
2x – 1/4” 100 PSI Gauge. (Male Threads.)
1x – 1/4” S.S Nipple. (As Short As You Can Buy.)
Other Materials:
1x – Tube Of Epoxy or Other Glue.
1x - .040 Drill Bit.
1x – Roll Of Teflon Tape.
Tools Required:
- Channel Locks/Pipe Wrench (Whatever You Prefer.)
- Adjustable Wrench. (Longer = More Leverage.)'
- Vice (If You Don't Have A Vice Get Two Pairs Of Channel Locks/Pipe Wrench.)
- Torque Wrench (Makes tightening the bushings super fast & efficient. Not needed though.)
Teflon tape is NOT a sealant. Many believe it is, but it is not. Teflon tape is a lubricant. It makes the pipe capable of screwing farther into the fittings. Anyone who tells you different is LYING to you.
When applying Teflon tape the “rule of three” applies. Apply the tape to the first three threads, and wrap it around the pipe three times. Keep it as tight as possible. Don't slop it on. You can put it on all the threads, but you're wasting it. Try not to get the tape over the opening of the pipe because it can flake off and go into the piping system when you screw it all together. On gas piping, this can clog the orifices and create a problem.
I personally put Teflon up the entire thread, and technically i'm wasting it, but I like doing it. This picture shows what a good Teflon job should look like;
Note; Instead of using the epoxy method to block one of the nipples before drilling a .040 hole into it, you can tap out the inside of the nipple with a tap and then drill the .040 hole into a plug and then screw the plug into internals taps on the nipple. Either way works. The plug method though is ideal, but there is nothing wrong with epoxy.
This picture shows everything you're going to need to create it, and then the following picture shows the finished product so you can see how you need to pipe everything together. I didn't take pictures of me going piece by piece. (If you can't build it by looking at my picture you shouldn't be building it.)
Process Of Creating Leak Down Tester:
- Obtain all parts/tools/misc things.
- Teflon every screw pipe first.
- The pressure reducer is the last part you will pipe in. Set it aside for now. You're going to pipe together to branch on the left first, and then the right. Once they're both complete you screw them both into the pressure reducer.
- Take the 1/4” nipple and screw it into the1/4” female air quick disconnect. DO NOT attempt to tighten the nipple by putting channel locks on the threads and tightening. When you tighten short nipples you use the next fitting in line to tighten them into each other. Take one of the 3/8” Male NPT x 1/4” Female NPT Bushing and screw the female side into the 1/4” nipple. Tighten the bushing onto the nipple and this will tighten the nipple into the quick disconnect.
- Screw a 3/8” Tee into the male threads on the bushing. Screw the run into the bushing. Tighten bushing into tee. Screw another bushing into the branch of the tee. Tighten it. Leave gauge out for now.
- Screw 3/8” nipple into other run of tee. Screw 3/8” ball valve onto nipple. Tighten down.
- The next nipple you see. (The one that goes between the ball valve and pressure reducer is special. Let me explain.
This is the damper valve. Take your nipple and tape off the threads. Mix epoxy and pour it into the nipple and let it setup. I used tape and taped the bottom of the nipple off so the epoxy couldn't run out of the bottom. Let the epoxy set up and cure for a while. Once it's cured, get your .040 drill bit and drill a hole right through the epoxy. Picture show me doing this.
Note; Instead of using the epoxy method to block one of the nipples before drilling a .040 hole into it, you can tap out the inside of the nipple with a tap and then drill the .040 hole into a plug and then screw the plug into internals taps on the nipple. Either way works. The plug method though is ideal, but there is nothing wrong with epoxy.
- You're done. Screw this damper into the ball valve and tighten it. Do not screw it into the pressure reducer at this time. Set this aside.
- Now onto the right side.
- Take the 1/4” Male NPT Air Coupling and screw it into the bushing. Tighten it in. Now screw the bushing into the coupling and tighten that.
- Tighten the coupling into the 3/8” nipple, and then screw the nipple into the run of another 3/8” tee. Tighten it all down.
- Screw a bushing into the branch of the tee, and tighten it down.
- Screw another nipple into the other run of the tee, and tighten it down.
- You're done with this side now.
- Screw your 1/4” 100PSI gauges into both of the bushings. Tighten them down.
- Screw both of your created runs into the pressure reducer. Tighten down until everything lines up the way you like it. The way the gauges face is all a personal preference.
That's it. You have now created the same thing I created. Now you're probably wondering how to get this to go into the spark plug hole. Let me explain that.
You can probably buy a compression tester adapter and use it on this, but we are making things here, so why not make that as well?
Building Adapter To Go Into Spark Plug Hole.
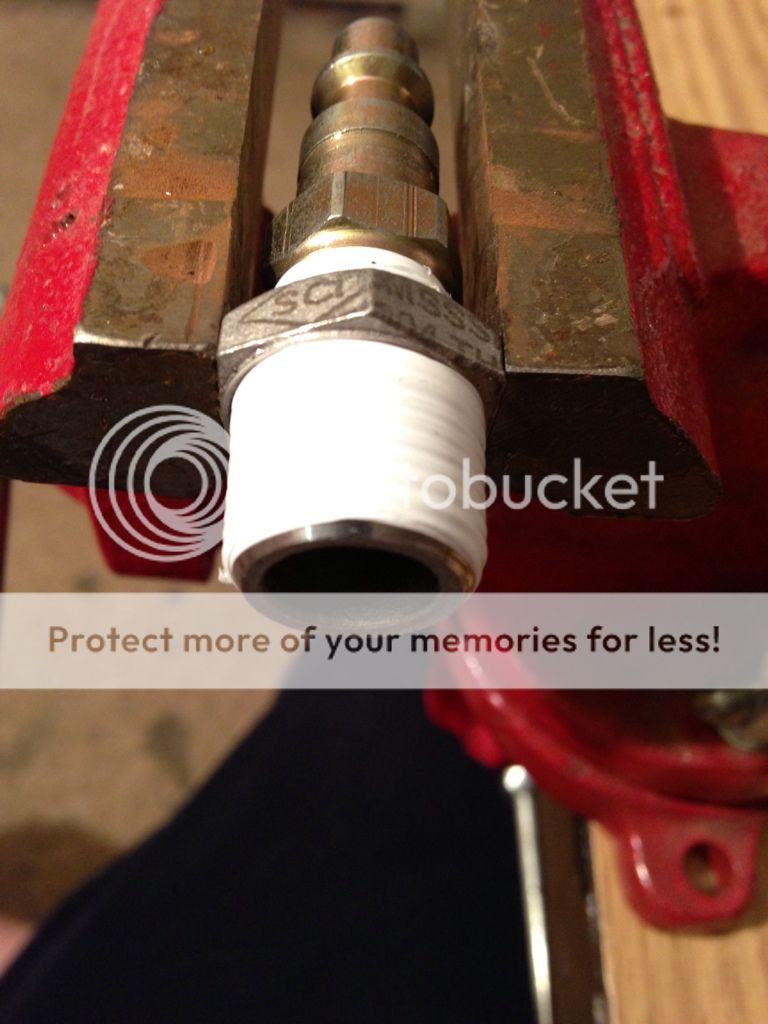
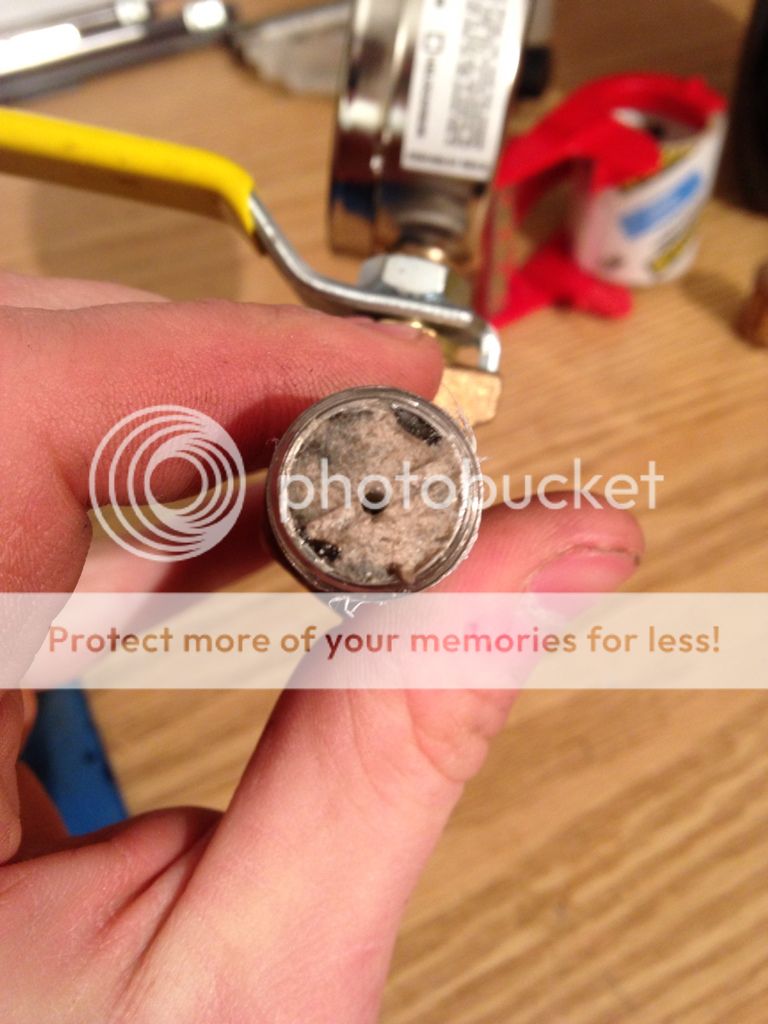
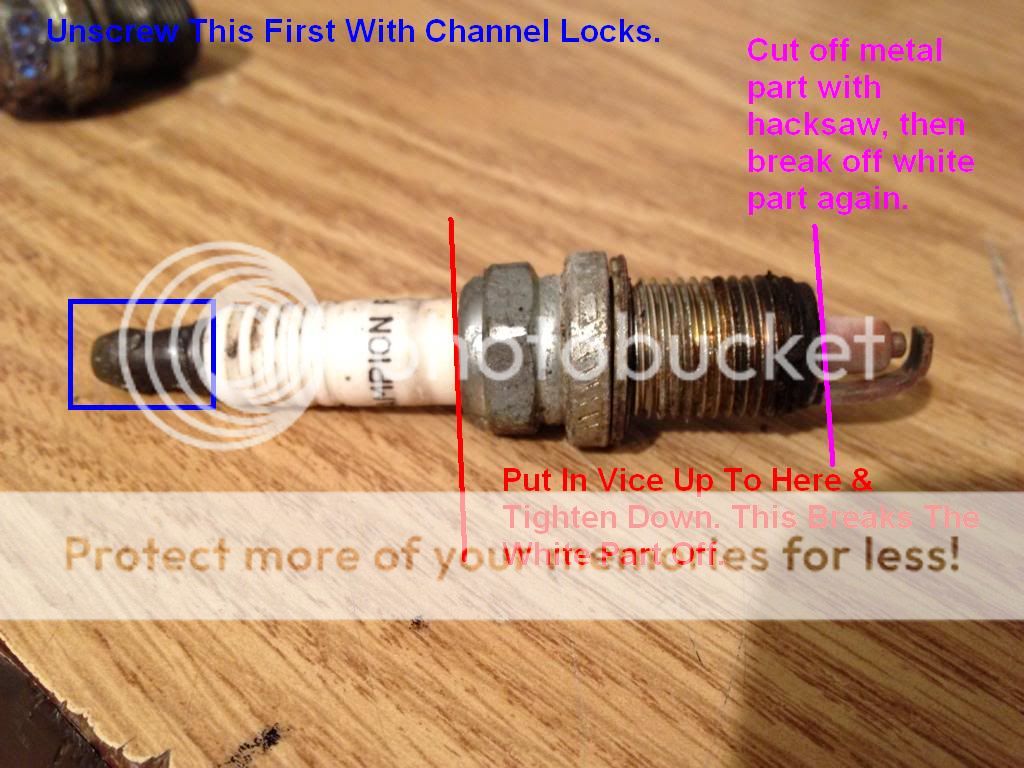
- Get an old spark plug.
- Follow steps in pictures to get your spark plug looking like the second picture below.
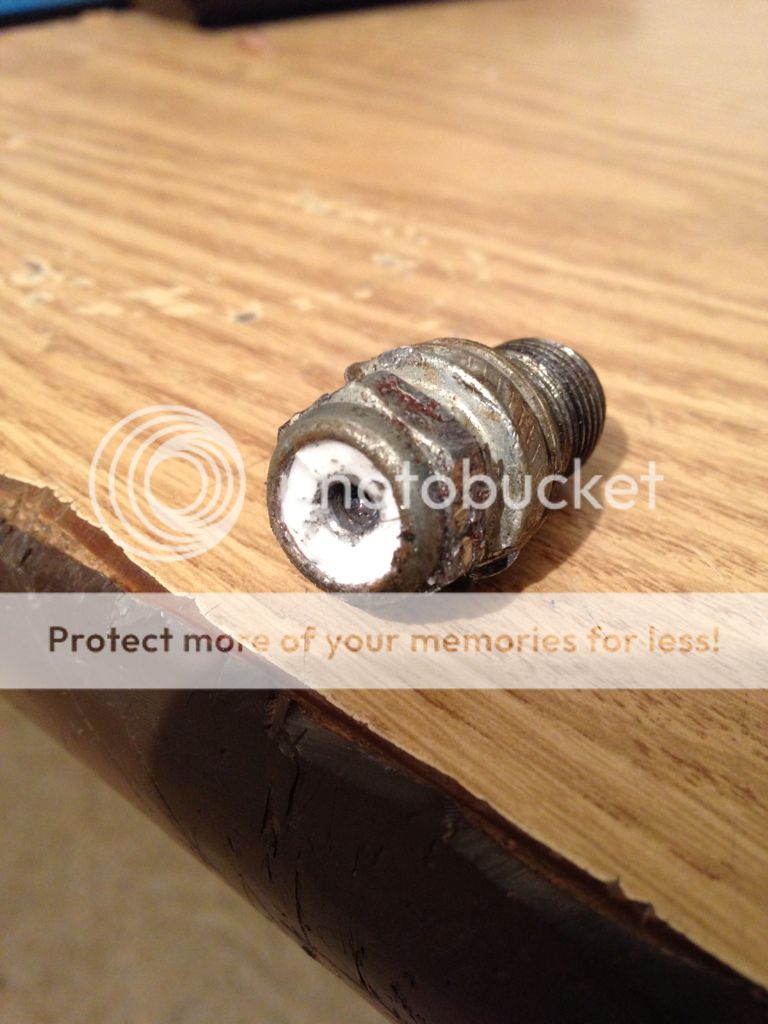
- Cut off the red lip with a hacksaw. (look at next picture.) This makes the rest of the spark plug knock out easier so you can blow air through it. Once it's cut off, use a drift and knock the rest of it out. It should fall right out.
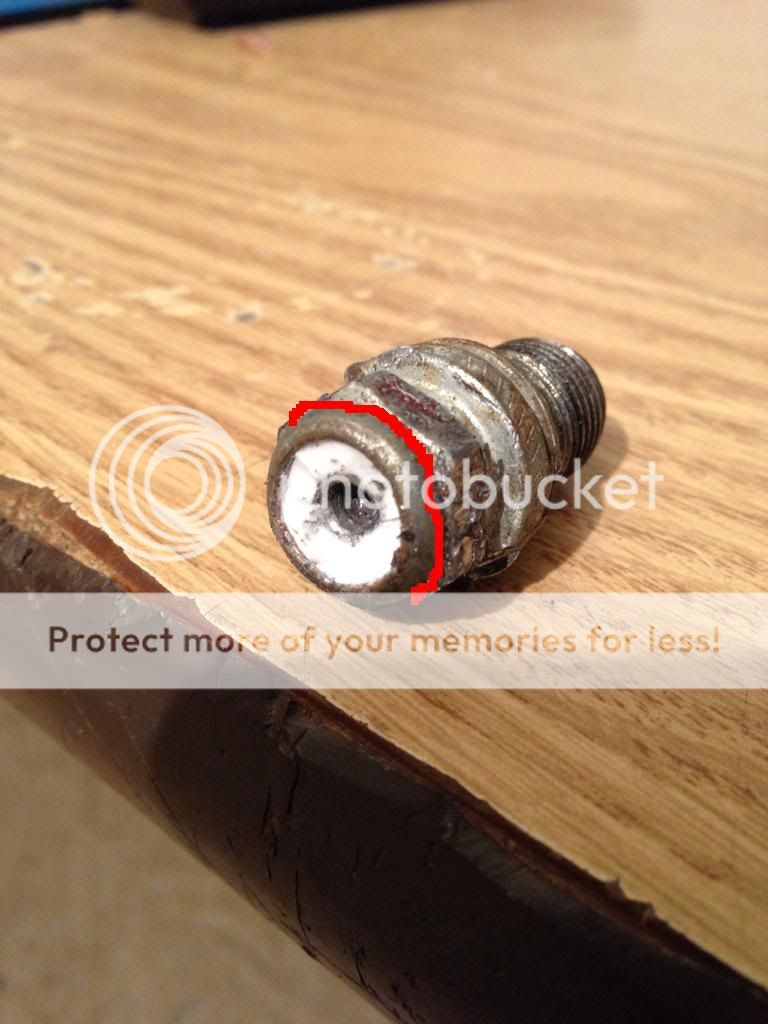
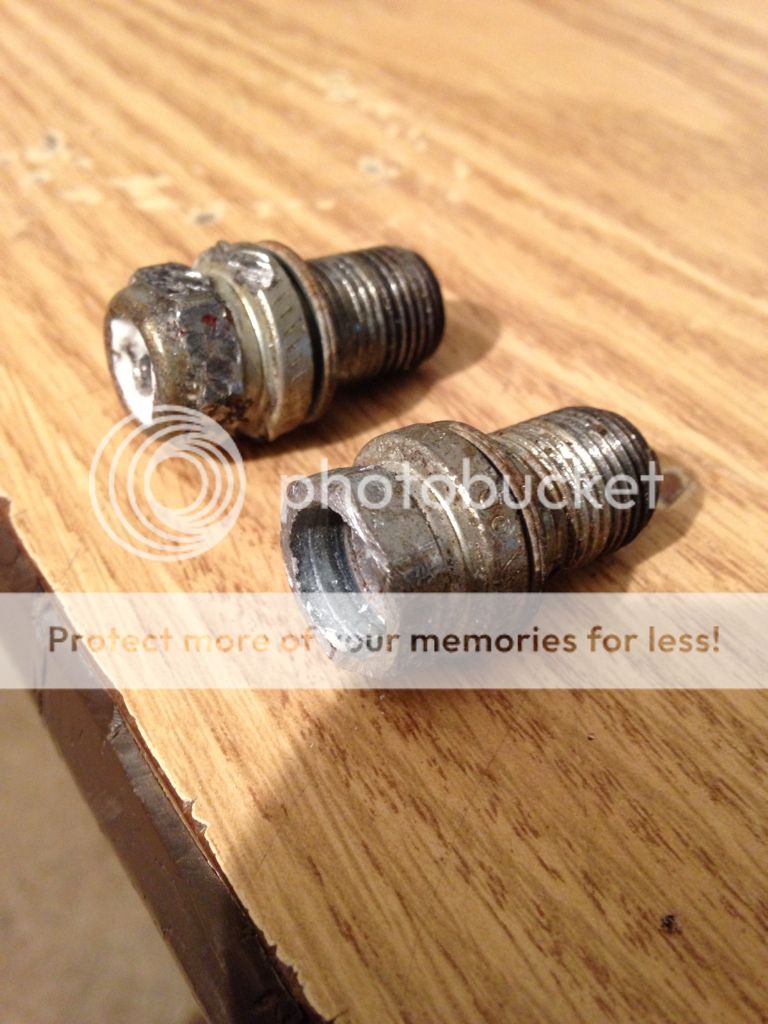
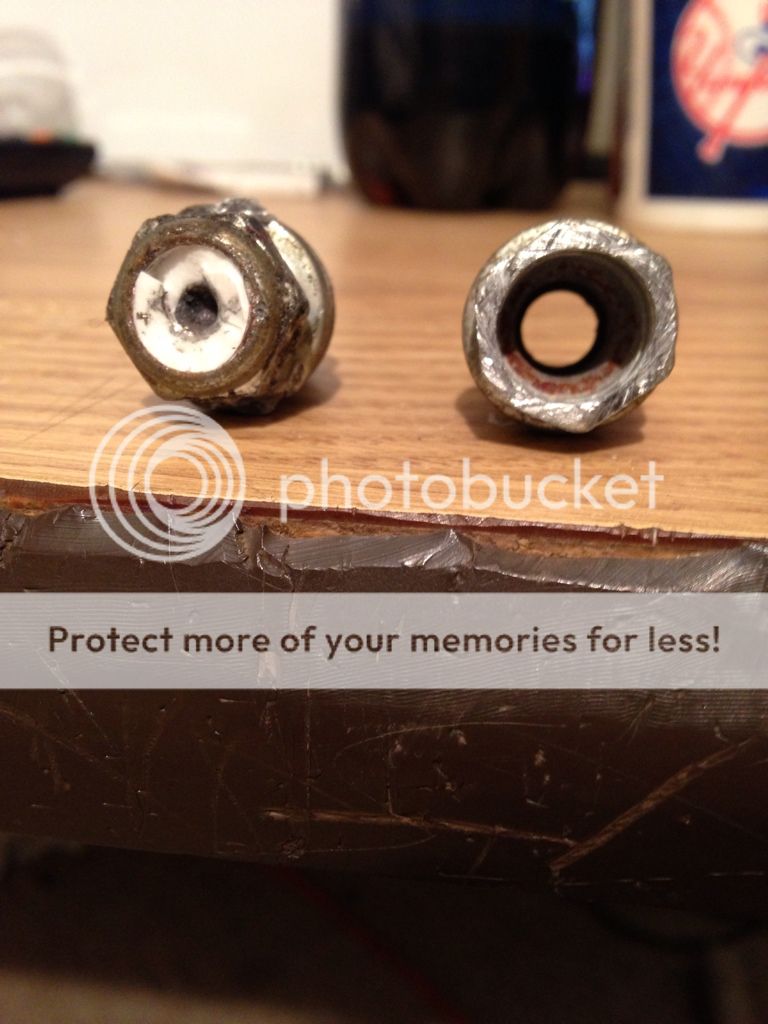
- Now you need to get creative. You can either tap out the spark plug with a 3/8” NPT tap, or you can weld a 1/4” coupling onto the spark plug. I welded the coupling on. Once I did this I screwed a 1/4” Male NPT x 3/8 barbed fitting into the coupling. This went to a 1' 1/4” air hose, and on the other end is a 3/8” barbed x 1/4” air connect.
That's it. This now screws into the spark plug and functions perfectly as a leak down tester. You can build as many hose connects for it as you want. Works way better than anything you could buy at harbor freight, and you can say you built it yourself.
Will post more pictures of it when I get them, but that's pretty much it. Feel free to ask any questions or give me your input. Hope this was easy enough to follow.
Last edited: