-
Welcome to the new NAXJA Forum! If your password does not work, please use "Forgot your password?" link on the log-in page. Please feel free to reach out to [email protected] if we can provide any assistance.
You are using an out of date browser. It may not display this or other websites correctly.
You should upgrade or use an alternative browser.
You should upgrade or use an alternative browser.
4.6L stroker in the works
- Thread starter Talyn
- Start date
wolfpackjeeper
NAXJA Forum User
- Location
- 500' and 500KCAS, RAF lakenheath
with the 4.0 I think you still have an option or two with eagle for forged H-beam rods. But I am not positive. With 4.2 rods you are pretty much stuck with re-machined old rods. Unless you can find some NOS performance rods.
Talyn
NAXJA Forum User
- Location
- Radford, Communistwealth of Virginia
Using the 4.0L rod the piston stays in the bottom of the bore more and in the case of the KB944 pistons, you get a stronger piston. You can get a set of 4.0L or 4.2L rods that have been reworked, but i purchased used 4.0L rods, polished and cryotempered them and the machine shop will be installing new ARP bolts and resizing them.
The eagle rods are longer than the 4.0L or 4.2L rods, but are hard to come buy, run at least $450, and you need custom pistons.
The eagle rods are longer than the 4.0L or 4.2L rods, but are hard to come buy, run at least $450, and you need custom pistons.
seanyb505
NAXJA Forum User
- Location
- Simpsonville, SC
I believe using the 4.0 rods gives better torque characteristics, but Im not sure. But it does have something to do with the piston remaining at the top and bottom of the bores like Silver said.
Talyn
NAXJA Forum User
- Location
- Radford, Communistwealth of Virginia
I believe using the 4.0 rods gives better torque characteristics, but Im not sure. But it does have something to do with the piston remaining at the top and bottom of the bores like Silver said.
KB did say that when I was asking questions before purchase. Maybe, maybe not.. thats not why I was interested in them. Until I seem some proven data that it changes torque on a 4.x stroker I'll pass that off as marketing hype.
seanyb505
NAXJA Forum User
- Location
- Simpsonville, SC
It was on Dinos website long before the KB piston?
This is what I found about the long rods on Dinos site. It doenst really mention the piston staying longer, just some other benefits. ctrl v:
"If the stock Jeep 4.0L 6.125" rods are used, expensive custom forged pistons with a shorter pin height than stock (1.380") are required to achieve zero deck clearance. Using longer rods does enable you to choose pistons with a larger dish volume than stock. These reduce the CR and allow the use of low octane fuel without detonation. You can also use a shorter duration camshaft for increased low-rev torque, and select the head gasket thickness required to achieve the desired 0.040"-0.060" quench height. "
Last edited:
Talyn
NAXJA Forum User
- Location
- Radford, Communistwealth of Virginia
I don't know how Dino came up with that, other than just a basic knowledge. Unfortunately I didn't have a chance to put my prior stroker on a dyno, so I won't be able to compare. However I will be able to provide dyno numbers on the stroker vs a modified 4.0L, assuming this one holds together long enough.
Talyn
NAXJA Forum User
- Location
- Radford, Communistwealth of Virginia
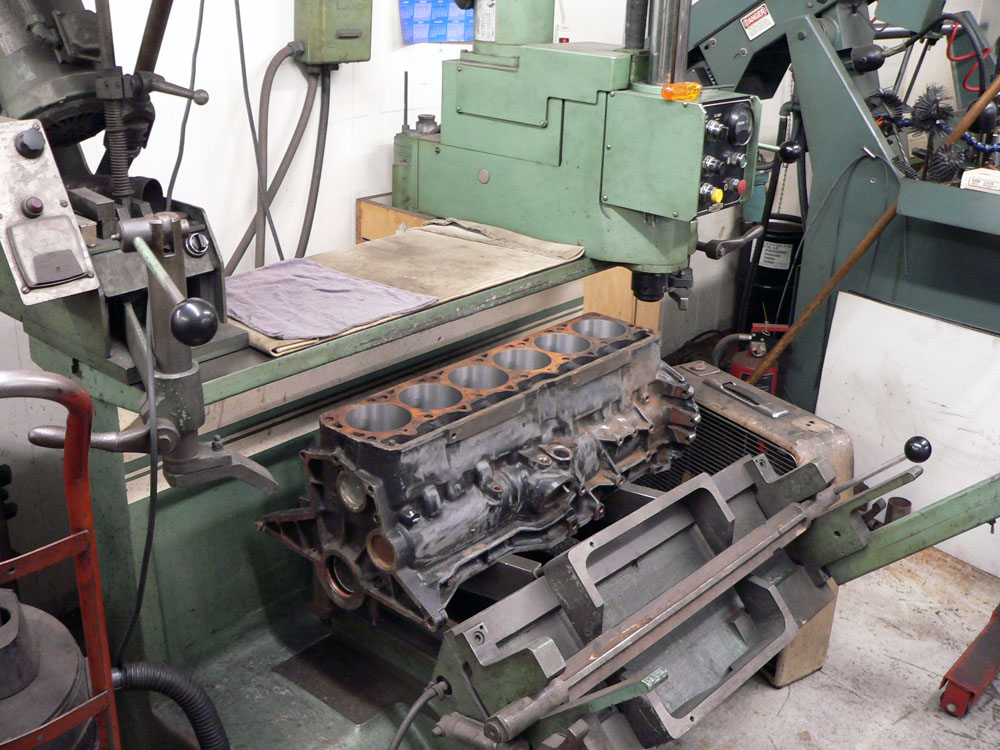
They have a crank! Its is what I was originally going to get.. 4wt, 10/10. Not welded at all either. Once again we were unable to find a 12wt crank and it appears finding any decent 258 crank is getting hard. So they have the block bored, and hopefully next week they will start to really tear into it.
However, he is a bit concerned about my chosen quench. First, he said that the .041" uncompressed head gasket will compress to .038", which I hadn't taken into account. Is that correct for a MLS head gasket? Also, he recommended that I leave the piston in the bore .007" instead of the .004" that I requested. His logic is that with the quench pad being only on one side it will cause the piston to rock when at TDC and the gas/air is compressed, then drag on the way down. I may go that route considering that the quench will still be .045" if the gasket compresses to .038". Opinions?
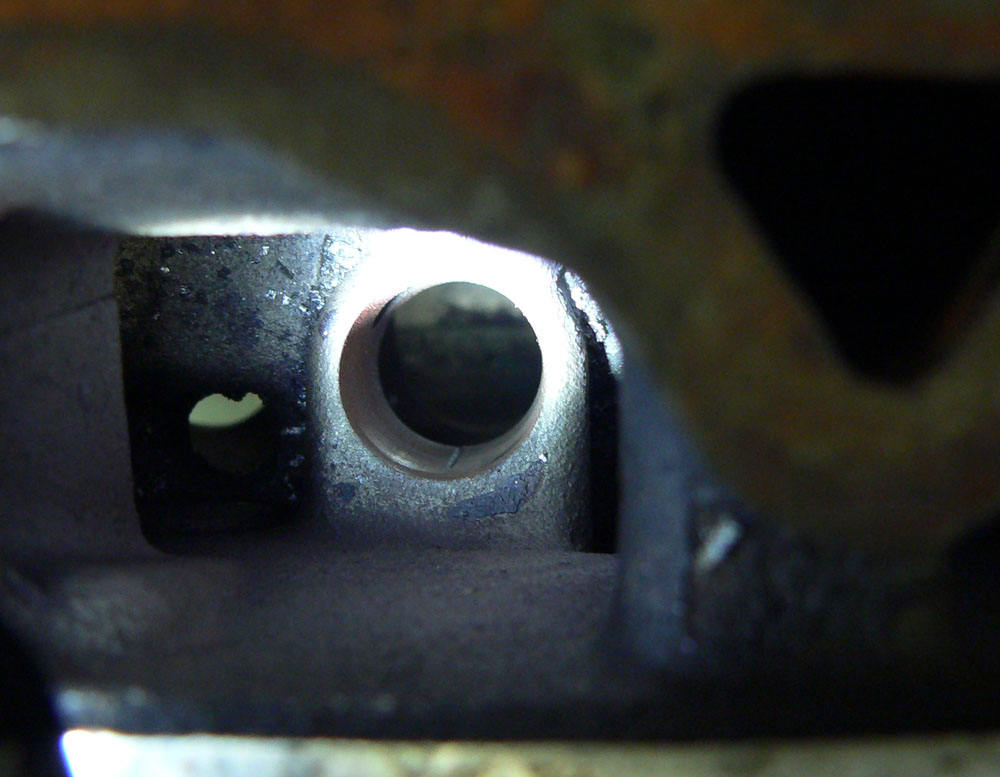
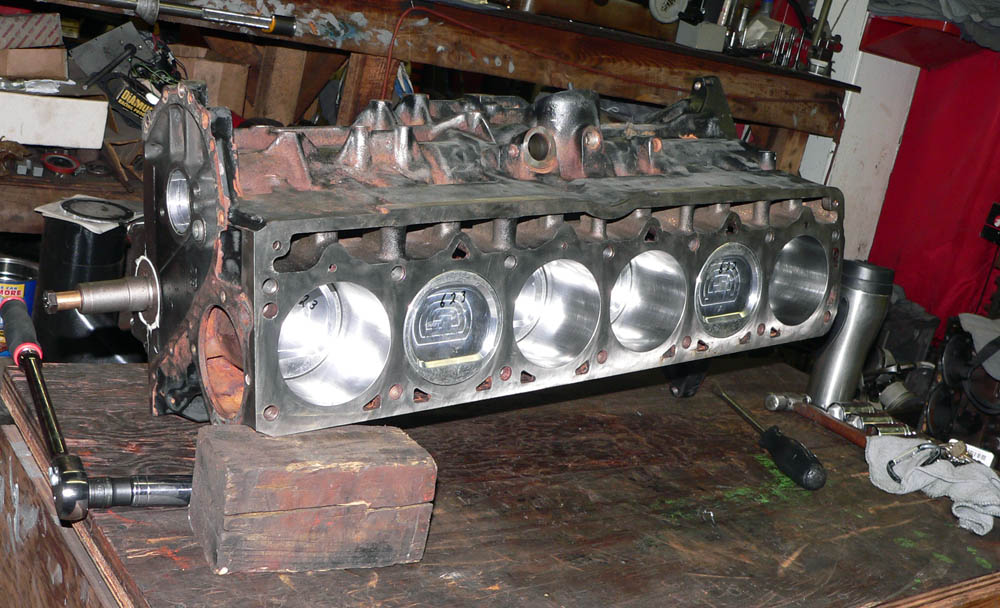
Anyhow, here are some pics. First is the best I could get of the lifter bore groove that we did... hard to hold a flash light, manually focus a camera and then snap the picture. The second is how the block sits now, bored.
However, he is a bit concerned about my chosen quench. First, he said that the .041" uncompressed head gasket will compress to .038", which I hadn't taken into account. Is that correct for a MLS head gasket? Also, he recommended that I leave the piston in the bore .007" instead of the .004" that I requested. His logic is that with the quench pad being only on one side it will cause the piston to rock when at TDC and the gas/air is compressed, then drag on the way down. I may go that route considering that the quench will still be .045" if the gasket compresses to .038". Opinions?
Anyhow, here are some pics. First is the best I could get of the lifter bore groove that we did... hard to hold a flash light, manually focus a camera and then snap the picture. The second is how the block sits now, bored.
Talyn
NAXJA Forum User
- Location
- Radford, Communistwealth of Virginia
Found out today that the freeze plug kit is missing two 2" freeze plugs. Brass ones come in on Saturday. Of course its the one thing that I don't check that has to be wrong. :doh:
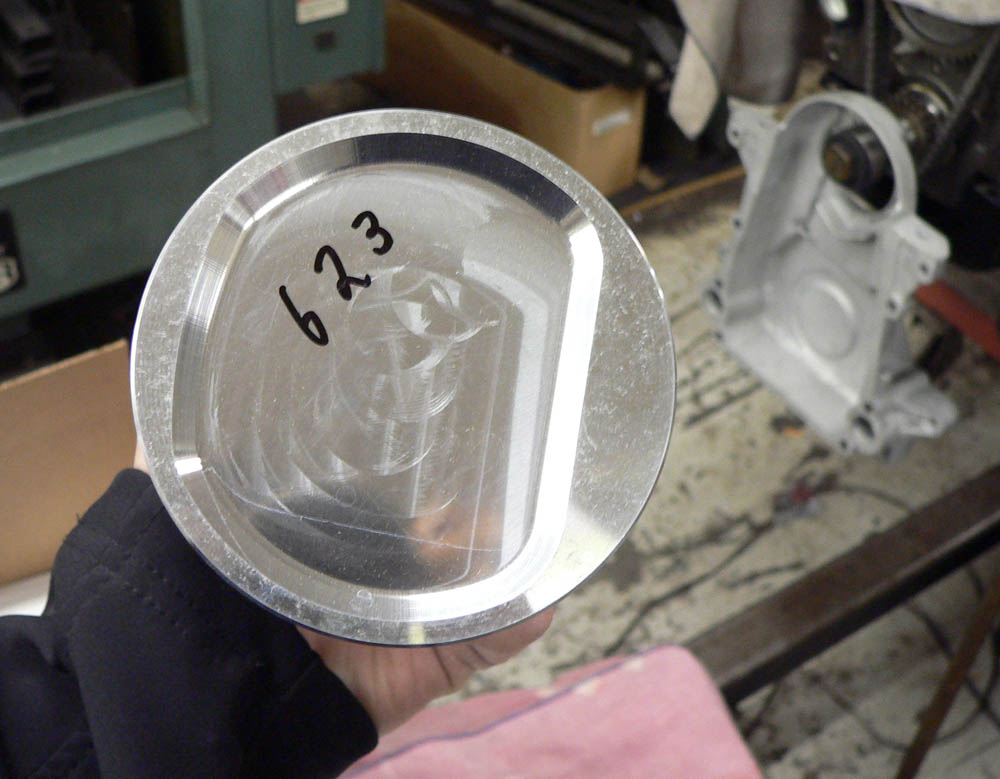
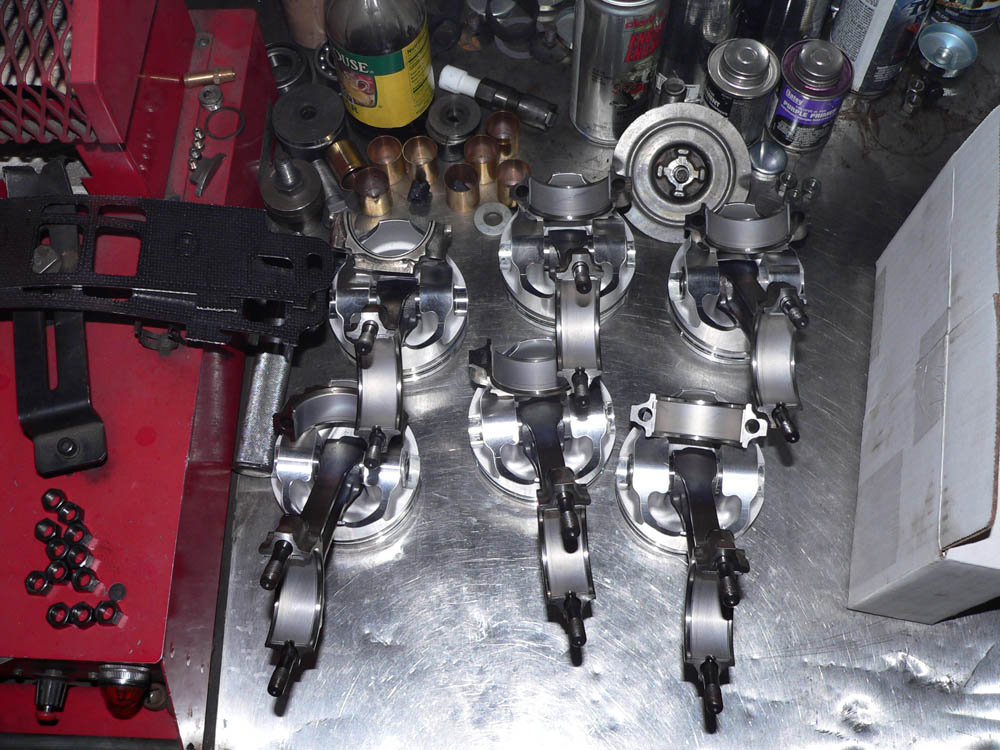
Anyway, everything has been balanced, decked and cam bearings installed. all that is left to do is final assembly, blue printing, freeze plugs. Each piston weighted 623 grams so no material removed from them.
Some pics for your enjoyment:
Crank on balancing machine:

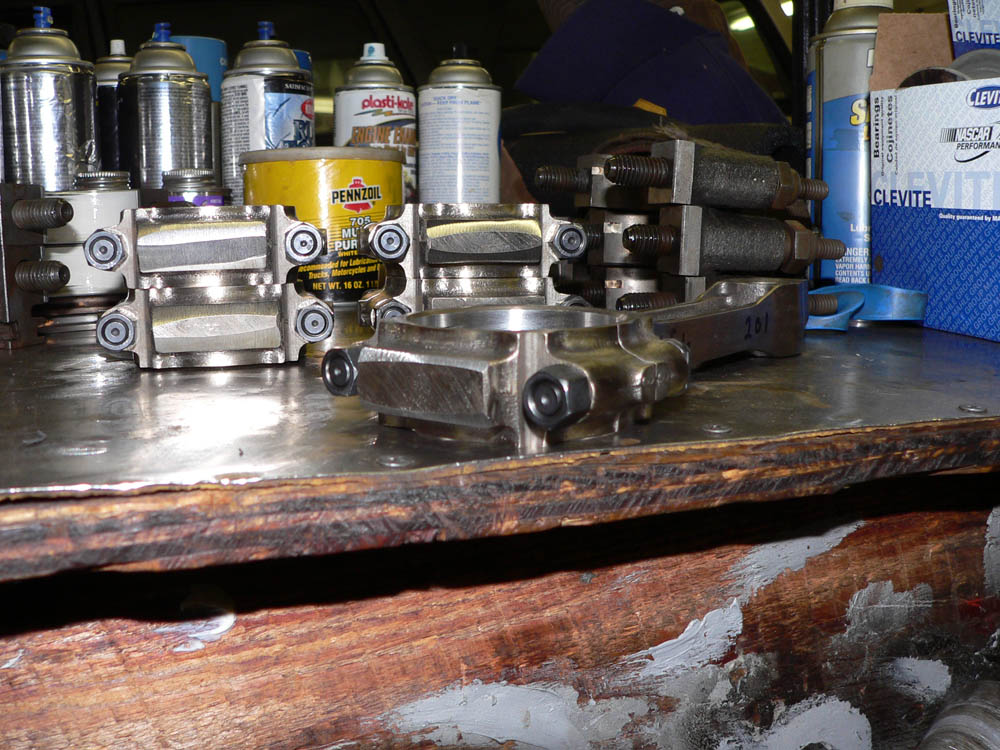
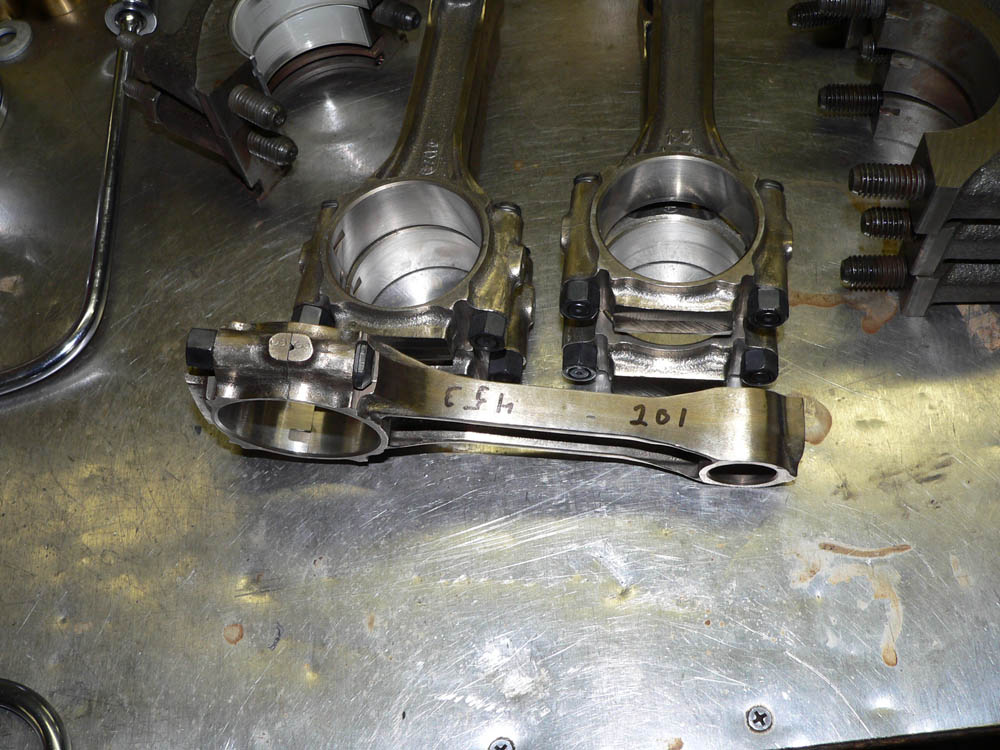
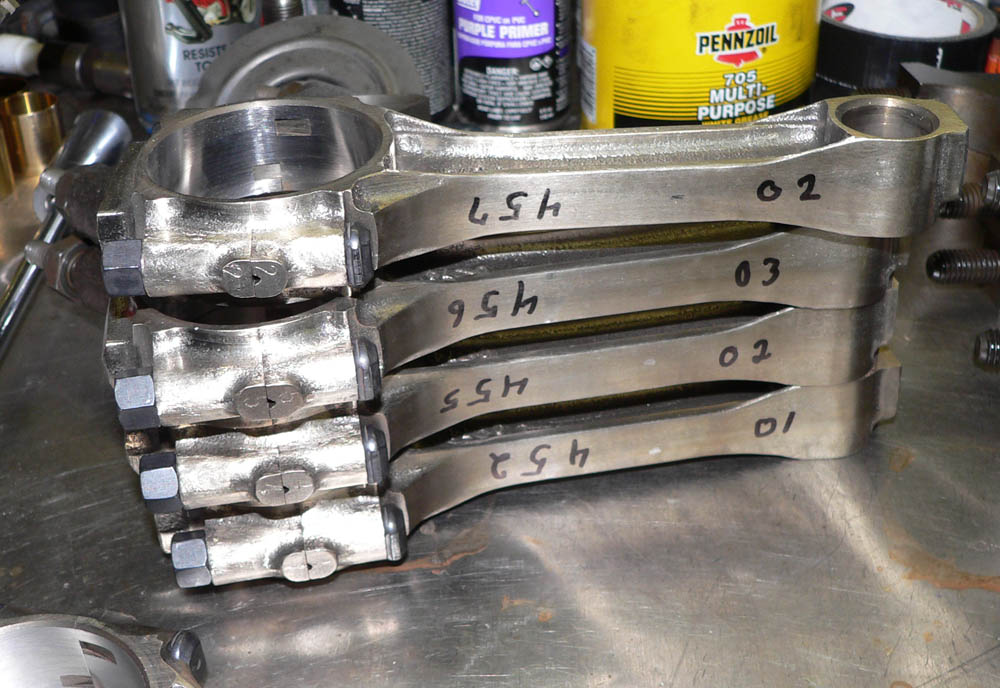
Rods:

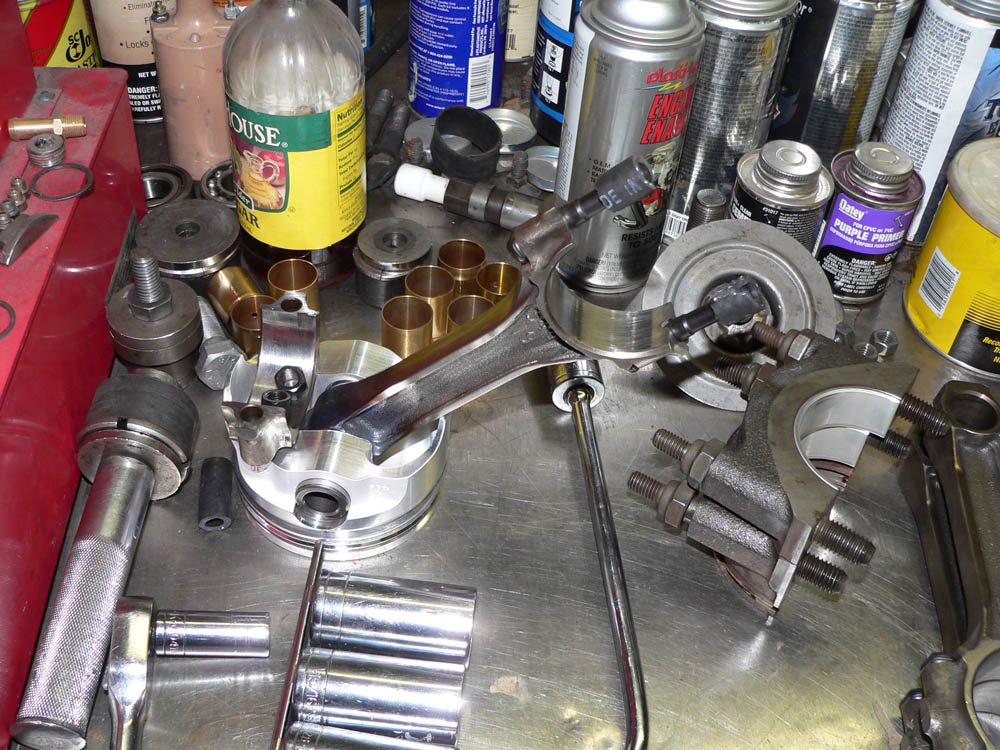
Rod heating machine used to install piston on rods:

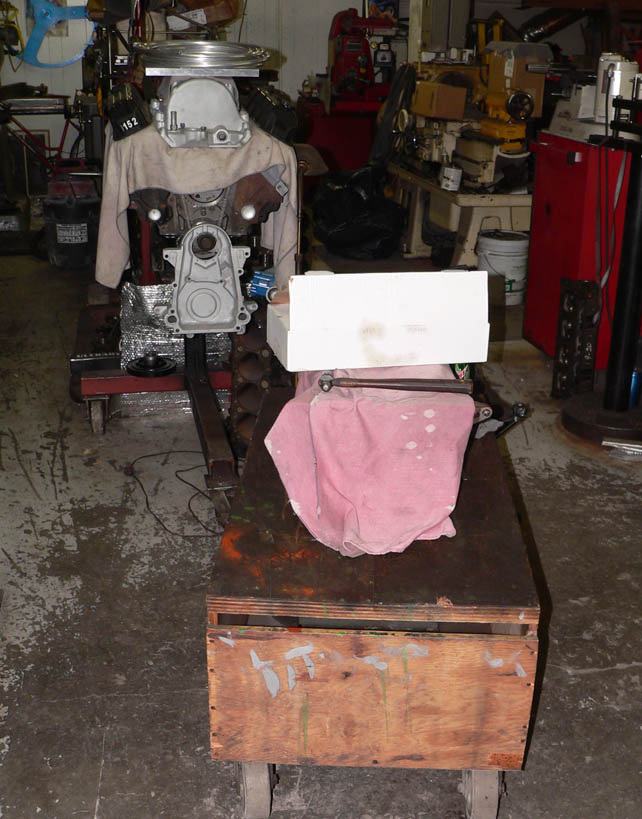
As it sits now:
Cam bearings:
The offending freeze plug kit:

Anyway, everything has been balanced, decked and cam bearings installed. all that is left to do is final assembly, blue printing, freeze plugs. Each piston weighted 623 grams so no material removed from them.
Some pics for your enjoyment:
Crank on balancing machine:
Rods:
Rod heating machine used to install piston on rods:
As it sits now:
Cam bearings:
The offending freeze plug kit:
Backroads
NAXJA Forum User
- Location
- Honey Brook, PA
sweet build. Good to see more people documenting these builds. I was really curious about a stroker a few months back and there wasnt a HUGE amount of picture healthy builds. Good luck with everything!
Talyn
NAXJA Forum User
- Location
- Radford, Communistwealth of Virginia
This is my second. The first one I purchased whole, and it wasn't close to healthy.
Talyn
NAXJA Forum User
- Location
- Radford, Communistwealth of Virginia
It appears that my web server is having some difficulty so the images may not show up yet. Check back in a few hours and hopefully the issue will be cleared up.
Crank installed, all pistons on the rods.
Of course, some pics:
Pistons on the rods:
Notch in rod bearing:

Crank:


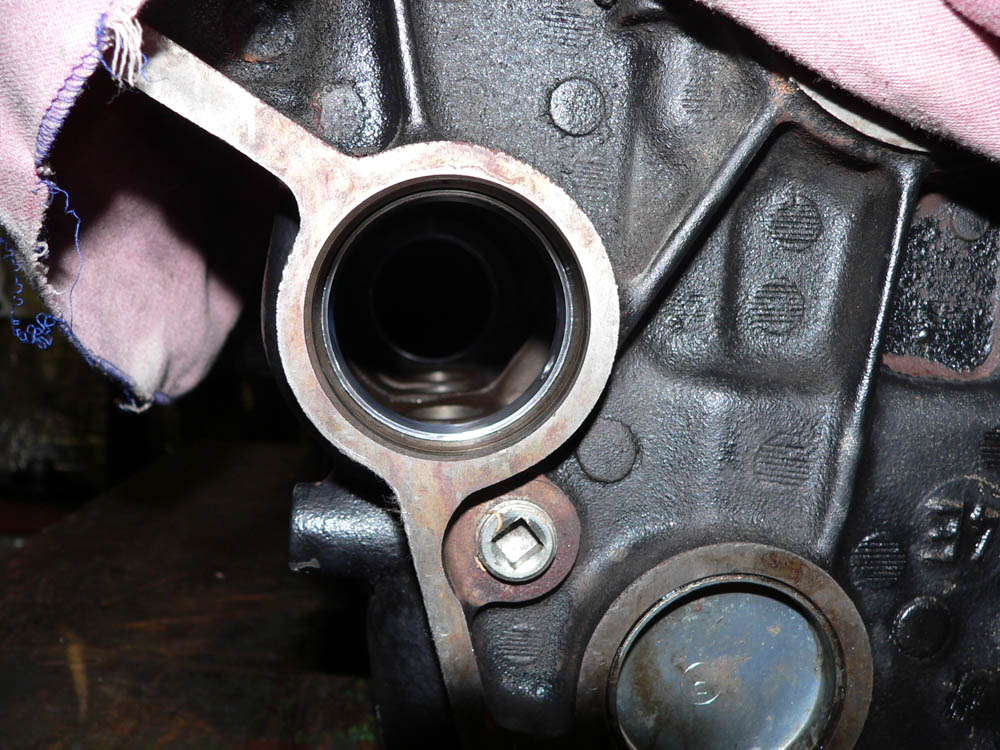
Now, he had a slight problem with the KB944 pistons. This was only a problem on the lightest rod, where the small end balancing pad was untouched. The first problem was he wouldn't get the piston pin to go into the other side of the piston once it passed though the rod. The problem was the rod kept hitting the far side of the piston after the pin had gone through the rod. The problem was the unaltered rod kept hitting the piston, pushing the rod up. In the pic below the circle shows where the rod had to be slightly modified to stop the rod from riding up. Once that was done he discovered that the piston wasn't rotating on the rod. If you look at some of my earlier piston images you see a nipple on the underside of the piston. That nipple was making contact with the rod end, causing it to bind. That little bit of piston material was removed allowing the piston to rotate freely on the rod. It appears that Keith Black didn't do 100% of their homework.

Crank installed, all pistons on the rods.
Of course, some pics:
Pistons on the rods:
Notch in rod bearing:
Crank:
Now, he had a slight problem with the KB944 pistons. This was only a problem on the lightest rod, where the small end balancing pad was untouched. The first problem was he wouldn't get the piston pin to go into the other side of the piston once it passed though the rod. The problem was the rod kept hitting the far side of the piston after the pin had gone through the rod. The problem was the unaltered rod kept hitting the piston, pushing the rod up. In the pic below the circle shows where the rod had to be slightly modified to stop the rod from riding up. Once that was done he discovered that the piston wasn't rotating on the rod. If you look at some of my earlier piston images you see a nipple on the underside of the piston. That nipple was making contact with the rod end, causing it to bind. That little bit of piston material was removed allowing the piston to rotate freely on the rod. It appears that Keith Black didn't do 100% of their homework.
Backroads
NAXJA Forum User
- Location
- Honey Brook, PA
in that second pic, is that a crack in the bearing?
Talyn
NAXJA Forum User
- Location
- Radford, Communistwealth of Virginia
Yeah, its a crack, i'm using cracked bearings... its the latest technique. :doh:
No, its actually a mark left by the bore gauge
No, its actually a mark left by the bore gauge
Talyn
NAXJA Forum User
- Location
- Radford, Communistwealth of Virginia
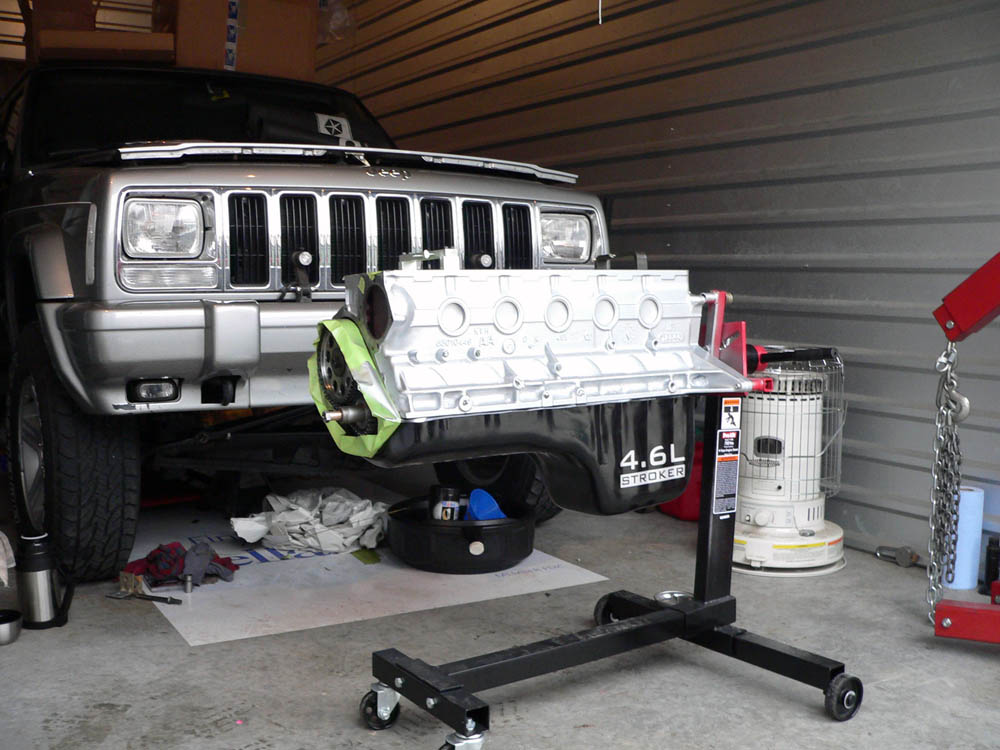
The machine shopped finished it today. $850 out the door (told her to just charge me the $50 for the crank core now as I haven't brought them the 4.0L crank yet.) Painted it there than brought it over to my storage unit. The two brass freeze plugs came in while I was waiting from Carquest. I was planning on picking it up on Moday to let the paint dry and all... but I decided the paint was dry enough to move it. Picked up a friend.. loaded it in the ZJ at 3.. drove to storage, bolted the engine stand on, dropped it off, covered it up and had my friend back at his place at 4.
So far with tools, oil, paint, parts, and machine work it has run me $3025
Now the fun begins. Install and degree the cam, install the main girdle, install oil pump and oil pan, install lifters install head, measure for pushrods (stock might work for now), install timing cover, install harmonic balance, install flex plate and drop it in.
seanyb505
NAXJA Forum User
- Location
- Simpsonville, SC
What color are you going with? Look freakin good btw! I dont remember, are you going to have a hi vol oil pump or are you sticking with stock? The lifter bore groves look much larger than the flat side on my cam saver lifters.
Talyn
NAXJA Forum User
- Location
- Radford, Communistwealth of Virginia
What color are you going with? Look freakin good btw! I dont remember, are you going to have a hi vol oil pump or are you sticking with stock? The lifter bore groves look much larger than the flat side on my cam saver lifters.
I'm going with silver for the head and block, black for the oil pan, blue valve cover, blue t-stat housing, blue oil filter adapter, silver intake, black exhaust header. Most of which you won't really see when the engine is installed but it will look damn good on the stand prior to install!
The grooves aren't larger. Maybe its the perspective or something. I'm going with the normal Melling pump. I ran the camsaver lifters and never had low oil pressure with them previously. I didn't go with teh cam savers this time because I don't think they are that good of a solution. 1) the cut area on the lifter isn't over the area of the cam that really matters that much as it spins, 2) The finish on the foot of the lifters wasn't as nice as compcam lifter finish, and 3) I had one or two weak lifters that bled down after sitting.
Talyn
NAXJA Forum User
- Location
- Radford, Communistwealth of Virginia
After some error on my part in measuring deck clearance here are my numbers:
Cylinder #; Front; Rear
1; .004
2; .003
3; -.001 (above deck)
4; .0013
5; .0043
6; .0039
So, quench ranges from .043" to .0483"
Yes, my connecting rods aren't the same length. So much for stock connecting rods. But it will do, and my machinist says it is normal for stock rods to be off this much.. I would like to see .004 or .005" across the board though.
At this point I have found the deck clearance and degreed my cam. A few pics from that.
The setup: (18" degree wheel)

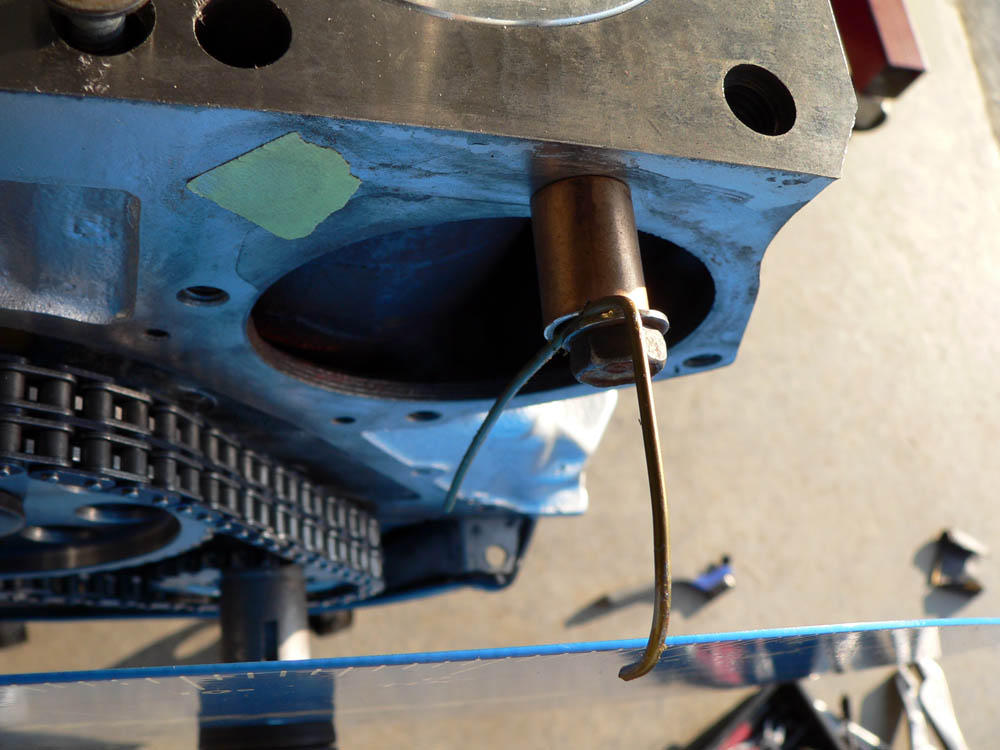
How I attached the pointer (water pump bolt, some random brass bushing filled and a piece of hanger)
Dial indicator setup on intake pushrod

Finding TDC 20* before TDC:
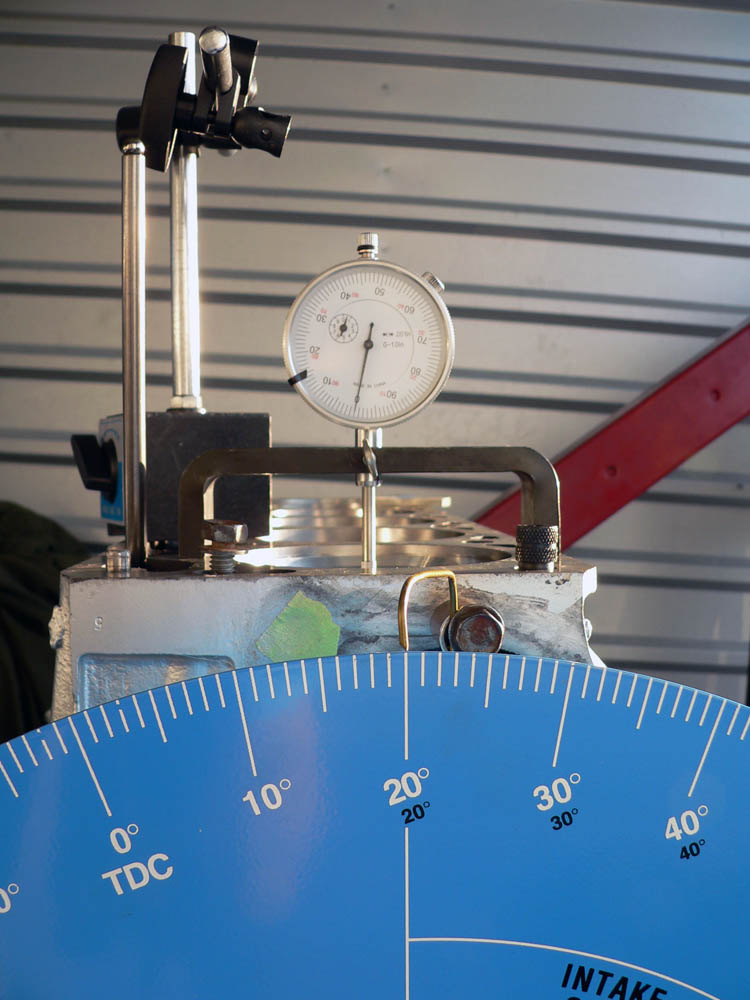
Finding TDC 20* after TDC:

That was after I had adjusted the pointer to TDC and used a dial indicator instead of a piston stop.
TDC:

Intake valve open at .050":

Exhaust valve close at .050":
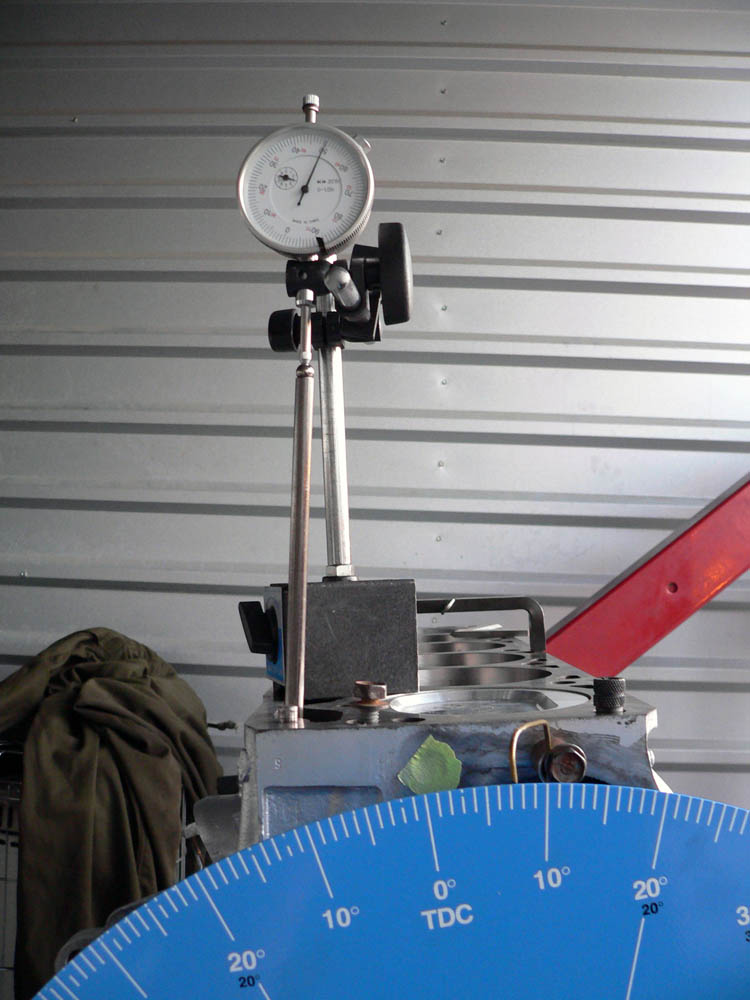
I installed it straight up and that is what it is. Center line worked out to 107*, which is what it is suppose to. I also checked teh valve open and closing timing. The Intake Valve Open was slightly off. I got -5.2* BTDC, when it should have been -4* BTDC. I verified all readings 5 times. I don't think 1.2* off will matter in my application. This is the first time I degree'd a cam. I was actually over thinking it and just confused myself while thinking about it, but once into it it was very easy. Its good to know that the cam reads close to what it should be. BTW, its a Comp Cam 68-231-4
How it sits now:

The only check left I have to do is the valve to piston clearance. I picked some weak springs up at Home Depot to replace the running springs so teh lifter won't compress. I am not expecting any issues, but I might as well verify that sine I have everything. Hopefully that is tomorrow. If I have time I will also put the timing cover on, the main girdle on and the oil pan on.
Cylinder #; Front; Rear
1; .004
2; .003
3; -.001 (above deck)
4; .0013
5; .0043
6; .0039
So, quench ranges from .043" to .0483"
Yes, my connecting rods aren't the same length. So much for stock connecting rods. But it will do, and my machinist says it is normal for stock rods to be off this much.. I would like to see .004 or .005" across the board though.
At this point I have found the deck clearance and degreed my cam. A few pics from that.
The setup: (18" degree wheel)
How I attached the pointer (water pump bolt, some random brass bushing filled and a piece of hanger)
Dial indicator setup on intake pushrod
Finding TDC 20* before TDC:
Finding TDC 20* after TDC:
That was after I had adjusted the pointer to TDC and used a dial indicator instead of a piston stop.
TDC:
Intake valve open at .050":
Exhaust valve close at .050":
I installed it straight up and that is what it is. Center line worked out to 107*, which is what it is suppose to. I also checked teh valve open and closing timing. The Intake Valve Open was slightly off. I got -5.2* BTDC, when it should have been -4* BTDC. I verified all readings 5 times. I don't think 1.2* off will matter in my application. This is the first time I degree'd a cam. I was actually over thinking it and just confused myself while thinking about it, but once into it it was very easy. Its good to know that the cam reads close to what it should be. BTW, its a Comp Cam 68-231-4
How it sits now:
The only check left I have to do is the valve to piston clearance. I picked some weak springs up at Home Depot to replace the running springs so teh lifter won't compress. I am not expecting any issues, but I might as well verify that sine I have everything. Hopefully that is tomorrow. If I have time I will also put the timing cover on, the main girdle on and the oil pan on.
Similar threads
- Replies
- 20
- Views
- 2K
- Replies
- 101
- Views
- 11K