I have a 2001 XJ and there is a hard line pipe coming out of it that connects to the heater core hose. I am replacing the hard line pipe because its literally falling apart. My question is there a torque specification for this I could use a crowfoot adapter / torque wrench on the formed nut on the pipe or is it a case of just tightening it up until its in the right position to attach the heater hose?
You are using an out of date browser. It may not display this or other websites correctly.
You should upgrade or use an alternative browser.
You should upgrade or use an alternative browser.
Water Pump - Hard Line Pipe
- Thread starter Tryfan
- Start date
Ben824
NAXJA Forum User
- Location
- Woodstock, GA
Just screw it on until it gets hard to turn and make sure it is aimed in the right direction. I usually just use teflon tape whenever I need to seal up pipe threads and it works fine.
2X_01_Jeeps
NAXJA Forum User
- Location
- Ft. Collins, CO
I'd be surprised if you could replace it while the pump is installed.
Be sure you turn it so the same number of threads is showing on the new one as the old one you took out.
I just changed a water pump and turned the new pipe in so that it was at the same angle as the old one. Even with thread sealant it leaked after everything was buttoned up. I had to remove the water pump and take another turn on the pipe.
It'll pretty much let you know when it's bottomed.
I'd be surprised if you could replace it while the pump is installed.
Be sure you turn it so the same number of threads is showing on the new one as the old one you took out..
That is correct if I remember right. I had one a cpl of years ago on a northern XJ i bought that was rusted to hell and leaking and Im pretty sure I had to pull the pump to put the new tube on.
ParadiseXJ
NAXJA Forum User
- Location
- Paradise, CA 95969
Just screw it on until it gets hard to turn and make sure it is aimed in the right direction.
Theres a sig line quote in here somewhere.
:laugh3:
Ben824
NAXJA Forum User
- Location
- Woodstock, GA
Theres a sig line quote in here somewhere.
:laugh3:
haha I didn't even notice that after I typed it out
5-90
NAXJA Forum User
- Location
- Hammerspace
I have a 2001 XJ and there is a hard line pipe coming out of it that connects to the heater core hose. I am replacing the hard line pipe because its literally falling apart. My question is there a torque specification for this I could use a crowfoot adapter / torque wrench on the formed nut on the pipe or is it a case of just tightening it up until its in the right position to attach the heater hose?
If you haven't already, don't bother with an OEM replacement part. It's made from stamped steel, and rusts out (as you've noted...)
Go to the hardware store, get a brass pipe nipple in 3/8". You can use a straight nipple a few inches long and just cut one threaded end off (you don't need threads for a hose join,) or figure lengths and get a long nipple, an elbow, and a short nipple to eliminate the moulded hose join (I don't know the lengths offhand, but I know it can be done off the rack at the hardware store.) Brass is recommended - it will hold up much longer.
The thumb rule for a 3/8" NPT join is to go one-half turn past finger tight (using PTFE sealant,) and then tighten to align (if necessary. If you don't do the elbow, you won't need to align.)
Even getting a galvanised iron nipple will cost less than the dealer - and last longer.
- Location
- Roanoke VA
If you haven't already, don't bother with an OEM replacement part. It's made from stamped steel, and rusts out (as you've noted...)
Go to the hardware store, get a brass pipe nipple in 3/8". You can use a straight nipple a few inches long and just cut one threaded end off (you don't need threads for a hose join,) or figure lengths and get a long nipple, an elbow, and a short nipple to eliminate the moulded hose join (I don't know the lengths offhand, but I know it can be done off the rack at the hardware store.) Brass is recommended - it will hold up much longer.
The thumb rule for a 3/8" NPT join is to go one-half turn past finger tight (using PTFE sealant,) and then tighten to align (if necessary. If you don't do the elbow, you won't need to align.)
Even getting a galvanised iron nipple will cost less than the dealer - and last longer.
This is how I do mine but I go one step further and use a brass elbow and a 5/8" hose barb screwed into that. It takes that bend off of the hose and makes a direct shot to the heater valve/core
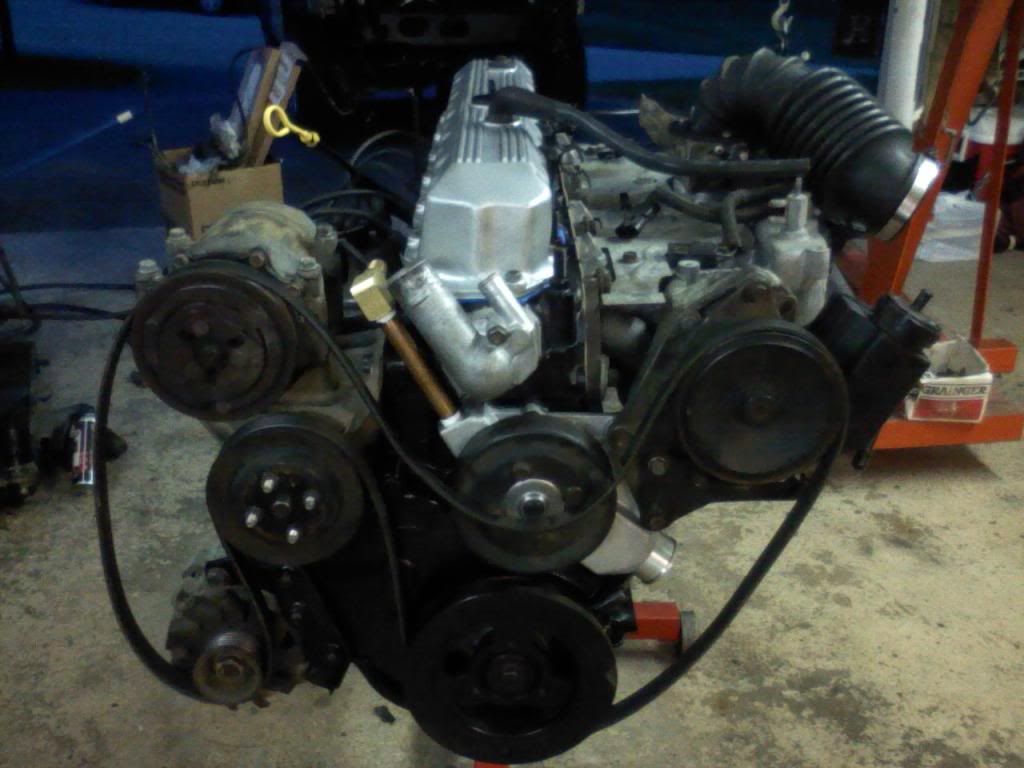
Here is a pic of the one on my MJ. And yes that is a R134 compressor/bracket on a RENIX motor!


- Location
- Rainy side of Washington
Well, after seeing the posts from 5-90 and xjtrailrider... the Dorman tube I have new in bag is relegated to spare / in case a friend needs it duty! Will be replacing any of mine with brass fittings in the future.
Home Depot is even open later (and earlier) than the auto parts stores around here.
Home Depot is even open later (and earlier) than the auto parts stores around here.
- Location
- Rainy side of Washington
xjtrailrider - as a sort of followup/derail, how did you put the r134a compressor on there with the renix style belt routing? Was it as simple as I think it should be and you just swapped the bracket for the compressor+fan pulley or did you need a new size belt? I am probably doing the same thing on my 88 MJ today since I let a friend take the AC delete pulley before realizing I'd be putting the jeep on the road without converting it to a V8 first. And now I've realized I sorta need that before I can get it running again, and don't have a pulley or a renix style compressor, but I have a few early 90s and late 90s compressors and brackets sitting around... obviously I need the early 90s bracket since the 96 and later belt tensioner/routing does not involve an idler pulley on that bracket.
- Location
- Roanoke VA
xjtrailrider - as a sort of followup/derail, how did you put the r134a compressor on there with the renix style belt routing? Was it as simple as I think it should be and you just swapped the bracket for the compressor+fan pulley or did you need a new size belt? I am probably doing the same thing on my 88 MJ today since I let a friend take the AC delete pulley before realizing I'd be putting the jeep on the road without converting it to a V8 first. And now I've realized I sorta need that before I can get it running again, and don't have a pulley or a renix style compressor, but I have a few early 90s and late 90s compressors and brackets sitting around... obviously I need the early 90s bracket since the 96 and later belt tensioner/routing does not involve an idler pulley on that bracket.
Ken, you got it! Its all bolt on you will need a new belt, that is it! I used the AC system off of our wrecked 96 XJ and bolted it all in with new "O" rings, used the r12 condenser so i didn't pull the dash either. Charged it all up and it works like a charm.
The Gates belt is available at Oriellys, the part number is;K060962, its a 96 7/8" belt.
- Location
- Roanoke VA
You can see in this pic how the hoses route. I like the R134 hose routing way better than the R12/RENIX routing, it just looks cleaner. Another side note is that the RENIX AC brackets are no longer available. The mechanical fan pulley bearings are not serviceable on the old R12 brackets either, I've tried! The R134 compressor brackets should be everywhere and easy to find.

- Location
- Rainy side of Washington
Thanks! That's exactly what I needed to know. On my way to the parts store now, as a matter of fact.
Good to know R134a works just as well, did you change the dryer or the orifice at the evap inlet?
Good to know R134a works just as well, did you change the dryer or the orifice at the evap inlet?
- Location
- Roanoke VA
Thanks! That's exactly what I needed to know. On my way to the parts store now, as a matter of fact.
Good to know R134a works just as well, did you change the dryer or the orifice at the evap inlet?
I changed the dryer but not the orifice. No problems with it now 6 months later.
garr
NAXJA Forum User
- Location
- Nassau County NY
How about using Copper tubing, soldering the necessary fittings as required? The copper should hold up as well as the brass.
5-90
NAXJA Forum User
- Location
- Hammerspace
How about using Copper tubing, soldering the necessary fittings as required? The copper should hold up as well as the brass.
Copper's fine - I did the rest of my heater lines in copper - but I don't know how well the OP can do a sweat job. Ergo, threaded.
But yeah, copper's just fine.
Similar threads
- Locked
- Replies
- 0
- Views
- 723