• Welcome to the new NAXJA Forum! If your password does not work, please use "Forgot your password?" link on the log-in page. Please feel free to reach out to [email protected] if we can provide any assistance.

Project 2000 XJ (Daily Driver)

After installing the Fumoto drain valve on my Dodge diesel (14 quart system), I wanted one for my other vehicles. They are simple to use, eliminate messes, and reduces the amount of time to change oil. I bought the valves with the nipples so I can attach a hose. The adjustable valve and hose makes it easy to fill bottles of any size. In all honesty, the valve will probably pay for itself with all the cat litter and paper towels that you would use to clean up your oil mess.
ROTFL.gif


F101N: Nipple Type Oil Drain
$26.95

5/8" Safety Clip
$1.00

3/8" ID x 3FT Clear Vinyl Tubing
$3.00

valveanimation.gif


33846874237_large.jpg
 
Distilled water, Amsoil Engine Coolant, and Amsoil Coolant Boost will be going in the new cooling system.

33846874235_large.jpg


33846874236_large.jpg
 
The 4" lift and built-in bumper hitch receiver has created a need for a longer drop down ball mount. I found a really good deal on a Reese 11" inch drop with a 5,000lb rating.

31489304066_large.jpg


Reese 2” chrome ball
1” shank diameter and 2” shank length
Rated for 6,000 lbs tow capacity.

31489304072_large.jpg


31489304073_large.jpg
 
Electrical Upgrade
I’m going to change out my electrical wiring for 1AWG, part # 2XJ-242-ANL-150(4) - which is the full kit and fuse setup. Eventually, I will upgrade to the Durango/Dakota/WJ/ZJ V8 upgrade (136A) Alternator.
Here’s the final product before it goes on the Jeep.

2XJ-242-ANL-150 (1 AWG, 150A fuse kit)
Cost: $207.00

CLAMP-B1 (Marine Brass Battery Clamps)
Cost: $7.50

“All the wiring is 1AWG welding cable with fine strands for flexibility and increased current-carrying capacity. All connections are pressure-crimped, packed with corrosion inhibitor, and sealed twice - first with vinyl terminal tape, then with polyolefin heat shrink tubing. This makes a connection that should never be contaminated or work loose over the life of the vehicle.”

Technical: http://www.kelleyswip.com/electric.html
Pricing: http://www.kelleyswip.com/price.html

The parts have arrived. I'm now waiting for the headlamps, bulbs, and wiring harness. It’s easier to get everything installed at one time, especially when the radiator is out.

33846874214_large.jpg


33846874215_large.jpg


33846874216_large.jpg
 
We were up on the mountain yesterday when the front passenger window dropped. I thought about buying the window regulator repair kit from Steiger, but for a few bucks more, I could order a new regulator and motor from eBay for $59.95 and free shipping.

97-01 Jeep Cherokee Power Window Regulator w/Motor Front RH Passenger Side

Specifications:
RH (Passenger Side) Front Door
Upgrade Design (The regulator has been redesigned to reduce binding)
OE replacement (No modification required)
Replaces dealer part numbers 55154958AH, 55154958AI

For those who are just interested in the window regulator repair kit, click on the link below:
http://www.steigerperformance.com/products/sp12001.html

33846874247_large.jpg


33846874246_large.jpg
 
The new window regulator/motor kit is now installed and works good! While the price was good, I went ahead and ordered one for the driver’s side. I wont replace it until it needs to be replaced, but at least I have the part on hand.

97-01 Jeep Cherokee Power Window Regulator w/Motor, Front LH Driver Side

Specifications:
LH (Driver Side) Front Door
Upgrade Design (The regulator has been redesigned to reduce binding)
OE replacement (No modification required)
Replaces dealer part numbers 55154959AH


33846874251_large.jpg
 
I’ve been researching headers for the past year or so. My 2000 XJ came with the OE cast iron exhaust manifold, which are actually very durable. I’m fairly confident that I can get many more miles out of my factory manifold; however, I would like to increase the efficiency of the exhaust flow. Theoretically, a high flow header should decrease engine temps, decrease under hood temps, increase horsepower, and increase fuel economy. There are several aftermarket companies who manufacture headers for the 4.0L, but I have narrowed my choice to one manufacturer.
 
I lost somewhere between 1/2" inch to 3/4" inch in the rear and I didn't lose anything in the front. I plan to order the JKS greasable shackles which should provide me with an additional 1" inch of lift. Here's where she sets right now.

33846874113_large.jpg


33846874126_large.jpg

After several months of towing and flexing the Jeep, there hasn’t been anymore settling. So I figured it was time to order the shackles.

JKS shackles
* Specifically designed for the Cherokee.
* Specifically designed to optimize rear suspension travel (The extended length and boomerang design allows full compression and extension of the leaf springs)
* Increases rear ride height by approximately 1” inch
* Rigid one-piece construction prevents premature bushing fatigue, a common problem on Jeep Cherokees with inferior shackle designs.
* Greasable Dura-Thane™ bushings and hardware are included for the chassis end of each XJ Shackle for smooth, quiet operation and easy lubrication.
* A durable powdercoat finish is applied for corrosion resistance.

33846874250_large.jpg


33846874249_large.jpg


33846874248_large.jpg
 
Overtime, there can be a lot of gunk buildup in the cooling system. There are many factors that can contribute to gunk buildup, but I’ll save that for another discussion. Since I’m rather proactive about maintenance, I wanted to install a coolant by-pass filter before installing the new radiator.

There are several universal coolant filter heads to choose from with various inlet/outlet configurations and bracket options. Unsure where I will choose as my final mounting location, I went ahead and decided to go with the WIX filter head and a cheap WIX coolant filter. You get what you pay for, and WIX is not the most transparent company. I asked WIX what their micron rating was, and they said, “27 micron.” I’m fairly sure that their filter isn’t rated at 27um (absolute). I then asked WIX what their coolant filter flowed (gallons per minute) and they said, “flow varies, the filter is designed to only accept about 10% of the fluid.” I find it frustrating when a company doesn’t make their data known and they can‘t answer specific questions.

The Baldwin coolant filter B5134 is rated at 45um absolute at 100% efficiency and 20um absolute at 50% efficiency. So when WIX says that their filter is rated at 27 micron, I really wanted to know at what efficiency.
banghead.gif
Unfortunately, WIX didn’t have an answer for me. Anyway, I decided to go with the WIX filter for test fitting purposes and to do an initial cleanup. I’ll eventually replace the WIX with a Donaldson ECF4085 coolant filter that is rated at 14um absolute. The Donaldson filter media is top quality and interval changes are rated at 150,000 miles, 4,000 hours, or 1 year; whichever comes first.


WIX Filter Head, Part# 33109
Spin-On Conversion Kit
Universal Mounting Base
11/16-16 Threaded Base Stud
3/8 NPT fittings

33846874254_large.jpg


WIX/NAPA Coolant Filter, Part# 24070
Rated at 27 micron (efficiency is unknown)

33846874252_large.jpg


33846874253_large.jpg
 
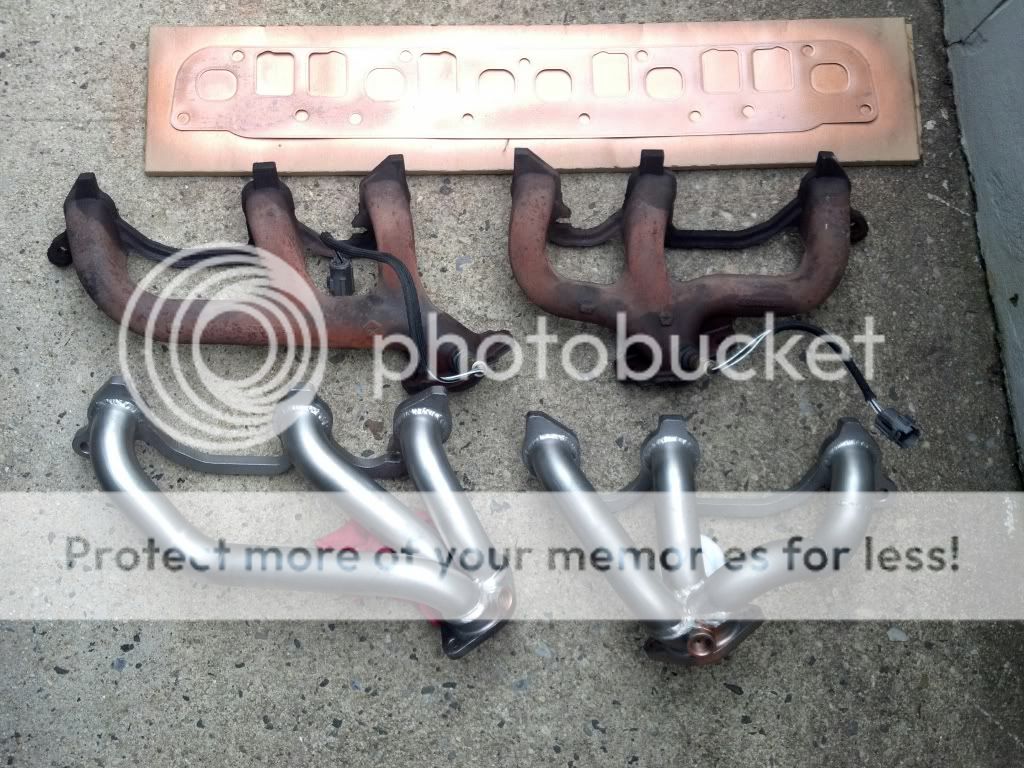
I’ve been researching headers for the past year or so. My 2000 XJ came with the OE cast iron exhaust manifold, which are actually very durable. I’m fairly confident that I can get many more miles out of my factory manifold; however, I would like to increase the efficiency of the exhaust flow. Theoretically, a high flow header should decrease engine temps, decrease under hood temps, increase horsepower, and increase fuel economy. There are several aftermarket companies who manufacture headers for the 4.0L, but I have narrowed my choice to one manufacturer.

The stainless steel Borla Headers came in.

39812784096_large.jpg


39812784095_large.jpg


39812784094_large.jpg


39812784093_large.jpg


39812784091_large.jpg


39812784090_large.jpg


39812784092_large.jpg


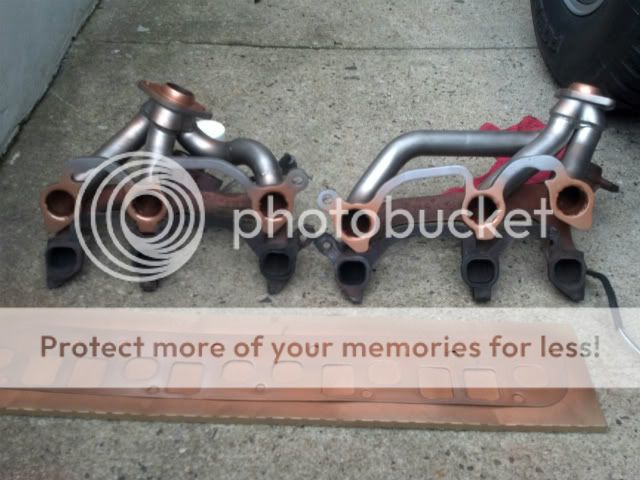
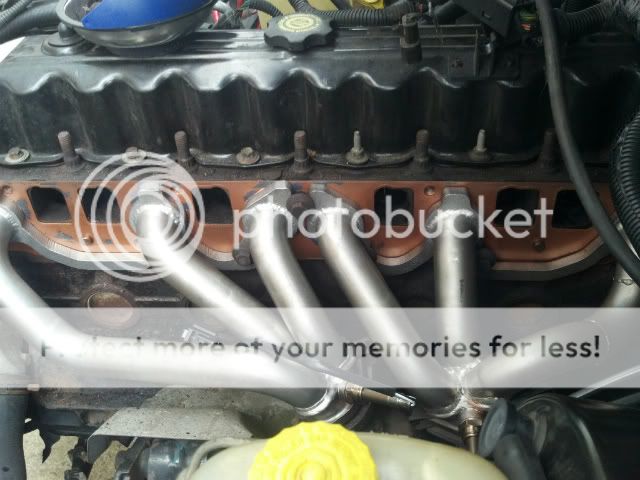
The photos below are not mine, I stole them from USMCGunrock. He put these headers on his 2000 XJ. Here's what they look like compared to the OE cast iron manifold. As you can see, there is a vast improvement over the stock headers.


2012-03-04-13-20-40-272.jpg


2012-03-04-13-22-01-244-1.jpg


2012-03-04-14-20-12-228-1.jpg
 
Last edited:
I’ve been looking at new pre-catalytic converters. There’s one company that stands out above the rest. Catco makes stainless steel converters that flow better than the OE converters. According to Cato, “The reason is because the 2200 series uses a metallic substrate as opposed to the ceramic type used in the OEM on your vehicle. The wall thickness is thinner on the metallic 2200 converter then on the OEM converter. This thickness affects how the exhaust gas flows through the converter. Also the 2200 uses a 200 cells per square inch substrate as opposed to the 400 cell used in the OEM cat. Again this would cause the exhaust gas to flow faster through the 2200 cat.”

My XJ has nearly 180,000 miles on it and the factory exhaust is 10 years old. I wonder what the condition of my OE cats are? I’ve heard that a clogged cat can be restrictive enough to produce enough heat to cause vapor lock and throw cylinder miss-fire codes. I really don’t have a clue. I know more about diesel engines than I do gasoline engines. Due to soot and unburned diesel fuel, a diesel engine can most certainly clog a cat. I don’t know how susceptible a gasoline engine is to clogging a cat?
 
The injectors came in yesterday. I went with some used Chrysler 007 injectors from the 3.3L Dodge/Chrysler mini-vans. They are newer 4-port (lower mileage) injectors that replaced the 784’s after 2001. They flow the same fuel per minute as the stock Cherokee injectors. I paid $70 dollars for cleaned reverse flushed injectors. They have been electronically tested two ways and have new o-rings and new micro-filters. I’m hoping that the better atomization will increase power and fuel efficiency.

33846874257_large.jpg
 
I pulled an oil sample just to see how the cold weather startups impacted the fuel dilution. I drive one mile to work, 1 mile home for lunch, 1 mile back to work, and 1 mile home to end the day every Monday - Friday. The engine doesn’t get to hit operating temperatures very often, which I know is causing fuel dilution.

These short trips are a lot of wear and tear on the engine, but that’s why I bought this Jeep. I wanted to take the wear and tear off our nicer vehicles and put the wear and tear on something that was more utilitarian and work related. And besides commuting to work every day, I use the Jeep for off-roading and towing loads of brush, firewood, etc.

Anyway, here’s my results:

Amsoil Oil Filter
Amsoil 10W30 OE oil

Oil sample duration:
5 months on lube
924 miles on lube
179,846 on engine

Iron 11
Chromium 0
Nickel 0
Aluminum 2
Copper 2
Lead 0
Tin 0
Cadmium 0
Silver 0
Vanadium 0
Silicon 26
Sodium 7
Potassium 4
Titanium 0
Molybdenum 82
Antimony 0
Manganese 0
Lithium 0
Boron 176
Magnesium 12
Calcium 1240
Barium 0
Phosphorous 703
Zinc 754

Fuel Dilution % vol 2.6 - GC
Viscosity 100*C 9.1

Oil Analyzers Recommendation: FUEL DILUTION is at a MODERATE LEVEL; FUEL DILUTION has caused viscosity to decrease slightly below grade; Abrasives (silicon/dirt) are at a MINOR LEVEL; Oil is suitable for continued use. Resample in 3,500 miles or 65 hours.

Even though my oil appears to be good for continued use, I’m going to go ahead and change it. I got 5 months of hard driving out of it, so I’m happy.
 
I’m in the market for brakes, rotors, and a brake rebuild kit, if there is such a thing. With 180,000 miles on my Jeep, I think it’s time for new brake hardware.

I decided on my front pads, rotors and calipers.

http://www.blackmagicbrakes.com/
XJ 4WD 00-01 Front Black Magic Brake Pad, Calipers, Rotors
KIT: Jeep XJ 4WD 2000 – 2001
Cost: $290

Includes parts for both Passenger and Driver sides
•Front - Black Magic Brake Pads
•Front - Stock Replacement Premium Zinc Plated Calipers
•Front - Centric Premium Rotors
 

I finally got around to having the wiring upgrade installed. Overall, this kit is top quality. A few of the cables were much longer than the OE cables. I’m not sure why they were so long since the extra length certainly isn’t needed. I suppose the extra length creates more flexibility for custom routing.

33846874258_large.jpg
 
I finally made a decision on where to put the coolant filter. I narrowed it down to three different locations with all but one requiring a custom bracket. After consulting with a local mechanic, we decided to put the coolant filter down on the front frame rail which was the location that didn’t require fabricating a bracket. It’s the lowest point in the cooling system which is actually recommended by the manufacturer. I’m really happy with the install location, the ease of maintenance, and most of all, the added protection and cooling it will offer. I need to figure out a shutoff valve system so I can change the filter without losing lots of coolant. Anyway, the install will begin tomorrow as well as the radiator and triple fan kit, transmission cooler, and magnefine in-line transmission filter. It will probably take a few days to complete this project since I'm not sure what extra parts we'll need and/or problems that we'll run into.
 
DAY 1

There isn’t a lot of customization involved with this install, however, there’s enough busyness going on to make us stop and think each process through. I’m a detailed oriented person, so I look at every way possible to make things better.

As you’ve seen by my previous photos, this is a well-built radiator, arguably the best quality and most efficient radiator for the Jeep Cherokee. It’s obvious that FF Dynamics put a lot of time and effort into this kit. The attention to detail is second to none and they offer a lifetime warranty if you have it installed by one of their dealers.

With that being said, I did find through my research some debate to whether or not the fan controller (that comes supplied with the kit) can handle the draw of all three fans simultaneously. According to the manufacturer, the fans have a low amp draw of 5 amps per fan at full speed, but that doesn’t account for the initial draw. One remedy to ensure the draw is to use a 75 amp relay to supply the fans. In other words, the advice that was given to me is the advice that I’m posting here, and that is to use the controller to trigger at least a 50 amp relay to supply the fans. Otherwise, the fans might not pull as much air as they should due to a lack of current.

Even though the controller comes with a 30 amp fuse, that may not be enough protection. If the 30 amp fuse blows, then I have no fans. Since I no longer have the mechanical fan, blowing the fuse is one risk that I don’t want to take. For this reason, I decided to use one 30 amp relay and 30 amp fuse for each fan. The fans will be triggered by one lead from the fan controller.

Okay, so on to the install. The radiator and electric fan kit was installed without any problems.

39812784100_large.jpg


Instead of using the OE transmission hardline to connect to the radiator, we plumbed the aftermarket transmission cooler to the radiator’s upper transmission outlet.

39812784099_large.jpg


The transmission will now flow through the radiator cooler to the external cooler and back to the transmission return line. After leaving the external coolant filter, the line is tucked behind the front bumper and is plumbed to the transmission filter. Not only is the filter in a safe place, but it’s going to be very easy to service.

39812784097_large.jpg


39812784098_large.jpg


33846874264_large.jpg


We ended the day by finding a mounting location for the controller.

33846874260_large.jpg


Here's the added relays for each fan.

33846874261_large.jpg
 
Day 2

Now that we have the radiator installed, there are some decisions that need to be made. First, I need to figure out what type of shutoff valve that I’m going to use to stop the flow to and from the coolant filter. The valves will make filter changes possible without drenching myself in coolant.

The second thing I need to consider is the mounting of the fan switch. I was pretty excited to see that I had a blank switch panel in the OE bezel. But, I also learned that the blank switch panel doesn’t contain the clips to hold the switch. That meant that I needed to find a 3 switch bezel. But to go one step further, I learned that the XJ also came with a 4 switch panel in the export market and in the police package. The fourth switch in the export market was for rear facing fog lights. The fourth switch in the police package was called an extended idle switch. “When you press the button it raises the idle RPM's to about 1000 rpm to provide better cooling and higher alternator amps for emergency lights.” I’ve been told that “the extended idle also raises your alternator speed, and increases coolant flow.” From my understanding, the extended idle switch and kit can still be bought.

After spending several hours researching and looking for switches and bezels, I ordered a 4 switch bezel and two OE switches.

While waiting on parts, we decided to install a magnefine filter for the power steering pump. While attempting the install, we broke off the hose fitting to the pump.
icon_mrgreen.gif
The original OE pump was 12+ years old with 180,000+ miles on it, so I can’t complain too much.
We got the new power steering pump on and installed a magnefine filter. Then we filled it with Amsoil Power Steering Fluid.

33846874270_large.jpg
 
Day 3

The coolant filter is installed and working properly. Initially I wanted to use a nicer ball valve without the handle, but since I was limited on time, I was able to test fit these valves without having to order them. We had plenty of room in the mounting location therefore the handles were not a concern.

Here's the inlet and outlet to and from the coolant filter

33846874267_large.jpg


33846874268_large.jpg


33846874269_large.jpg


33846874266_large.jpg


The coolant filter is tucked away behind the front bumper and protected by the radiator support and frame rail.

33846874265_large.jpg


33846874262_large.jpg


You can see both the transmission filter and coolant filter.

33846874263_large.jpg
 
Back
Top