• Welcome to the new NAXJA Forum! If your password does not work, please use "Forgot your password?" link on the log-in page. Please feel free to reach out to [email protected] if we can provide any assistance.

beater!

Been struggling with sporadic voltage for a little while then a few days ago it just dropped to 9 (luckily able to get home on battery power). After some looking and cleaning and replacing some parts, I finally took a look at the ANL fuse between the alternator and battery that I'd installed as part of the 5-90 wiring upgrade during the engine swap.

Blown_ANL_150.jpg


That's a 150 amp fuse. It was blown but was still making slight contact along the frags, which explains why the voltage was fluctuating.

They are hard to find, NAPA didn't have anything in their catalog and none of the others knew about them. Ended up buying a couple off the interwebs
 
I started work on the D30 today. Not a lot just taking a look at it and figuring out what I have to do. This thing is pretty rusty but it seems pretty sound overall.

Here's a pic of the thing soaking in PB Blaster for a while. The rust is flakey so I have to knock it off with something. I am really tempted to take it somewhere for sandblasting.

Nasty_Rust.sized.jpg


Make sure it's got 4.10 gears before I go any further... yep you can see the 4 right by the nut in the rust patch, and that's factory RTV so should be golden

410_Tag.sized.jpg


Diff fluid is dark but it's alright, somewhere between honey and syrup colored, and not a really bad stink on it.

Junkyard_Diff_Fluid.sized.jpg


I had stripped it most of the way at the shop, and today I got all the hardware off and the UCA bushings pressed out. I am letting it soak more and will remove the ball joints and swaybar pins next. The bolts all came out with just a bit of fight, and the rubber pieces are in pretty good shape (some dry rot but not too much). I expected to break a bunch of bolts and didn't. It looks pretty good underneath the flake rust hiding everything.
 
After I got some of the dirt off the axle I was able to look at it more closely. One thing I noticed is that the center is basically fine, then as you get further out it gets progressively worse. The center tubes still had paint, the mounts had some rust, and the knuckles were bad.

Housing.sized.jpg


Flaking_Paint_2.sized.jpg


The stuff that looks like flaking rust is actually paint that was chipped. In some places rust had formed under it.

Flaking_Paint_1.sized.jpg


So what I did was go at it with a flathead screwdriver and a mallet, knocking off whatever paint chips I could find, and periodically letting it soak in WD40 and/or PB Blaster to loosen the grime and rust. If a piece of paint didn't come free I left it alone on the theory that it wasn't doing any harm if it wasn't hiding rust. Once that was mostly done, I used a 3M paint and rust stripping wheel to get things smoothed out a bit, then used a stiff wire brush attachment to clean it up. It came out pretty good

Cleaned.sized.jpg


I've got it covered in primer now and will let it alone for another while

Primed.sized.jpg


Three out of the four ball-joints still have fully intact rubber grease boots and the fourth is only torn, so I am thinking that I will keep them installed for now and replace them as part of the WJ knuckle swap. I will pull the carrier and clean the tubes a bit, and replace the seals as part of that. I don't think I need to bother with the pinion seal but may do it at the same time anyway--much easier while it's all on the bench.
 
I had to go out of town for a few days but I got a couple of coats of paint on the axle before I left. I am leaving the cover unpainted and will do it when it's unbolted. The other spots are legitimate misses and will get extra attention when I flip it and repaint. I am using Rustoleum metallic as a base and Rustoleum semi-gloss as a top coat. The metallic stuff is stupid tough when it fully cures, and it dries to the touch stupid fast (like 5 min) so it's easy to recoat, but the metal flakes will rust if they are left exposed to the elements, so I treat it like a base coat and cover it with something else then it works the best. I should be able to get the next pass done in a couple of days, after the 4th.

Painted_1.sized.jpg


I also rebuilt a driveshaft that I had gotten for the SYE. This time Northern forgot to send me the low-profile zerk fittings so I had to track them down myself. They are sold by McMaster-Carr as item number 10595K14, $2.53 for a bag of 5 fittings.

5_153X_low_profile_Zerk.sized.jpg


I'm getting some noise from my jeep that sounds like gravel in a blender, and I'm pretty sure it's the transfer case chain since it started right after I did the SYE and leaked out all the fluid. So I need to get the parts together for a rebuild of the 242.
 
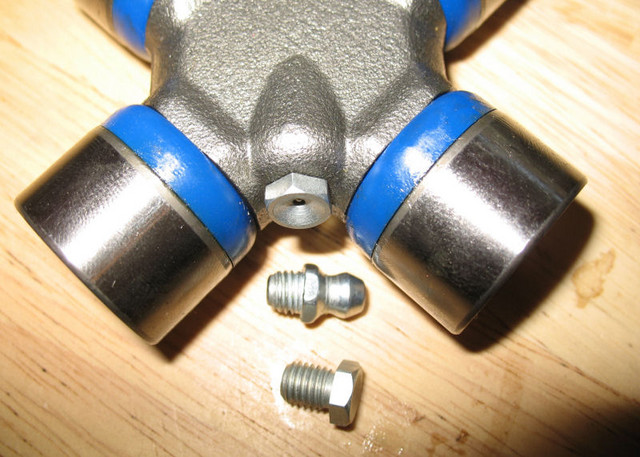
I got some more paint on the axle and did a little more work on the exterior. One thing I've long wanted is to drill and tap the coil pads so that I can bolt hockey pucks in place, and I got that done with some 8mm button head screws that I had laying around.

Puck_Bolts.sized.jpg


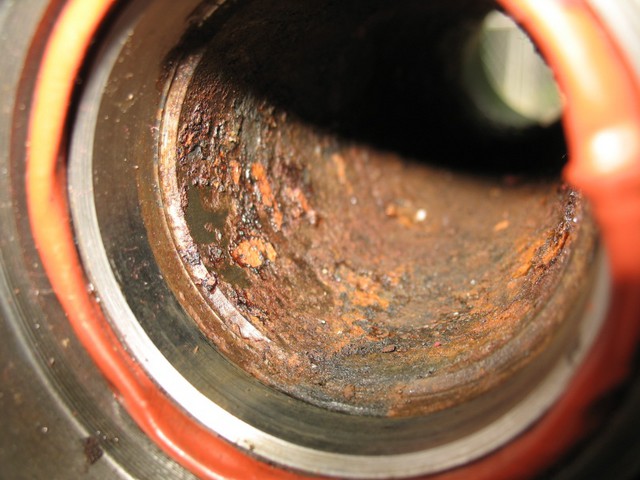
Today I got inside the axle. The differential itself looks pretty good, and the gears turn quiet with no clacking or anything. The only odd thing is that the axle looks like its off-centered a bit--the bearing on the left side of the pic has more exposed surface area, but the axle shaft on the right side has deeper insertion.

Off_Centered_Diff.sized.jpg


I didn't see any shims anywhere. I didn't remove the bearings so I assume they are behind those. Another thing I noticed was that there was some funk on the left (short) side of the differential but everything still looked alright. Everything hosed down with brake cleaner alright, and there weren't any bad noises

Dirty_Differential.sized.jpg


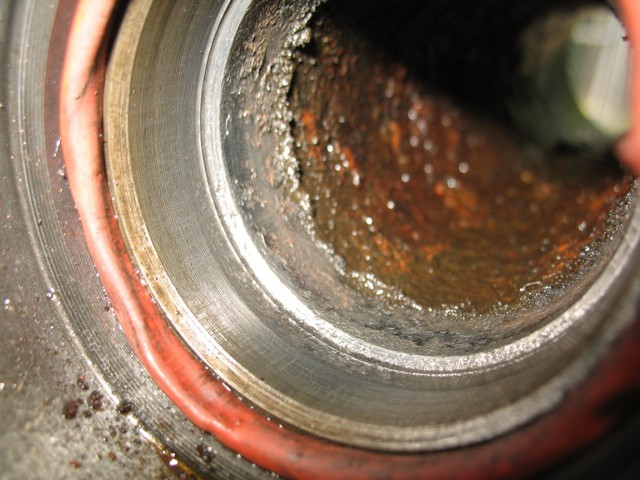
The right (long) side of the axle was pristine, but the left (short) side had a lot of corrosion build up

Right_Shaft_Clean.sized.jpg


Left_Shaft_Corrosion.sized.jpg


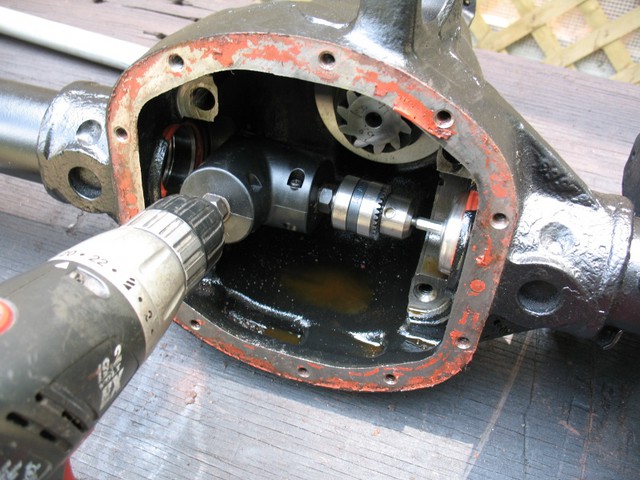
The corrosion was into the area where the seal sits, and had managed to work its way under the seal and also into the seal opening, so I had to clean this area before I could install the new seals. What I finally settled on was using a 90-degree attachment on the handheld drill with a wire brush. This worked really well and got the seal surface really clean. I wish I was able to run the wire brush all the way down the shaft but unfortunately I don't have an extender that will work, so I had to settle for rags and brake cleaner on the rest of it.

Left_Shaft_Drill_90.sized.jpg


Left_Shaft_Cleaned.sized.jpg


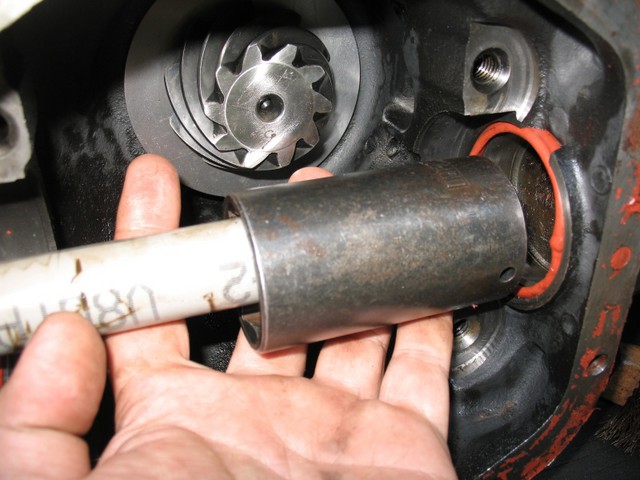
For the new seals, I had ordered a couple from Morris 4x4, which were like $3 each for Crown. One of them was damaged so I had to fish around locally, and eventually found some National 710068 axle shaft seals at Advance. A nearby Autozone had Timken 710068 seals too. These are all basically the same seal, like this Timken, with a curved lip to help guide the shaft into the differential and protect the seal rubber.

3068af2d.jpg


Some PVC conduit that was laying around worked as a rod, and a deep-well 36mm hub nut socket worked as an anvil. The conduit fit through the seal so I was able to use the same tool for both sides.

PCV_36MM_Tool.sized.jpg


Everything went back together alright. I won't know until the differ cover is painted and dry if the installation was successful but at least I know what to do now.

I have decided to leave the current ball joints installed for now since they seem to be nice and tight (good preload) with no wobble. I have a pinion seal but haven't decided what to do with it--from what I have read they are easy to swap on the HP30 so I will do some more research and will probably swap it.

Other than that I am waiting for UCA bushings to show up and then I can swap the axle.

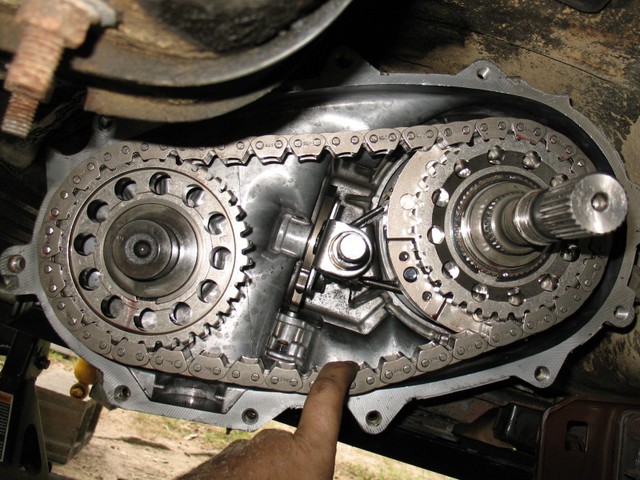
My transfer case noise seems to be the chain dragging. I have ordered a new Cloyes chain from rockauto and will install that at the same time as the axle swap probably.
 
I got the old axle off of the jeep today and did some more prep work. For the axle itself, I ordered some of the Alloy tube seals and I got those installed. Here is a pic of the new style seals with the ribbing for her pleasure.

Alloy_Seals.sized.jpg


The instructions say to coat the rubberized part with RTV and let it seal against the axle tube before using it, so that's what I did. While I was goofing with that I also replaced the plastic breather nipple with a brass adapter fitting, 1/8 NPT to barbed.

Alloy_Seals_Installed.sized.jpg


If I had ordered UCA bushings instead of LCA bushings I'd be done now... waiting for the UCA bushings to come in tomorrow :banghead:

While the axle was off I also knocked off another item on my long-term to-do list, which was to replace the welded jounce bumpstop cups with screw on cups from a TJ. The TJ cups and jounce bumpers are often listed as TJ and XJ but as you can see here the TJ stuff is much beefier. There is more of an aftermarket for the TJ bumps, and plus by switching to the screw-on cups I will have more options for extensions and whatnot.

Jounce_Cups_Compared.sized.jpg


Here's the stock in case you've forgotten what they look like

Jounce_Cup_Stock.sized.jpg


There is a little plate just below the welded line (about 1/4" down). It already has a hole that is the right size for a 10mm bolt, but it's not threaded.

Jounce_Cup_Plate.sized.jpg


Tapped the hole for 10mm, cleaned and painted and smoothed with RTV, and then install the bigger jounce cup and bumper

Jounce_Cup_Replaced.sized.jpg


Tomorrow I will install the new axle, and hopefully the transfer case chain too
 
I did the transfer case while waiting for the UCA bushings to show up. Disassembly of the 242 was pretty simple. I basically followed these two write-ups (go-jeep, mall-crawlin) to get the transfer case open while it was still on the jeep, then swapped out the chain. The old one was just starting to go bad and was only rubbing after it had warmed up, and as you can see it was only dragging a little bit

242_Chain_Stretched.sized.jpg


The new chain is much more snug. Interestingly the rear output shaft has also lost almost all of its in-and-out play, since the chain partly holds it in place with lateral tension. I used Right Stuff instead of silicon RTV and man that stuff is great... too bad it is $15 for a can or I would use it for everything all the time.

Once I got the UCA bushings for the axle, I was able to get it back together and mounted on the control arms pretty quickly, but its not back on its own weight just yet so I will have to finish and torque it down tomorrow. I am also hoping to fix some other stuff tomorrow while I've got the transfer case skid removed
 
D30 is installed and working. I need to paint my steering parts again

D30_Installed.sized.jpg


In all-wheel-drive, the front axle has a slight howl, which I assume is because of low usage on the drive side of the gears. Otherwise it feels predictable and works like it should.

No leaks under the axles or transfer case. This is the first time since I've owned it that it hasn't leaked from the transfer case. The Right Stuff works great

I've had a chirp noise forever, and it is still there. I was hoping it was pinion noise on the old axle. I regreased all of the driveshafts and axle shafts so it shouldn't be those. Maybe the input on the transfer case, or maybe a wheel hub :mad:
 
I've had a chirp noise forever, and it is still there. I was hoping it was pinion noise on the old axle. I regreased all of the driveshafts and axle shafts so it shouldn't be those. Maybe the input on the transfer case, or maybe a wheel hub :mad:

Did you drive it before you put the front driveshaft in? That chirp noise is very common. Its probably the cv ball/socket on either the front or rear driveshaft. If you have a needle grease fitting, try to get it up under the seal at the ball/socket on the driveshafts and get some grease in there. If you greased the cv at the normal grease fitting, it is likely that the grease didn't make it to the seal, and that is what makes the chirping.
 
In AWD (full time) there is/was a slight chirp that turns into a steady scraping noise (sounds kind of like the wear indicator on a brake pad). In 2WD, there isn't any chirping, but the scraping noise will still fade in on the highway then disappear when I slow down a little bit (always consistent behavior but not always the same speed).

It's not the driveshaft. I have rebuilt and fully greased both of them, and the scraping noise appears even with the front shaft removed.

The difference in the chirp is probably the drive vs coast side of things, such as an axle u-joint or hub bearing, or the front output shaft bearing on the transfer case. I was hoping it was the old D30 pinion.

The scraping noise could be a secondary thing entirely. The rotors have some rust around the outer ring and the pads could be making some contact, although I would expect to hear it in town too.

I am planning on doing the WJ knuckles at some point so hopefully the noises will go away when I replace the hubs and brakes for that.
 
I cleaned up the axle shafts from the junkyard axle best I could. They had the same corrosion pattern as the housing. First, soaked them overnight in PB Blaster to get the nasty loosened up.

Junkyard_Axle_Shafts_Rusted.sized.jpg


Knocked off the loose stuff, then separated the inners and outers to get inside. The c-clips wouldn't come off on one of the u-joint axis, so I had to cut the joint ears with an angle grinder

Junkyard_Axle_Shafts_Separated.sized.jpg


3M paint and rust stripping wheel, and a variety of wire brushes

Junkyard_Axle_Shafts_Brushed.sized.jpg


Finally gave them a coat of rust converter, then sanded and brushed that off

Junkyard_Axle_Shafts_Cleaned.sized.jpg


The pitting is a problem--the shafts are probably weakened, more rust will want to form up, and they would probably tear up any seals they rode on for very long. I'm going to put some cheap greasable Neapco joints in them and carry them for emergencies, and probably won't ask for them back.
 
I cleaned up the axle shafts from the junkyard axle best I could. [...] The pitting is a problem--the shafts are probably weakened, more rust will want to form up, and they would probably tear up any seals they rode on for very long. I'm going to put some cheap greasable Neapco joints in them and carry them for emergencies, and probably won't ask for them back.

A couple of weeks ago I got some more shafts from a local club guy and started working on those as spares. But after comparing them to the shafts that came out of the junkyard D30, I decided to keep and use the ones I already had since they were in better overall condition. However I did manage to pop open and regrease the hub bearings on the donor shafts, so now I have a full set of spares ready to install.

Salvaged_Hub_Bearings.sized.jpg


I swapped them into the axle today so that I could get the hub nut torqued down, and drove them around for a while. No problems with anything but I didn't run them for very long. The neapco u-joints suck so I am probably going to replace them at some point, dunno with what yet but probably some of the non-serviceable spicers.

The scraping noise is still there, so I know it's not the u-joints or hubs. I also pulled the dust shields off the disc brakes, and I know it's not those now too. The only remaining possibilities are the rotors or the 242 transfer case.
 
The scraping noise that was fading in and out seems to have been from the brake pads "singing" when they vibrate in the caliper at speed. The brakes work good, but the pads and calipers have some rust buildup (old parts that only see limited mileage per year). The pads don't seem to have any noise-reduction backing (or if they did have it at one point, it's just rust now), so the slight rust buildup was producing some scratching and scraping noise when the pads started to vibrate.

Disc_Brake_Rust.sized.jpg


I already had some Disc Brake Quiet in the workshop, so I removed and cleaned the pads, and sprayed the backs.

Disc_Brake_Quiet.sized.jpg


While that was drying I also cleaned the rust off the calipers, and lubricated the caliper pins and bolts again to make it easier for the pads to separate from the discs at speed. The scraping noise has not come back yet, so that problem seems to have been solved.

The chirping noise is still there. I need to do some more thinking but at this point I am going to assume that the pads and calipers and rotors all need to be replaced. Since I hope to do a WJ knuckle swap at some point I am wanting to defer any investments in brake parts, especially if it's just for noise (the brakes work fine).

The chirping noise may also be coming from the transfer case. I am getting some periodic binding and clacking with the 242, and I think the main shaft is sliding inside the clutch. I remember seeing a couple of grooves that looked like they should hold lock rings, but the FSM doesn't show anything there and the nearest I can find is spacers, but I'm not sure. I probably need to remove the 242 and do a bench diagnosis but am not in the mood for that right now.
 
Last edited:
Thought I posted a follow-up on the transfer case but obviously I didn't. The problem there was that the rear bearing housing was not installed flush to the rear case half. This allowed the rear bearing race to move a little bit, which in turn allowed the main shaft to slide back and forth a little bit too, which was enough for the teeth on the shaft to interference with the chain gear. Reseating the rear bearing housing solved that problem. Transfer case is quiet and is easier than ever to shift.

Today I replaced the power steering supply line since the old one was leaking a little at the joint. While I was doing that I also took the opportunity to drill out the adapter on the pump, aka redneck ram. The existing port was 1/8 so I bumped it up to 9/64. It makes a big difference when sitting still, makes no real difference driving down the road. Also the jeep is quieter because there's no air getting sucked into the fluid.

Otherwise things are slow and I'm working on other stuff. Might not be any more updates for a couple of months.
 
we've noted that several times in the last 27 pages... he hasn't done anything about it. :dunno:
 
Back
Top