Talyn
NAXJA Forum User
- Location
- Radford, Communistwealth of Virginia
Figured I would post a few other project I have been working on for the XJ.
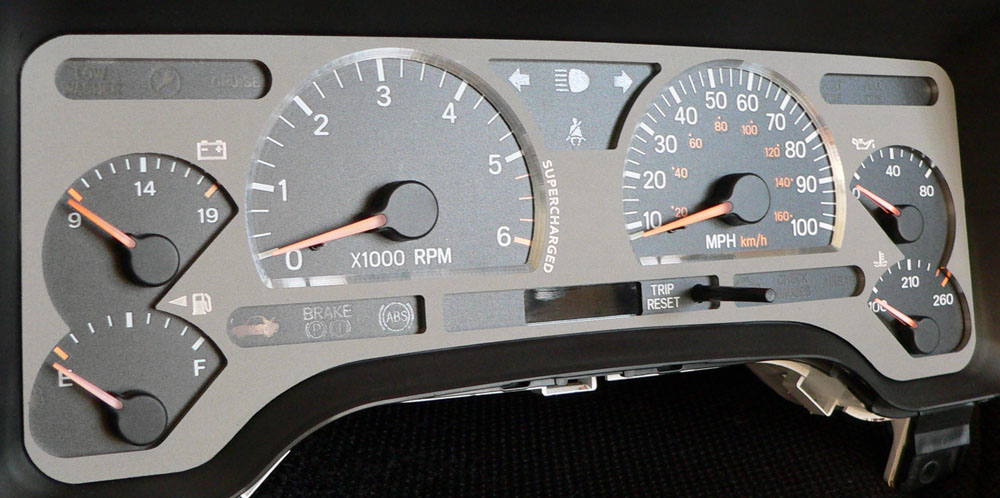
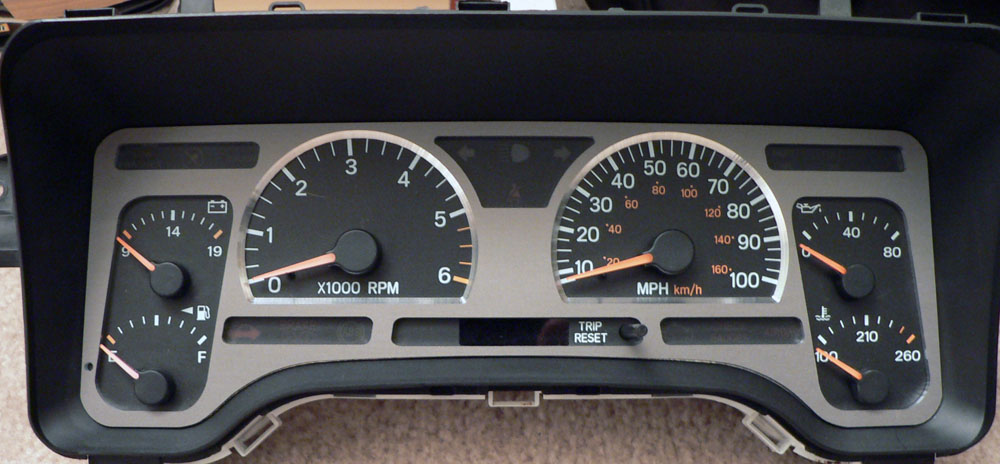
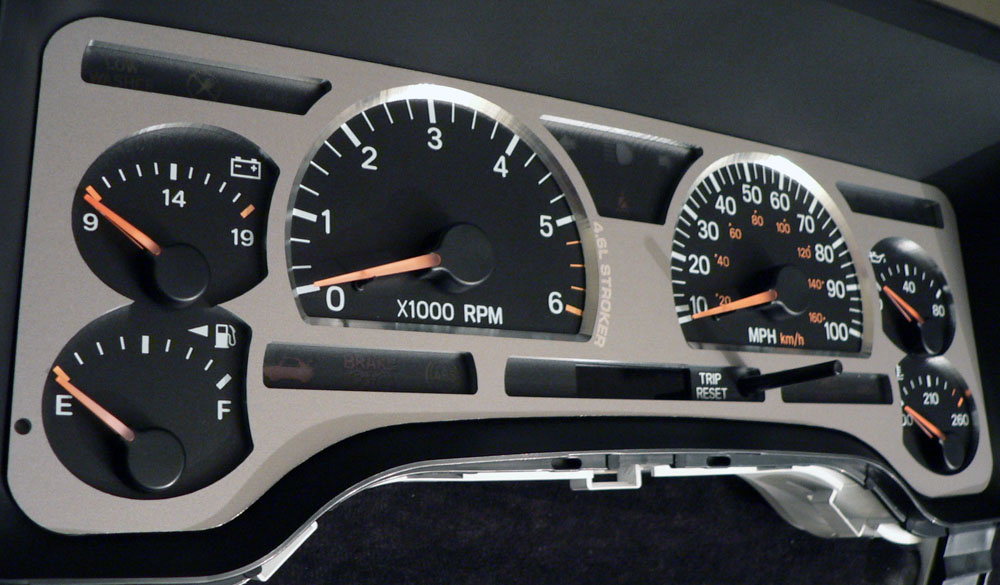
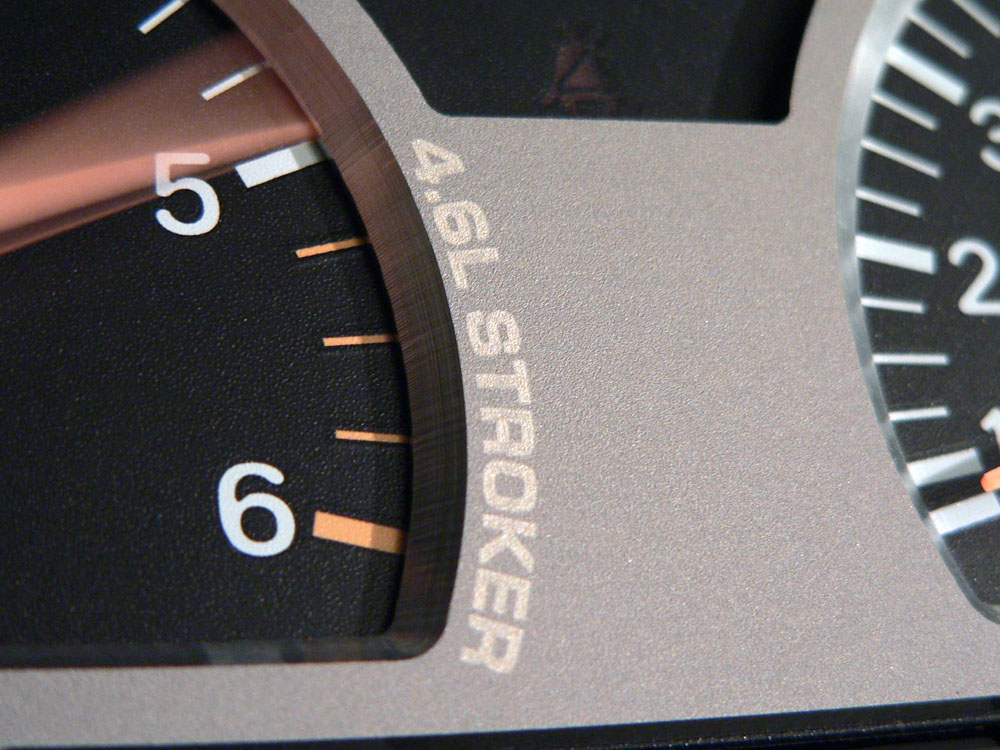
First I made a gauge bezel/overlay. I had been thinking about doing something like this for a while since I have access to a router at work. Previous I had one of the cheap stainless 2d ones found on ebay. The final nudge to get me going came from a friend in Canada. I purchased a gauge cluster for test fitting and scanned it in to my computer. From there I brought it into illustrator and drew the shapes needed. After several test cuts and alterations in Illustrator I came up with what you see below. It is 6061 T6 aluminum, sandblasted then hard anodized grey. The text and symbols were etched on the laser at work. The speedo and tach have 45* bevel and the other gauges are straight cut. 3 different designs were made. This project went well over a year in production. It is pure bling but it came out better than expected.
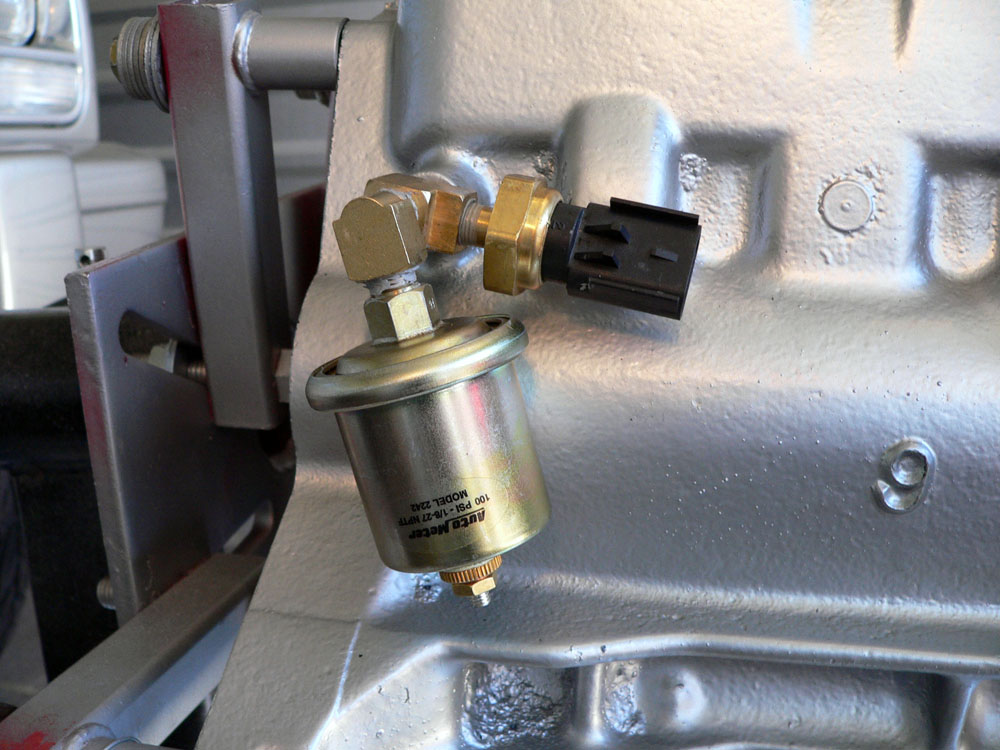
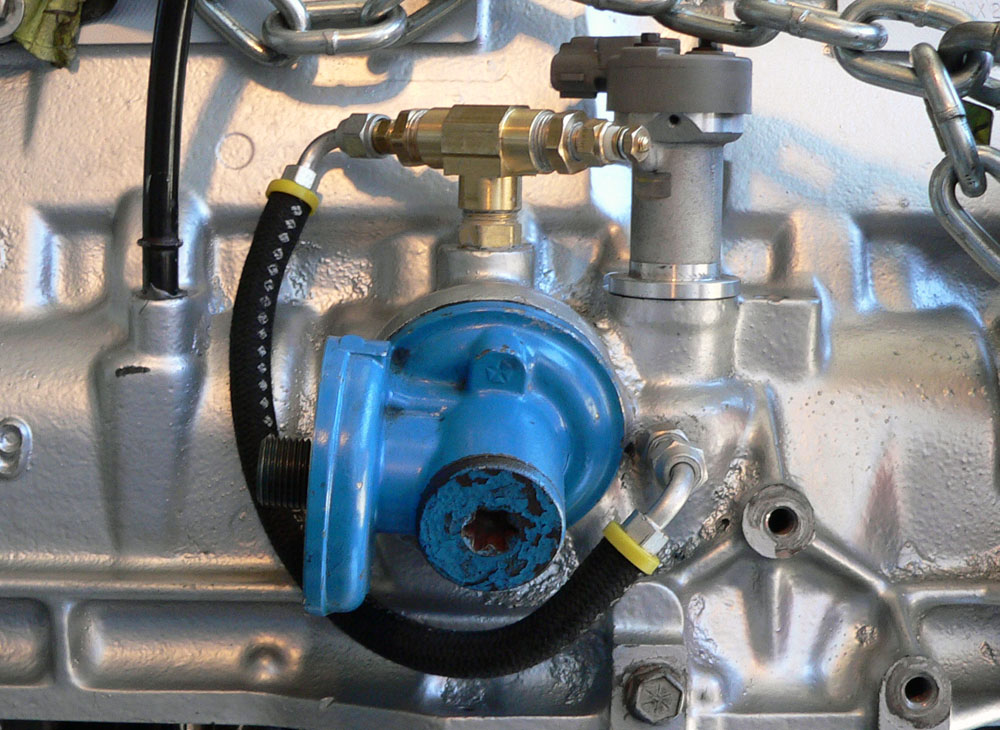
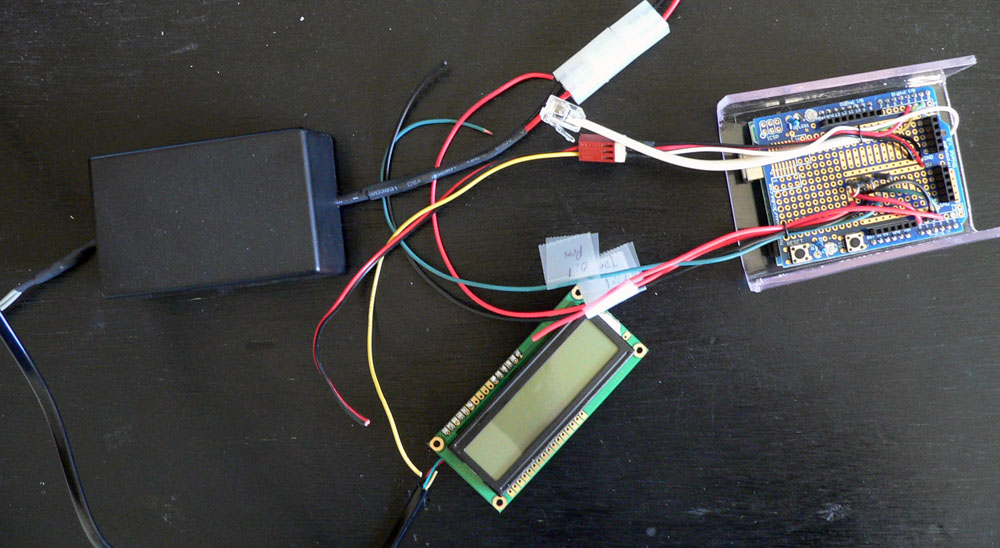
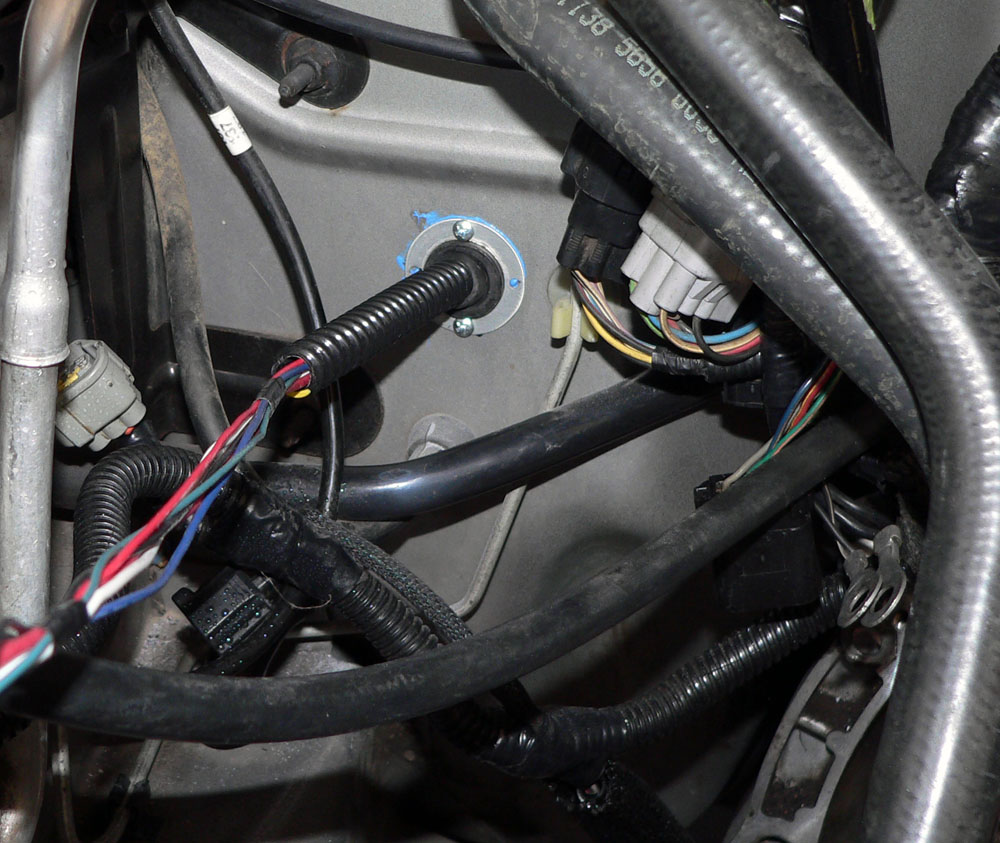
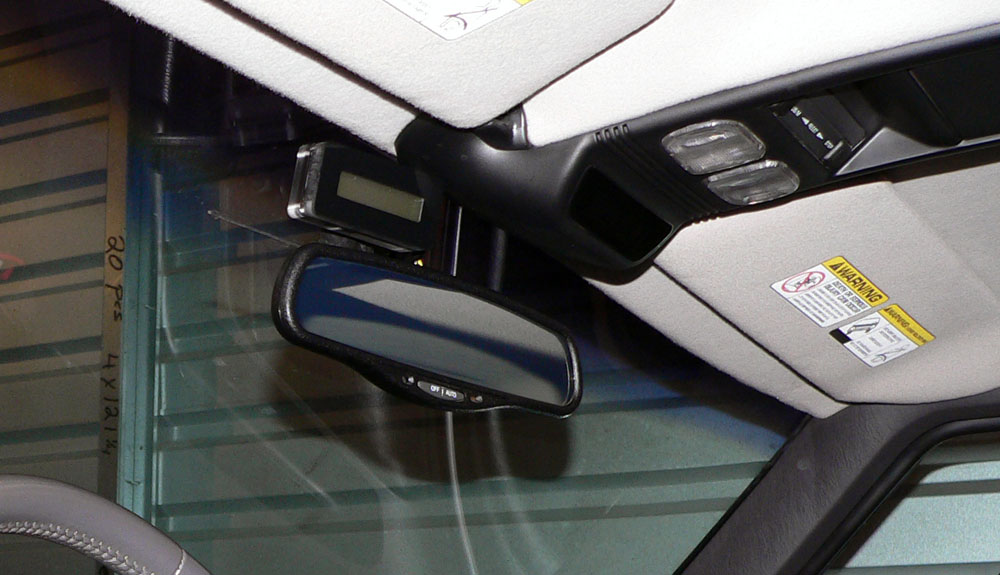
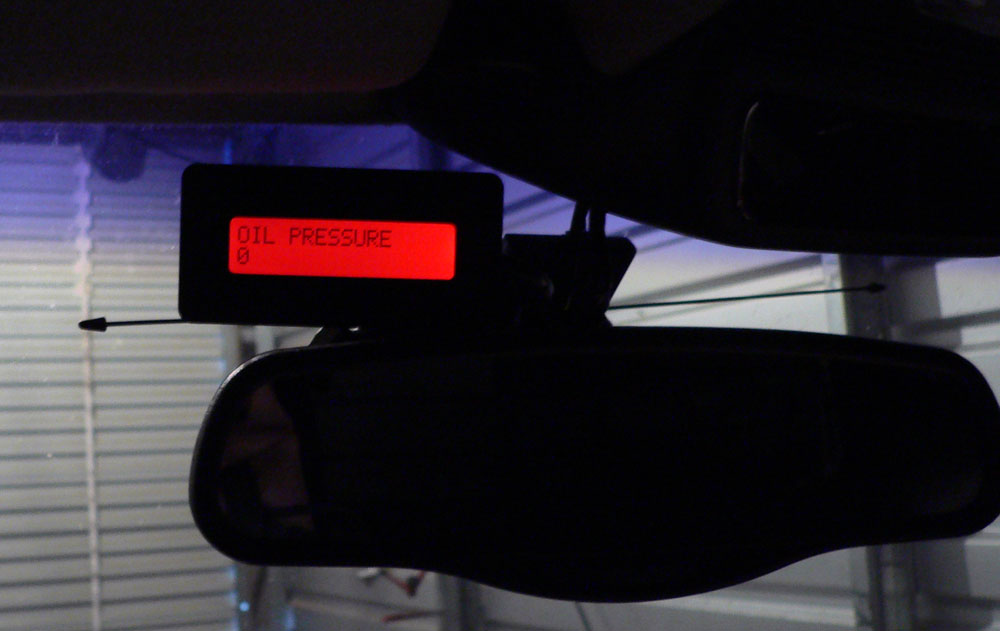
The second one I was working on is a multigauge. I wanted some extra gauges, but didn't see anything I liked. Just purchasing something would have been too expensive, too many and have taken up too much room. When you start adding crap to the interior you realize how limited the space you have to work with is. The gauge will display engine vacuum, oil pressure, oil temp, and transmission temp. I can also later add other sensors and features to it if I want to. It is based on an Arduino Duemilanove (http://arduino.cc/en/). The Duemilanove has 6 analog inputs and 14 digital input/outputs (http://arduino.cc/en/Main/ArduinoBoardDiecimila). It is programmed in C. Amazingly I actually remembered how to program in C. The display is a 16x2 trans-reflective LCD amber in color. It is encased in a 4 part plexi housing; clear back, clear mid section, black front with clear lens. The housing was also cut on the router. The Arduino and its power supply)it takes 7-12v for input) are mounted behind the glove box. For temperature I used ISSPro sensors, oil I used an Autometer sensor, and for vacuum I will tie into the factory MAP sensor. I normal operation it will display oil temp, oil pressure, transmission temp, and vacuum. Should the oil pressure drop too low, the oil temp get to high, or the transmission temp too high it will sound an alarm (really annoying) and display the out of spec parameter (which can be seen in the images). I used a RAM mount to attach it to the mirror arm. The oil pressure sensor is at the back of the block where the stock sensor has been relocated to. The oil temp sensor is placed after the oil filter where the stock oil pressure sensor use to be. The transmission temp sensor will be placed after the hot hard line and before the soft line for the cooler that I installed earlier.
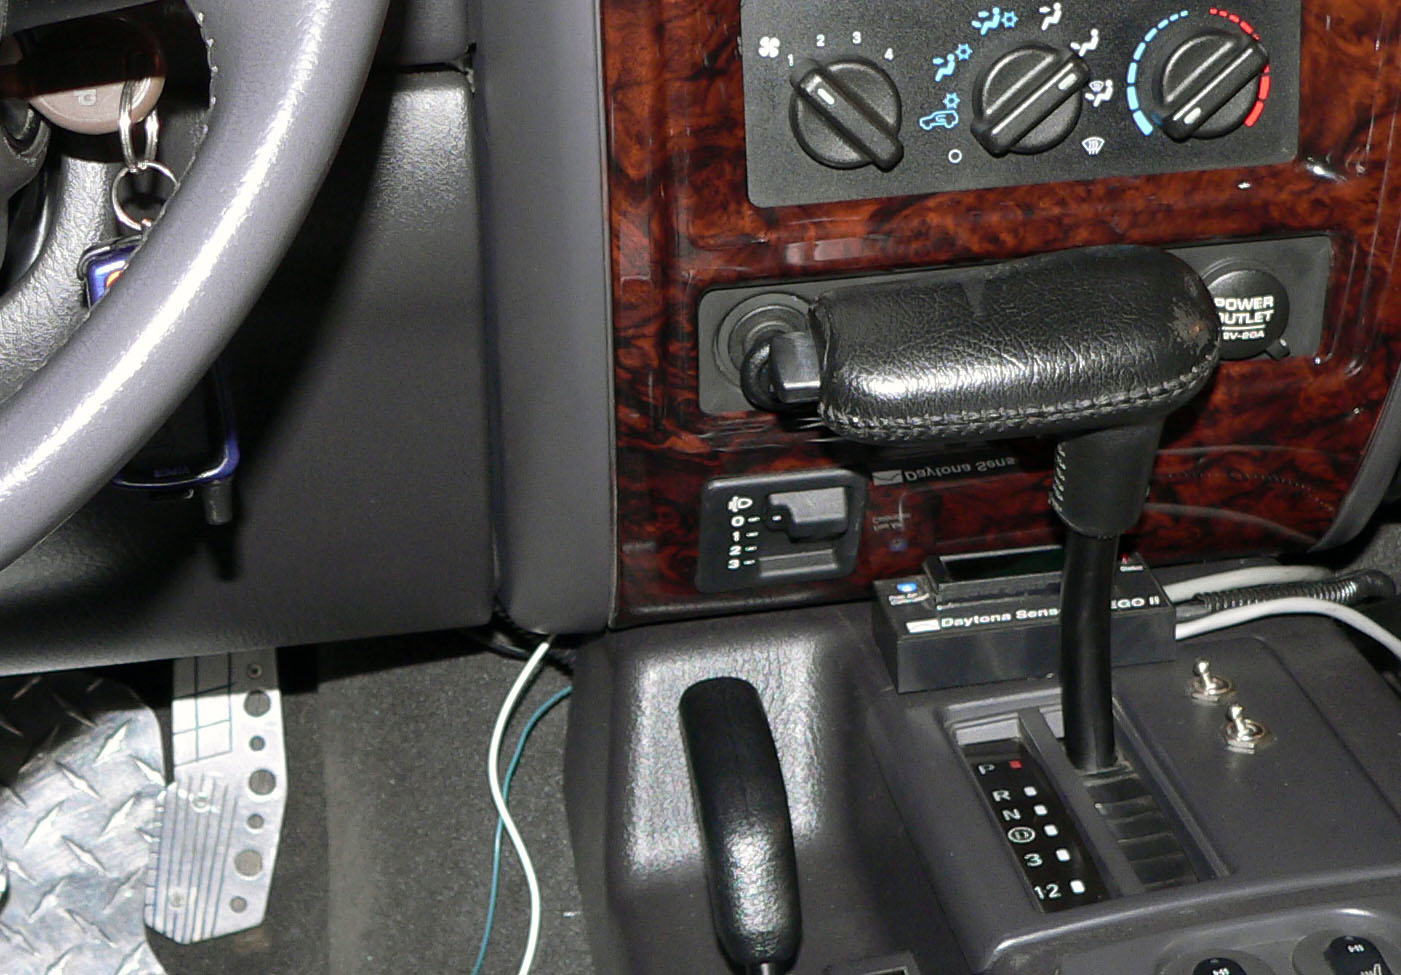
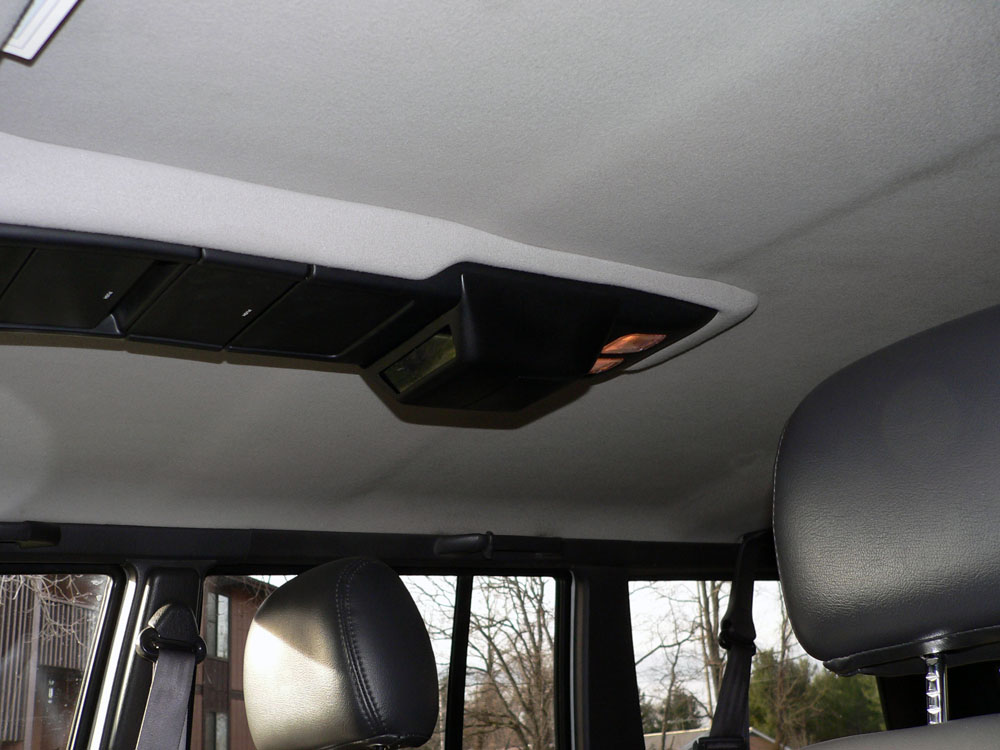
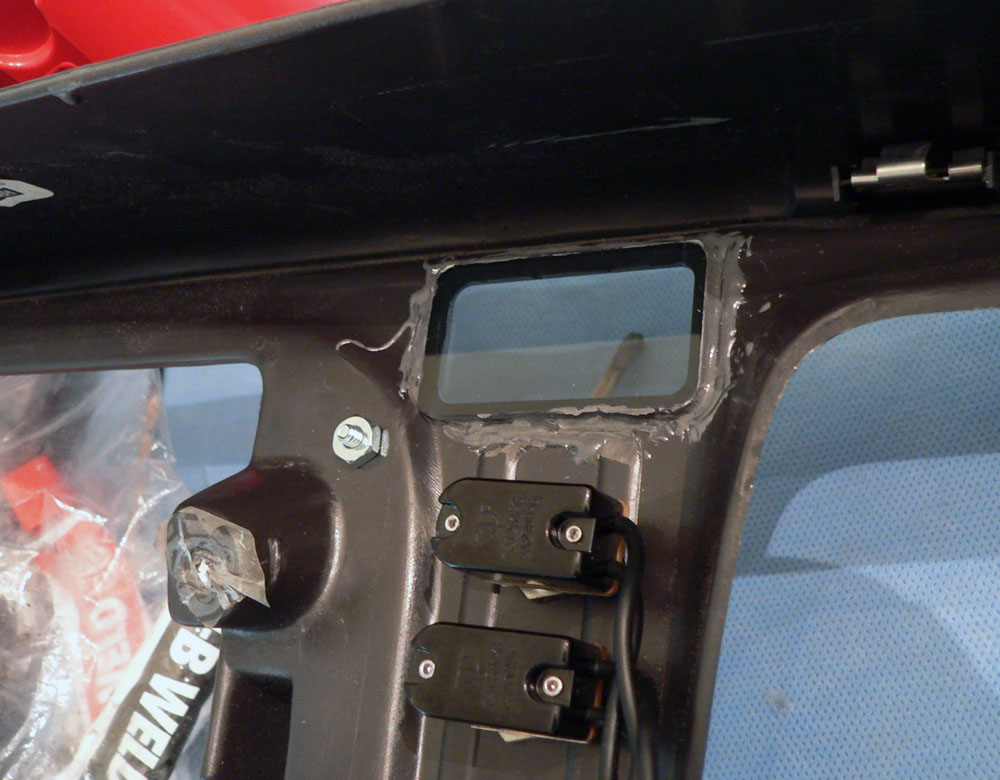
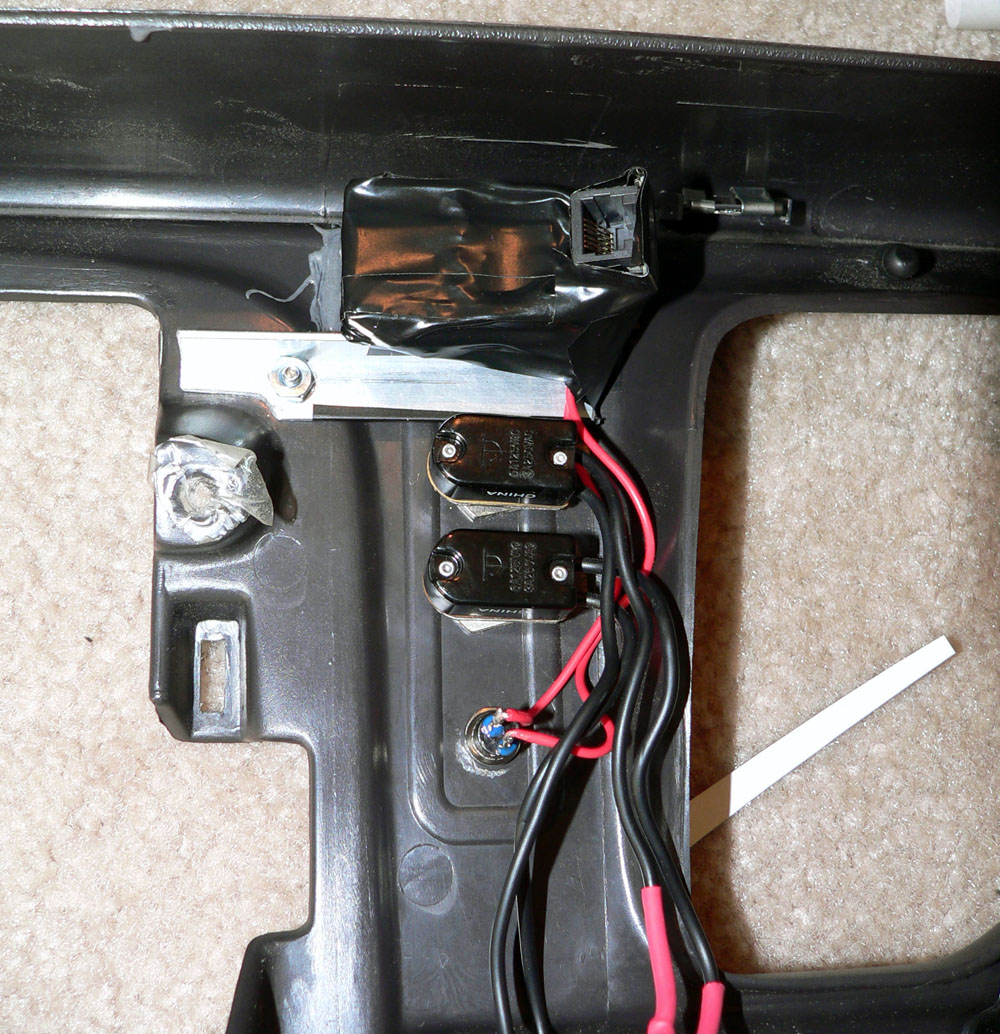
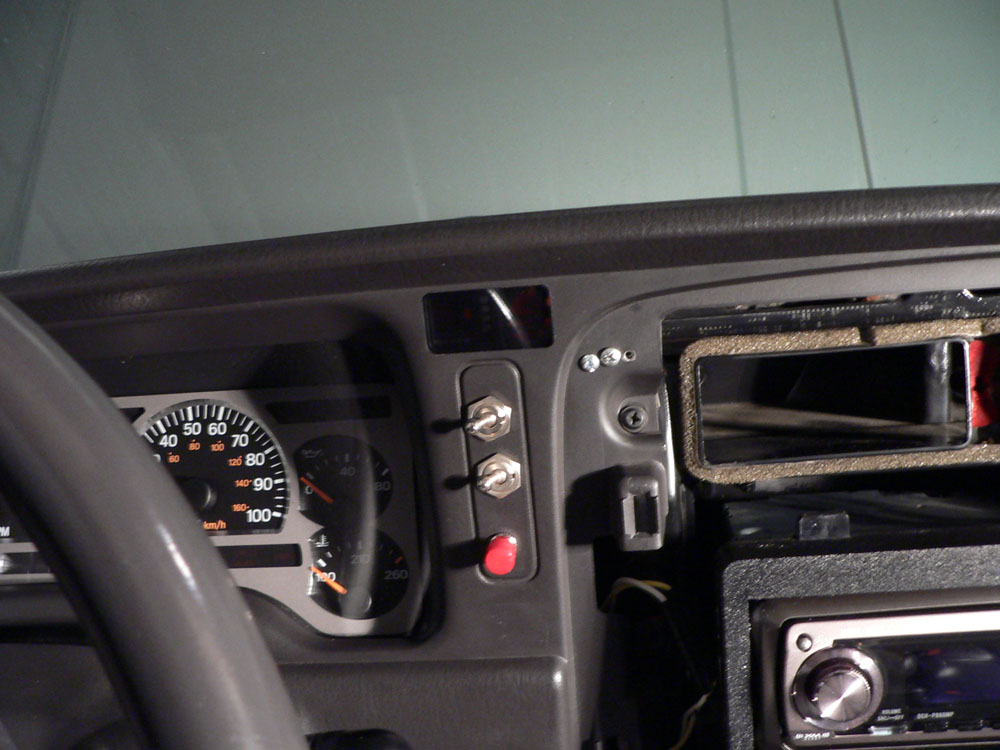
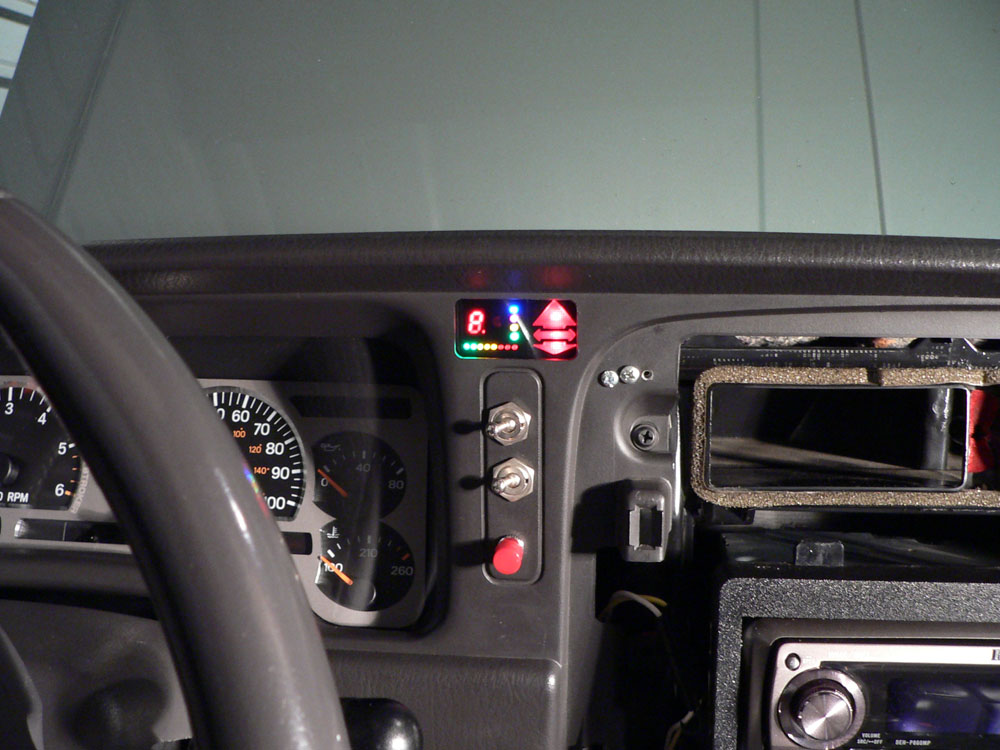
The last project is a more concealer radar detector. A few years ago I had made a concealed mount for my Valentine 1 on the over head console out of fiberglass, as seen below, and used its remote display mounted on the dash. I was unhappy with a) where the remote display was mounted (low right of the gauge cluster) and the fact that the Velcro that was holding it on kept falling off. I decided to mount it behind the dash it self. I used the router to cut a hole in the dash panel to the upper right of the gauge cluster then cut a lexan panel to fit flush in the hole in that hole. I also put some tint on the back of the lexan to disguise it further when off. The display was converted from all red leds to different color leds indication signal strength and the band. The mute/function button was installed on the dash below the toggle switch for the Lightforce lights I installed years ago. Now I have a completely concealer and out of the way radar detector.
First I made a gauge bezel/overlay. I had been thinking about doing something like this for a while since I have access to a router at work. Previous I had one of the cheap stainless 2d ones found on ebay. The final nudge to get me going came from a friend in Canada. I purchased a gauge cluster for test fitting and scanned it in to my computer. From there I brought it into illustrator and drew the shapes needed. After several test cuts and alterations in Illustrator I came up with what you see below. It is 6061 T6 aluminum, sandblasted then hard anodized grey. The text and symbols were etched on the laser at work. The speedo and tach have 45* bevel and the other gauges are straight cut. 3 different designs were made. This project went well over a year in production. It is pure bling but it came out better than expected.
The second one I was working on is a multigauge. I wanted some extra gauges, but didn't see anything I liked. Just purchasing something would have been too expensive, too many and have taken up too much room. When you start adding crap to the interior you realize how limited the space you have to work with is. The gauge will display engine vacuum, oil pressure, oil temp, and transmission temp. I can also later add other sensors and features to it if I want to. It is based on an Arduino Duemilanove (http://arduino.cc/en/). The Duemilanove has 6 analog inputs and 14 digital input/outputs (http://arduino.cc/en/Main/ArduinoBoardDiecimila). It is programmed in C. Amazingly I actually remembered how to program in C. The display is a 16x2 trans-reflective LCD amber in color. It is encased in a 4 part plexi housing; clear back, clear mid section, black front with clear lens. The housing was also cut on the router. The Arduino and its power supply)it takes 7-12v for input) are mounted behind the glove box. For temperature I used ISSPro sensors, oil I used an Autometer sensor, and for vacuum I will tie into the factory MAP sensor. I normal operation it will display oil temp, oil pressure, transmission temp, and vacuum. Should the oil pressure drop too low, the oil temp get to high, or the transmission temp too high it will sound an alarm (really annoying) and display the out of spec parameter (which can be seen in the images). I used a RAM mount to attach it to the mirror arm. The oil pressure sensor is at the back of the block where the stock sensor has been relocated to. The oil temp sensor is placed after the oil filter where the stock oil pressure sensor use to be. The transmission temp sensor will be placed after the hot hard line and before the soft line for the cooler that I installed earlier.
The last project is a more concealer radar detector. A few years ago I had made a concealed mount for my Valentine 1 on the over head console out of fiberglass, as seen below, and used its remote display mounted on the dash. I was unhappy with a) where the remote display was mounted (low right of the gauge cluster) and the fact that the Velcro that was holding it on kept falling off. I decided to mount it behind the dash it self. I used the router to cut a hole in the dash panel to the upper right of the gauge cluster then cut a lexan panel to fit flush in the hole in that hole. I also put some tint on the back of the lexan to disguise it further when off. The display was converted from all red leds to different color leds indication signal strength and the band. The mute/function button was installed on the dash below the toggle switch for the Lightforce lights I installed years ago. Now I have a completely concealer and out of the way radar detector.