- Location
- San Diego
no problem! :cheers:
Yes it does, the best way to do it is to build a jig, and bolt it down as you do. Or you can send it to an axle shop, and have them pre-bend it, like currie. Then once you weld your truss on, it'll be straight.Don't welding on something all on one side like that make the item pull or bow that direction as the welds cool? When I weld up things like that I clamp them down or tack them down to my table to stop the welding pull. Just curious because I plan to truss my axle but was going to fab the whole thing myself. I was planing on truss top and bottom so I wouldn't have the weld shrink problem of welding on one side.
Dave
Yes it does, the best way to do it is to build a jig, and bolt it down as you do. Or you can send it to an axle shop, and have them pre-bend it, like currie. Then once you weld your truss on, it'll be straight.
Sure, you can take measures to lessen the warpage, but you'll never stop it without jigging it down. Think a D30 is stronger than a ford 9"? Ask Tony about his back truss that warped the hell out of his 9". Has to go to Currie to get straightened.if you do it right you will end up with a negligable amount of bend. just food for thought: the weld shrinkage will have to bend the axle tube (tubing is quite strong)... for starters just the compressive forces located at that location of the tube (not on the top where leverage would be greatest) required to would be pretty extreme(i know the D30 is nothing to write home about, but tubing of that diameter even in thin wall is quite stout). secondly, if you weld it properly you will significantly reduce the chances of distortion: start by welding 2-3" at the ends, and on both sides of the truss and let cool. now in order for distortion to occur both the axle tube and the truss have to bend (shink at the weld) at the same time. now weld the rest of the truss to the tube in sections and allow to thoroughly cool. overheating the part can be a huge factor in weld distortion so if you are really worried about it you can preheat the whole thing, weld, post heat and slow cool, but thats pretty extreme for low carbon steel.
honestly i wouldnt worry about it that much, especially if done right.
.
i have no doubt that in the instance of currie or other mfgs that pre bending is the most effective/efficent way to go. i'm sure that their operating factor is significantly higher if they dont have to wait between operations.
Sure, you can take measures to lessen the warpage, but you'll never stop it without jigging it down. Think a D30 is stronger than a ford 9"? Ask Tony about his back truss that warped the hell out of his 9". Has to go to Currie to get straightened.
Tony put down the joint SON!!!D30 stronger than a 9" !!! Jimbo.... what are you smokin!!! Man, your like Harry Potter lately... first Robby has no talent, now a D30 is stronger than a 9'???
My 9" could very well have been warped before we even put a truss on it..... it was on a bronco that had 37"projects.. so it is possible that it was tweaked prior. Also, after welding the upper and back brace, it tweaked out 3/8". Not a whole lot.
That being said, any housing, that gets a truss welded on to, is most likely going to warp, plain and simple. You have to prepare for that.
Tony put down the joint SON!!!
Why don't you go re-read what I quoted... he talked about how strong the D30 is and how it won't warp when trussed... To which I asked if he thought his D30 is stronger than a 9". It's obviously not, which is the point. If a 9" warped when it was trussed, then a D30 is DEFINITELY going to warp.
:rtm:
 assgas:assgas:
Tony put down the joint SON!!!
Why don't you go re-read what I quoted... he talked about how strong the D30 is and how it won't warp when trussed... To which I asked if he thought his D30 is stronger than a 9". It's obviously not, which is the point. If a 9" warped when it was trussed, then a D30 is DEFINITELY going to warp.
:rtm:
I kind of think I follow what Jeff did........
Yes, you use the bump stop bolt in the bottom of the tower to bolt a round plate to the bottom of the tower. The bump stop floats inside the coil and hits against that plate. If you have a later model XJ where the stock bump stop is welded to the tower, you'll need to weld something to the bottom of the tower so the plate can be bolted on.
I made my plate just small enough that the spring could go over it. I think that's too small a plate, so I recommend making the plate bigger and bolting it in after installing the spring.
Any body ever get any pics of this setup? thanks
I should have time to post them up in the next day or 3........
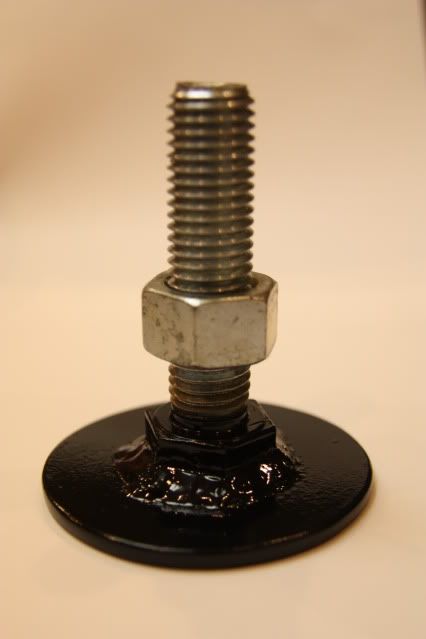
Here's what I did on my 2000:
The factory bumpstop cup is welded on instead of screwed on, as in the early model XJ's, so using my sawzall I cut right above the weld. This left me with 5" of bumpstop tower, which is hollow.
I grabbed 2- 3/4" bolts-2" long and 4 nuts from HD.
Cut out 2-3" diameter circles from some scrap 1/4" plate. This is slightly larger than the flat on the end of the Prothane bumps.
I welded the 3/4" bolt head to the center of each 3" plate.

The inside of the stock bump tower is approx 1.75" ID and I had some tube scraps laying around that had a 1.5" OD and the 3/4" nut would slip inside with a little grinding of the ears.
I cut 2-2" lengths of tube which I used with the 3/4" nut to create a threaded sleeve to insert into the bump tower.
Leaving the nut protuding about .25" from this sleeve, I welded it to the 1.5" OD tube. I then ran a bead around the circumference of the sleeve on each end to tighten up the gap between the OD of the sleeve and the ID of the tower. Some minor grinding resulted in a snug, centered fit.

I then welded the sleeve into the stock bump tower, with the sleeve about 1/4" out of the tower, then buffed it clean and painted it along with the 3" bump plate.
I threaded the 2nd nut onto the bolt on the bump plate and dropped it inside the Prothane bump, shoved the bump inside the coil spring and installed the spring.
I then reached inside the coil, grabbing my fabbed bump plate and flipped it over so the bolt was pointing up and then threaded it into the bump tower. This needs to be done with coil uncompressed.
Once threaded in completely, I snugged the nut with a wrench, then seated the coil and lowered the weight of the Jeep onto the coil.
The 3" plates contact the top of the Prothanes upon compression and don't hang up on the coils while flexing. With a 6" lift, I ended up trimming 2 rings from the 10" Prothane bumps, which seems to work perfectly with my setup.
There is just over 1" of adjustablilty with my plate setup, so I can thread the plate out to reduce the airgap if needed to limit uptravel.
Fab up a 3" round plate, drill a hole and thread it onto your JKS bump towers. This should solve your problem.
The original link to jegs no longer shows these. Ideas on where to get them now?
You need a part# for the prothanes? Just look on jegs and I am using the 10 1/2" but just cut down to about 8" right now until I get a poly upper bumpstop to go in the factory position then I should be able to cut it to 6.5" http://www.jegs.com/p/Prothane/762178/10002/-1
The original link to jegs no longer shows these. Ideas on where to get them now?
The first quote and GoSlow's link both show the right location...after looking around in the thread, I found the post I quoted...Hopefully buying some for my ZJ when I start building it in a few months, here's where I recently found them:
http://www.jegs.com/p/Prothane/Prothane-Coil-Spring-Inserts/762178/10002/-1
 I'm putting in an order for the 10" today. Everything else has an 8 day wait.
The original link to jegs no longer shows these. Ideas on where to get them now?
Looks like he's got em free floating. That working out alright for him?just did a 400 mile desert run and a friend ran these in his TJ. heres a video of them in action
http://www.youtube.com/watch?v=1h_XfQrHSuU
")