deucestudios
NAXJA Forum User
- Location
- Malvern, PA / JFC
Wasn't sure if this was modified or OEM tech, but since I modified it I dumped this here. The motive is to use the existing fuse holder and existing relay holders in the Power Distribution Center (PDC).
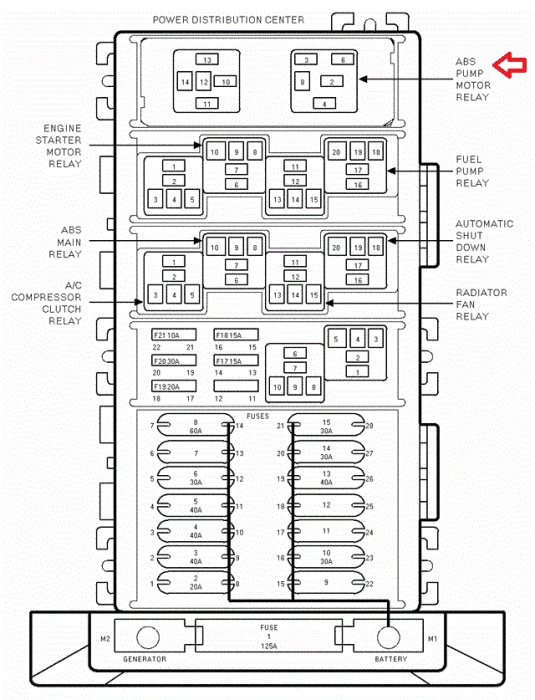
I got no ABS, so the whole top row (as shown on the diagram) is empty in mine.
There's also plenty of fuse spaces.
Go get a PDC at the junkyard that matches yours.
Relays are gone but the boxes are everywhere.
Remove your positive terminal from the battery, and the feed to the PDC from it's main terminal.
There's 2 metal tabs to remove the PDC from the body (big screwdriver)
Then 6 tabs to remove the bottom cover.
That's all that's in mine, if you got a lot of options, power windows, power doors, all that, you probably are a little fuller in there.


Remove the cover from the bottom of the bus.
These are things you should start doing first on your junkyard PDC, so you get used to breaking the little tabs off, and realizing how you should have removed it without doing that.

So looking down through the main fuse bar, you can see the empty holes have no metal terminal in them, you need to get the little connectors out of the JY PDC and put them in yours.
I should have taken the other fuses out for this pic so you can see what I mean.
Take a picture of your fuses & relays so you know where to put them back...

This is the JY box, the bus (the main terminal in the PDC) has been removed. It's just plugged into every slot, so work it with a screwdriver out of there.

Remove the bus plugs, the little metal inserts.
There's little slots in the front that catches a tab on the metal part, then it slides right out the bottom.
The first one isn't coming out easy, but start cutting the junkyard box open if you have to and when you get the first one out look at the little catch on the side of the bus plug. You have to hit that from the front, through the slot in the main housing.
Plug them up from the bottom, into your PDC.

In both pictures I have the yellow fuse center plate in, but that has to come out to do all this, and if you break any of the little tabs, the yellow thing isn't going back in right.
So don't do that.
Also, look at the bus and the last fuse spot at the main terminal, where it plugs in is the opposite side, so consider that when you're putting your bus plugs in.

I got no ABS, so the whole top row (as shown on the diagram) is empty in mine.
There's also plenty of fuse spaces.
Go get a PDC at the junkyard that matches yours.
Relays are gone but the boxes are everywhere.
Remove your positive terminal from the battery, and the feed to the PDC from it's main terminal.
There's 2 metal tabs to remove the PDC from the body (big screwdriver)
Then 6 tabs to remove the bottom cover.
That's all that's in mine, if you got a lot of options, power windows, power doors, all that, you probably are a little fuller in there.
Remove the cover from the bottom of the bus.
These are things you should start doing first on your junkyard PDC, so you get used to breaking the little tabs off, and realizing how you should have removed it without doing that.
So looking down through the main fuse bar, you can see the empty holes have no metal terminal in them, you need to get the little connectors out of the JY PDC and put them in yours.
I should have taken the other fuses out for this pic so you can see what I mean.
Take a picture of your fuses & relays so you know where to put them back...
This is the JY box, the bus (the main terminal in the PDC) has been removed. It's just plugged into every slot, so work it with a screwdriver out of there.
Remove the bus plugs, the little metal inserts.
There's little slots in the front that catches a tab on the metal part, then it slides right out the bottom.
The first one isn't coming out easy, but start cutting the junkyard box open if you have to and when you get the first one out look at the little catch on the side of the bus plug. You have to hit that from the front, through the slot in the main housing.
Plug them up from the bottom, into your PDC.
In both pictures I have the yellow fuse center plate in, but that has to come out to do all this, and if you break any of the little tabs, the yellow thing isn't going back in right.
So don't do that.
Also, look at the bus and the last fuse spot at the main terminal, where it plugs in is the opposite side, so consider that when you're putting your bus plugs in.