Project Downward Spiral

Dude...I need pics BAD!
I'm constantly on this thread waiting for pics.
I've taken pictures of the good stuff. Not really much to take pictures of for the rest. I mean I guess I could take pictures of the pages of notes and calculations, cleaned up ready to be geared D60s, the fresh welded and smoothed unibody rails, or the broom handle with pipe insulation I'm using as a mock rear driveshaft... if you want. :laugh:
Don't forget, break-in run in 20 days :D
HAHA! :rof:
 
Got them in postion on the Jeep. Don't mind the electrical conduit it was all I had to get them to stay in place easy. This is with 6" of uptravel and 8" of downtravel. This leaves me with 1.5" of clearance to the "frame" and 2" of clearance to the tire. I think this should be fine?

Coilover_1st_Mock.jpg


Ran into a issue with the hatch clearance.

Coilover_Hatch_Close.jpg


So...
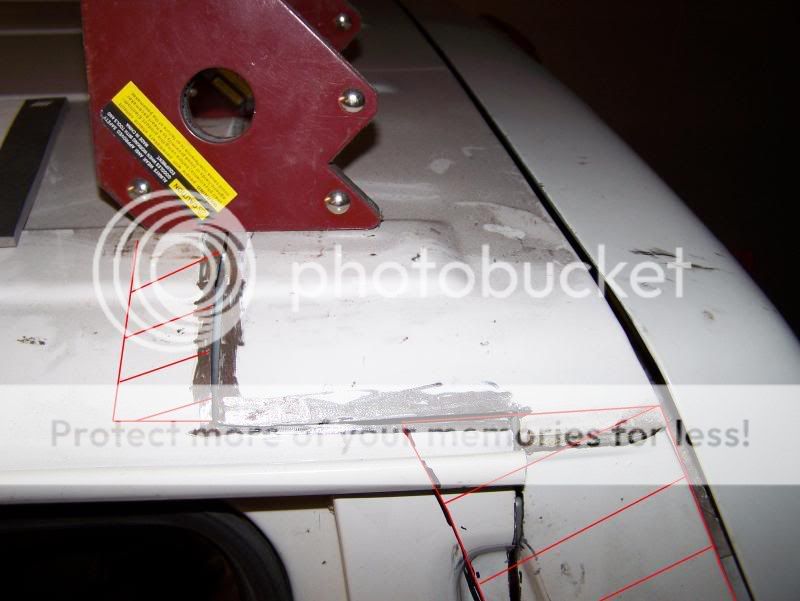
After all the work getting the rear 'D' pillar moved forward, it is going to disappear. The below to pictures show what I'm going to cut out and remove (red hatched sections). I'll be sliding the top section of roof forward (see second picture) This should gain me 3.5" and plenty of room for the coilover.

2nd_RoofCuts1.jpg


2nd_RoofCuts2.jpg


That is it for tonight. Gonna sit down with some Eggnog and rum and hit the hay early so I can get a good start tomorrow before I have to quit early.

Might be a bit to late, but why not angle the coilovers backwards?

Assume you move the upper mount back 1'', or even 2'', that will give you enough clearance and not have you redo all the body work.
 
Might be a bit to late, but why not angle the coilovers backwards?
Assume you move the upper mount back 1'', or even 2'', that will give you enough clearance and not have you redo all the body work.
Yup, a little late, its already been 70-80% reworked. :)
I did think about having them angle backwards, and I actually moved them and mocked them that way before I cut it all again. The idea was throw out for one simple reason; I didn't like how it looked. I know the rest of the XJ will probably get thrashed, but I still didn't like the angled back look.
 
Yet another minor setback...

So I was going to gear my axles over this long weekend due to Christmas.
Got all setup other than when I went to attach the rear 5.38s to the spool. The ring gear bolts bottomed out before they were tight. They bottom out with 0.110" left before they make contact with flange.

The spools are generally a little thinner than the open carriers / detroits / limited slips.

When I ordered new ring gear bolts from Strange, they asked what kind of locker I was putting in.
 
The spools are generally a little thinner than the open carriers / detroits / limited slips.

When I ordered new ring gear bolts from Strange, they asked what kind of locker I was putting in.
Ya... that is something I learned when I went to install everything. I didn't know that before.
No big deal, Dave @ Northridge4x4 is sending out the correct ones this evening.
 
*mostly* kidding.... meaning you weren't kidding. :D
 
Haha... thanks for the offers guys. I'll take ya up on it if I need something.
For the most part I think I'm all set. Not really much work for more than one person right now as it is all figuring/working things out and trying to get the cash for everything.
I appreciate it!

Oh, and I'm stoked for the M&G!
 
Alright... since I've got a few minutes and there are so many of you that are bored and can't live without pictures (I've actually got PMs about them); I'll give you something to look at for a few minutes. :dunce:

The freshly rebuilt kingpins:
Top view:
Fresh_Kingpin_Top.jpg


Bottom view:
Fresh_Kingpin_Bottom.jpg


Cleaned up and ready to be geared rear D60:
(Don't mind the two different colors on the housing, I only painted the top that was covered with the truss, the rest is still primer.)
Cleaned_Rear_D60.jpg


I love the finish on this thing, is looks sweet! My new SOLID D60 cover that my gal got me for Christmas:
SOLID_D60_Cover.jpg
 
Updates:
Got the front axle in its final location so I could finish the crossmember mounts for the lower arms. Ran into an issue with the driveshaft so I'll have to rework them.

I got a tire in place to check for clearance with the lower arm. I think I'll need some trimming. Oh, don't mind the wood and the G8 hardware, my 9/16" wheel studs are not in yet; I just needed something to hold the wheel to the hub. :shhh:
Front_TireMock1.jpg


I was worried that it would contact at full lock. I should just clear the arm by about 1/2". Picture shows the tire at full lock, taken from the underside looking forward.
Front_TireMock3.jpg


How much the tire will be sticking out past the fender. Just over half of it.
Front_TireMock2.jpg


After I got everything figured out I switched gears back to the rear suspension. Given the 4-link numbers I posted up earlier; the previous mounts I made will no longer work.
Here a a quick set of sketches as to what I think I'll probably do. I might leave out the 1/4" plate on either side of the floor and just bring the 1 3/4" 0.120" wall tube down to the 2x2". Thoughts?
Sketch_RearLowerMount_Rear.jpg


The 1/4" plate on the side here is really 3/16" and is already part of the plating that is finished on the "frame rails"
Sketch_RearLowerMount_Top.jpg


Knowing that I'd have to come up and cut the floor I finished gutting the interior. I put back the console as I want to keep it.

Interior_Stripped.jpg


Look ma no rust! :D

Floor_NoRust.jpg
 
Looks great Bill, can't wait to see this thing driving, its going to be a beast. I'm surprised the tires only stick out that far, those H1 rims must have a lot of backspacing.

I like the wood and grade 8 bolts holding the wheels on, I think you should just use those.
 
Looks great Bill, can't wait to see this thing driving, its going to be a beast.
You and me both. Although I can't complain, the buildup is a ton of fun.
I'm surprised the tires only stick out that far, those H1 rims must have a lot of backspacing.
Yup, one of the reasons I chose them. 7.25" of backspacing makes the full-widths not so wide. I do run into an issue with the steering on my HP D60. The clearance is and I had to modify the knuckle and cut off the stock steering arm which forces me to run high steer (not that that is a bad thing).

Knuckle Mods:
I took a few extra minutes and chamfered the corners and I think they came out good.

CutKnuckle1.jpg


CutKnuckle2.jpg
 
I like the wood and grade 8 bolts holding the wheels on, I think you should just use those.


x2, then you'd know what your fuse is on the front drivetrain.

damn you and your lack of rust by the way. if your looking for a much lighter version I can send you my floor boards... shipping should cost $$nadda!
 
I like the wood and grade 8 bolts holding the wheels on, I think you should just use those.
x2, then you'd know what your fuse is on the front drivetrain.
Haha... ya... don't think so. ;)
damn you and your lack of rust by the way. if your looking for a much lighter version I can send you my floor boards... shipping should cost $$nadda!
I'm actually kinda surprised. I was expecting some, but nothing like some I've seen. It was a VERY clean XJ before I got hit and torn into it. :D
 
I'm actually kinda surprised. I was expecting some, but nothing like some I've seen. It was a VERY clean XJ before I got hit and torn into it. :D

Ya, my XJ was very clean before I got mine as well. When I took my carpets out, I luckily found the same thing you did, no rust or anything.
 
I'm actually kinda surprised. I was expecting some, but nothing like some I've seen. It was a VERY clean XJ before I got hit and torn into it. :D
Actually, the other day when I pulled my rear carpet to install the cell was the first time I'd ever looked at it. I had been pretty much thinking "if I don't see the rust, I don't have to fix it..." So now that I know how bad it is I need to. It'll all be taken care of when I cut out the rear to move stuff around this summer.

Front axle is looking nice! It's making me wish I hadn't sunk so much into my 30.:dunce:
 
Back
Top