• Welcome to the new NAXJA Forum! If your password does not work, please use "Forgot your password?" link on the log-in page. Please feel free to reach out to [email protected] if we can provide any assistance.

Flop resurrection

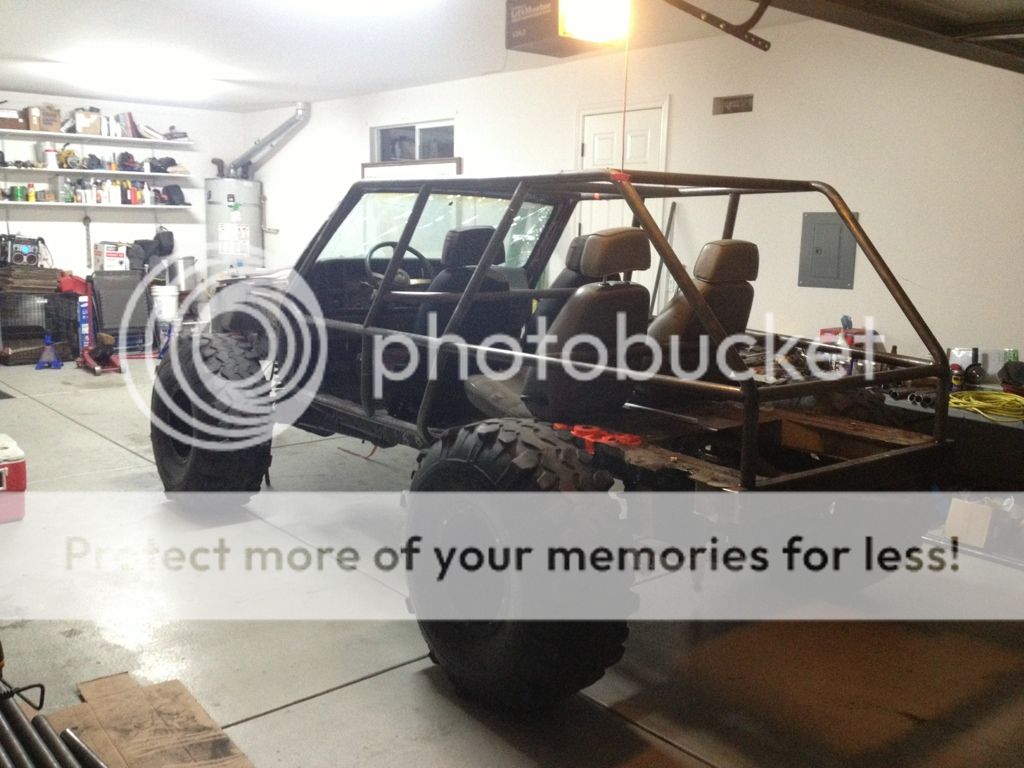
Hacked up a bit more metal and tube yesterday. I put her back on wheels just to roll her back to work on the front end. most of the tube work is complete now from the windshield back. I am a little unsure about what to do with the tubing at the roof line, I think I'm just going to throw in some short angle braces in each corner and call it a day. I'm trying to keep the tube work away from where our heads will be as much a possible.

11EC41A8-B591-4E32-B1A3-DBA8C404E97D-6877-000007E0835108FD.jpg

7526B35E-149A-4A22-93B5-5FFAC13C1B07-6877-000007E0A686A98C.jpg

16074D18-7B16-4A5D-91D4-6A59CEC65BC6-6877-000007E0976438E1.jpg

0D744495-49EB-4E3D-9CAB-F2E07B9D35AE-6877-000007E0D06CDB85.jpg


I got the front cross member cut and welded in. 2x6 1/4" heavy SOB!! I used 3 1/2", 3/16" angle to tie it into the outside frame stiffeners.

04C1555B-19D6-41D8-9928-CEE3C2D18AF1-8086-000009C58F70DE7A.jpg

2C67B6B3-C60A-4542-87EE-1E5E68DEB4A4-8086-000009C57779071A.jpg

EC979064-B9C8-46D9-98C4-08F4322A6C87-8086-000009C582AE9F3A.jpg


I then got the stinger bent up and welded on, along with a horizontal tube to support the front of the winch plate. I had some 3/8" plate laying around, so we used that as the bottom winch plate. Welded all that solid to the cross member and the tube work.

C101A4CA-6A79-4DBF-A9F3-D3DCBFB3069C-8086-000009C558025222.jpg

85547FA2-8464-4C0A-AC82-479002359C8F-8086-000009C54BD46019.jpg

FC421277-EB1F-49F0-ABEB-FB8B64B2EB28-8086-000009C53B4B2FBA.jpg

31344DC4-21F3-4982-B403-DC4C03417184-8086-000009C51C287C6F.jpg

8B6B2614-7A99-4992-83AB-66921DC698E7-8086-000009C5228D7C8D.jpg

8D5851BE-75CF-4B09-AB5E-23DB81994124-8086-000009C535B3FC04.jpg

957353D9-9E1D-4719-B388-6F9293A7317E-8086-000009C50D959A48.jpg
 
F3B551E7-5BFE-4C53-91BF-0D64BAF79BE9-8086-000009C50770B60F.jpg


Found the picture limit!

I'm pretty happy with the progress. I'm trying to get a little better at welding before I tackle the cage, I really don't want a bunch of nasty welds that I won't be able to grind down or want to grind down!!

Does anyone know if Ivan run a non roller fair lead with a steel cable? I really don't want to use the huge roller unit that comes with the winch.

I original plan was to bury the winch behind the cross member, like moparmaniac did, but with this being my first winch, I coul see that location bein a huge pain in the arse. So I decided to kill my approach angle a bit in the hopes of easier access an functionality for myself.
 
I buried my winch behind my front bumper, which sticks out exactly 2" past the tabs on the front frame horns. No regrets.

Was going to go behind the crossmember with it but I'd rather keep the bumper a couple inches out and protect my header panel a little more.
 
Looking good. Planning on doing a piece of tubing from the crossmember to the corner there, across where the headlight would be?
 
Looking good. Planning on doing a piece of tubing from the crossmember to the corner there, across where the headlight would be?

Yes, I'm waiting to put "head lights" in so I form the tube around them. I'm not sure the diameter of the lights, so I will throw those vertical pieces on once I get them.

And thanks mako! My hobby is drinking beer, it just so happens I fill in the free time between sips with working on this pile!! :cheers:
 
Some minor progress over the weekend, even though a lot of hours went into it.

Got the tie rod, drag link, track bar, and upper 3rd link all fabricated, welded, painted, and ready for install. Got the track bar frame and axle mounts installed and reinforced.

57A1167E-0901-4719-8790-A770C1A20318-11742-00000B1B8EB47ABA.jpg

EDD92096-0F35-425A-B64F-915B2089049B-11742-00000B1A628ACF2F.jpg

34C08ACE-757A-4604-9EED-4AEBEB805944-11742-00000B1A753D7388.jpg


Also got everything up front painted, final assembled the axle, and installed the new prothane bumps. I haven't trimmed the bumps yet, but they sit right on the bump stop tower at ride height, and from what I've read this will be pretty close to what I want. I'm looking at 4" of up travel, and the bumps should compress about 3 1/2". I ended up cutting a metal disk and welding it to the bottom of the tower so it doesn't destroy the bump, and then just let it free float in the coil.

Pics of full droop and full bump.

E3E72C46-8172-4F24-B363-FF5AF3E1D12D-11742-00000B1B0F846FAA.jpg

05CEB781-5725-436C-98CF-8D637E087DF8-11742-00000B1B1A1E2CE6.jpg


Also got the gas tank all strapped in, filler installed, and the fuel lines reconnected. Then sprayed the floor pan and frame rails all flat black.

15DCA0AB-E916-4231-A447-A4195358F09F-11742-00000B1AEB5F6AB2.jpg

9EFCF492-AD7C-4D45-B2E3-6FB166E0780E-11742-00000B1A4110CA5B.jpg
 
Nice work dude, keep it up :thumbup:

Did you put the bolts back in for where the track bar connects to the motor mount bracket through the frame rail?
 
Nice work dude, keep it up :thumbup:

Did you put the bolts back in for where the track bar connects to the motor mount bracket through the frame rail?

Thank you! Yes I put the bolts back in but just through the stock frame rail. I plated the bottom of the frame rail with 3/16 and welded the mount to that and the 3/16 Fran stiffener. I'm seriously contemplating running a tube from the bracket to the upper cage tube work... I really don't want that coming apart
 
I'm seriously contemplating running a tube from the bracket to the upper cage tube work... I really don't want that coming apart

I was thinking about doing something similar with mine. make sure on full stuff on that side that the top of the tire doesnt interfer with it. I ended up not adding it in mine, its hasnt gone anywhere yet wheeling. if I ever feel the need, ill build a brace from the bracket to the opposite framerail like RE does.
 
Back
Top