- Location
- In a strange land
For the past several years I have been running adapters in order to plug multiple devices into the single, factory cigarette lighter. If it were just me I might be able to get away with the one cigarette lighter, but Varmint #1 is my geek, and in addition to my GPS he is trying to run a handheld transceiver (never mind the Kenwood built into the Jeep) and an MP3 player and charge his e-reader all at once. No wonder I start blowing fuses. And the Jeep does too.
I have looked at that panel with the one cigarette lighter in the middle of it and thought “there has to be a way to run more than just one cigarette lighter in that space.” And I found that Powerwerx carries a line of panel mount components: https://powerwerx.com/panel-mounts
It looked to me like it might be possible to fit four of the panel mount components in the space occupied by the one cigarette lighter. The problem was, I knew the dash bezel would have to lap over the flanges. Notching the dash panel did not seem like a graceful solution, and I lack the mill that would be required to machine out the face of what would be needed in order to fabricate a new panel in metal. The best solution I could come up with was to give up on the idea of replacing the cigarette lighter panel and to instead mount pods in the kick panels, and I didn’t particularly care for that solution because I know that between my size 13 feet and Varmint #1’s size 13 feet a pod in the kick panel is not a safe bet. I bought pieces to try to see what sort of clearance I would get, but I wasn’t happy with what I would end up with. So the pieces just sat.
Then Boot13 posted up a thread about 3D printers and his plan to make a replacement panel for the panel just above the cigarette lighter. I glommed onto that like a hungry dog onto a dropped steak, and Boot13 was willing to help make my idea for the cigarette lighter panel a reality. Within 2 days of my suggestion he had already printed out a flat panel and just needed me to provide dimensions for the holes and recesses.
I think the recesses proved to be a bit problematic. The simplest way to print this part is from the face back, but that is done with the part laying on its face. The recesses need to start showing up later in the process, but they need to be supported, and those supports have to be planned from the beginning. You can’t quite print on thin air. And then the supports have to be removed, in as clean a fashion as possible. I don’t know how many iterations of this part Boot13 went through, but I know he tried more than one way in an effort to make the final piece easier to clean up. But he came through with the parts, even traveling across the country to hand deliver them. How is that for service? (I wouldn’t expect that as part of his normal operations though.)
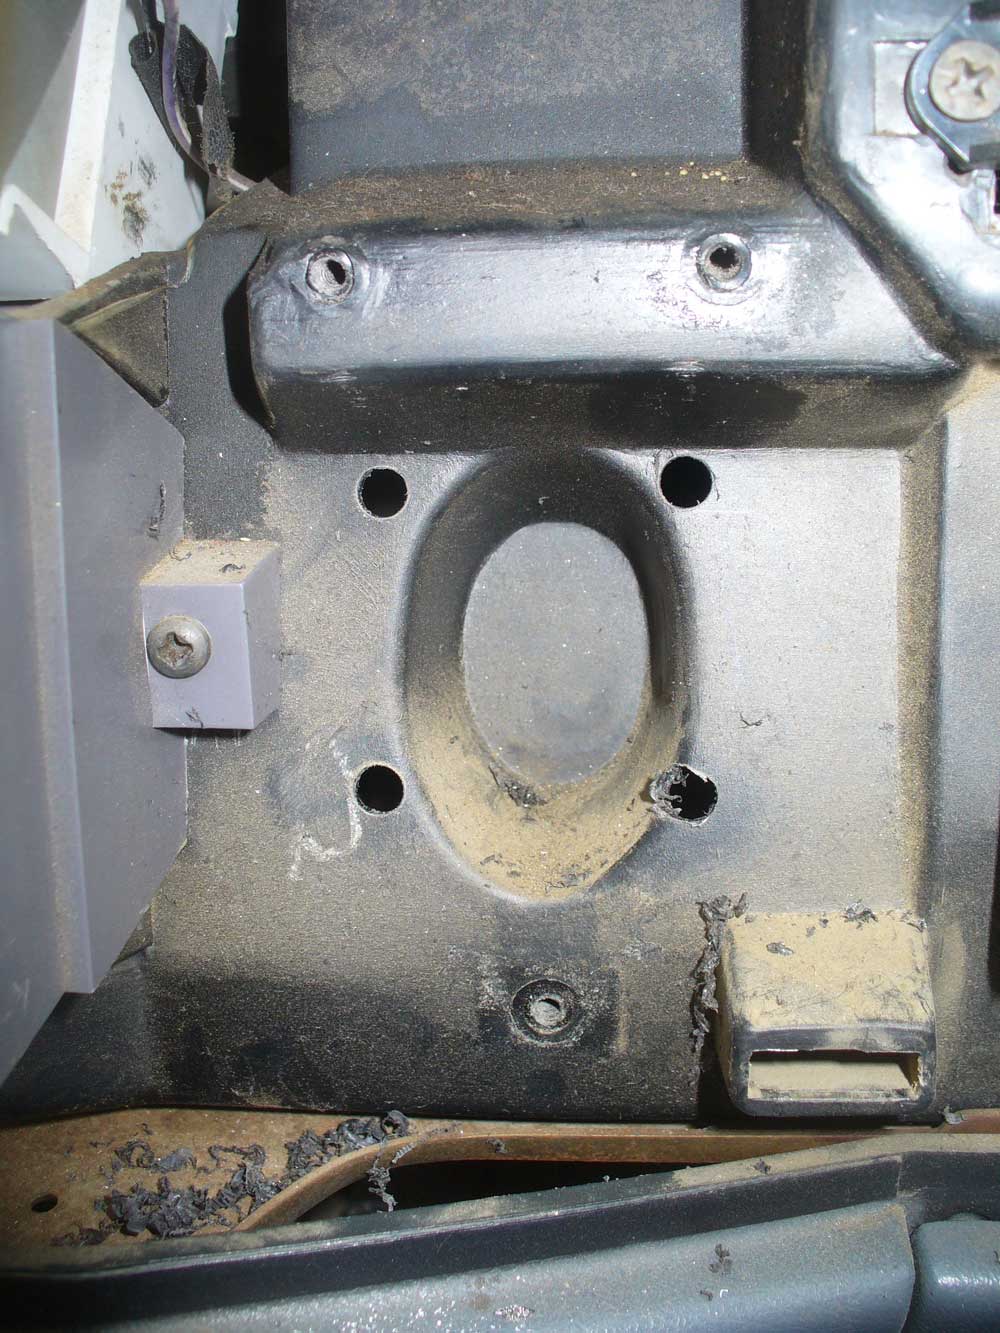
I then got to figure out how to get the necessary clearance behind this particular panel. Boot13 had warned me that there was not adequate depth for the panel mount components, but it didn’t look like an insurmountable obstacle. It was just a question of what was directly behind that location. As the factory built the XJs it is blocked off.
I started by making myself a centering drill guide out of aluminum.
There is a ¼” hole through the center of that dowel which allowed me to drill pilot holes for the four holes I would need.
Here are the four pilot holes:
I then used a hole saw with a ¼” rod as a pilot. If I were to use a drill bit as a pilot it would chew its way sideways into the thin plastic while the cutting teeth of the hole saw were engaged on one side only (sloped surface being cut into), but by using a smooth rod the pilot holes remain intact and keep the hole saw from wandering.
The first pass got me this far.
Notice that I am still a good ways from reaching the bottom of the center recess on the top two. That is because the hole saw bottomed out on the ridge at the top on those ones. I need to remove that ridge, but still keep my pilot hole. Some patient work with a utility knife was my solution there. Just lots of cuts along the same line until it can finally be snapped off.
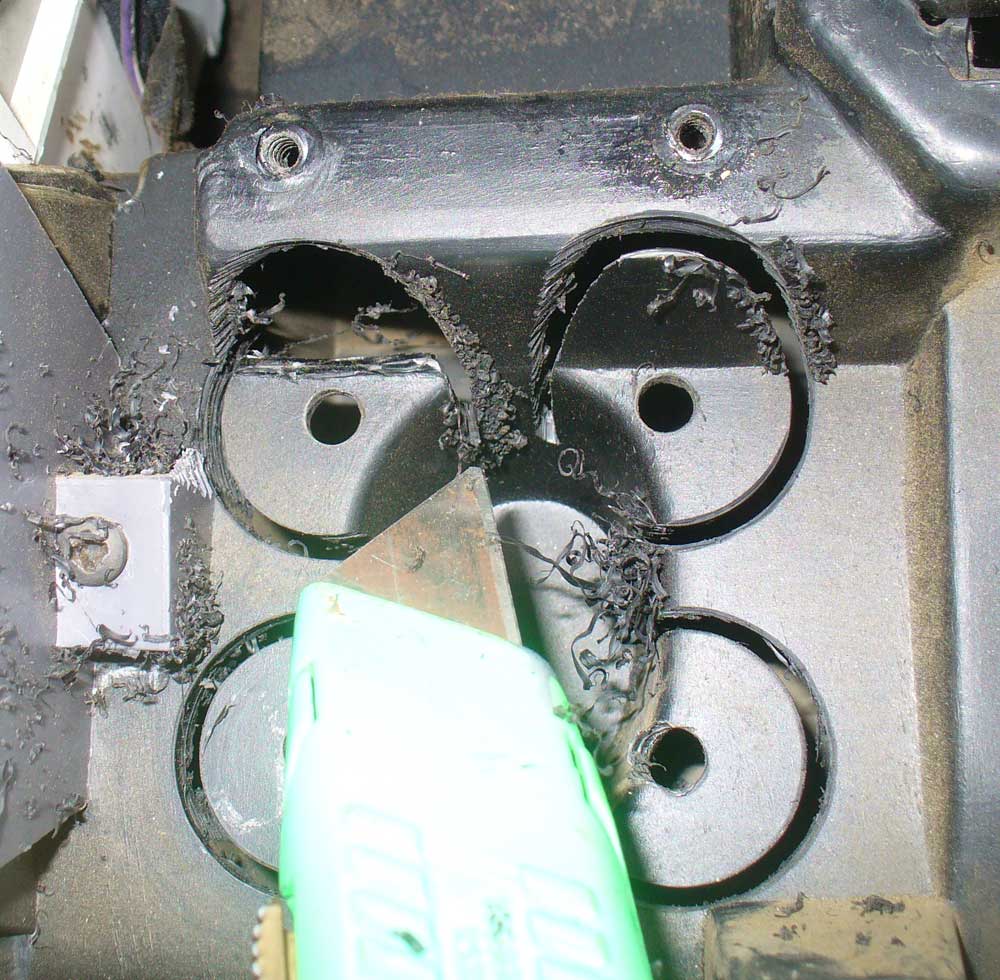
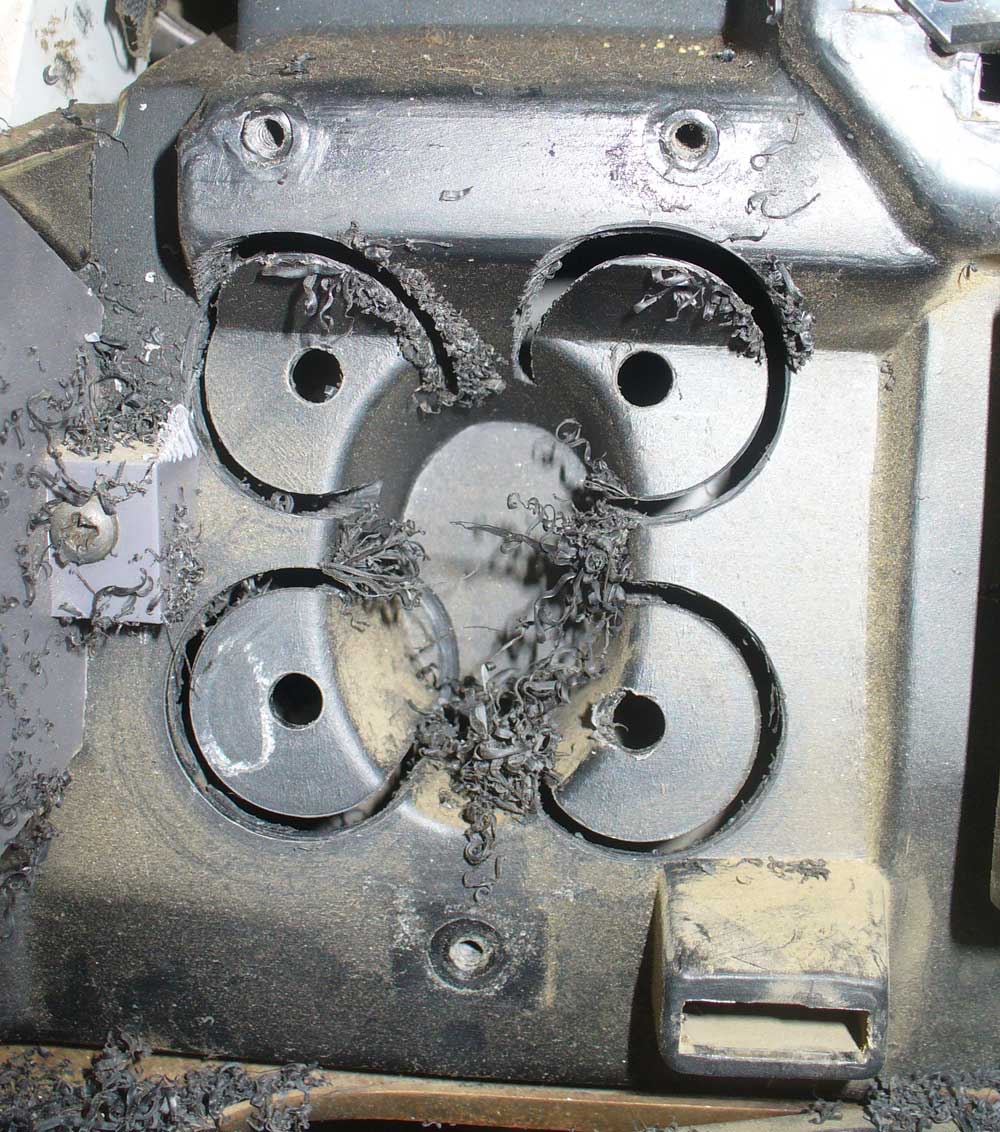
Final cuts with the hole saw and clean up with a utility knife:
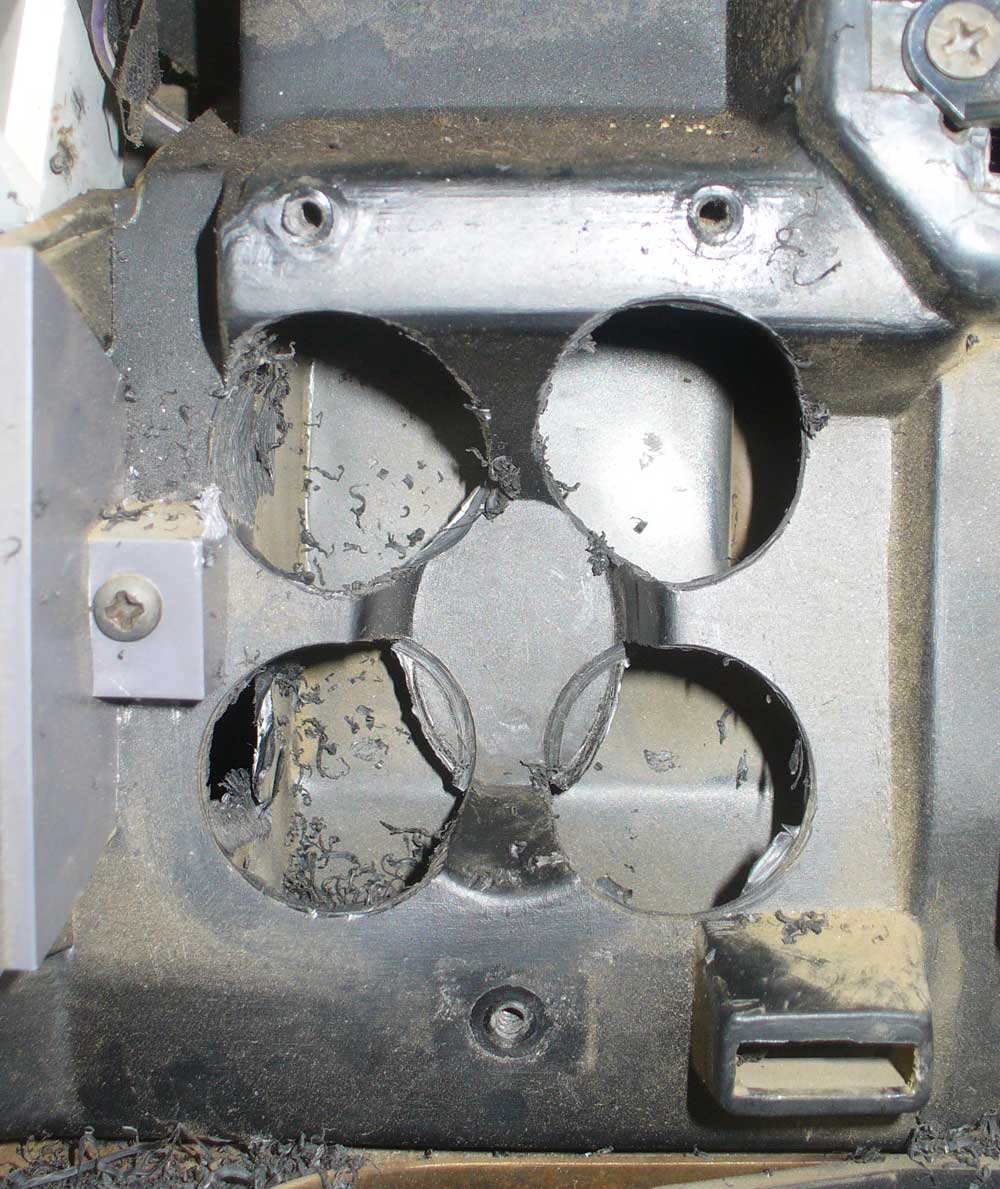
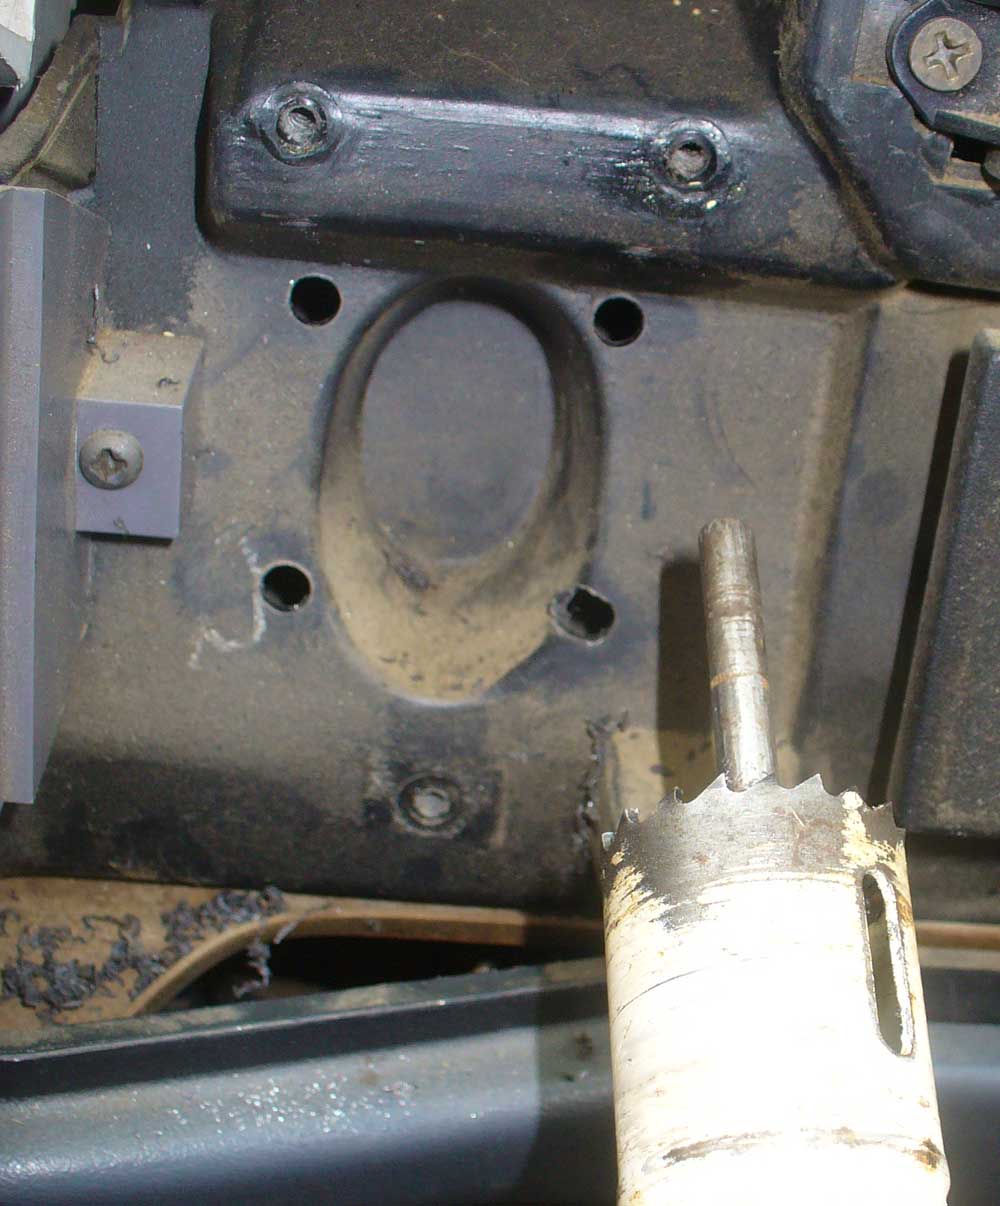
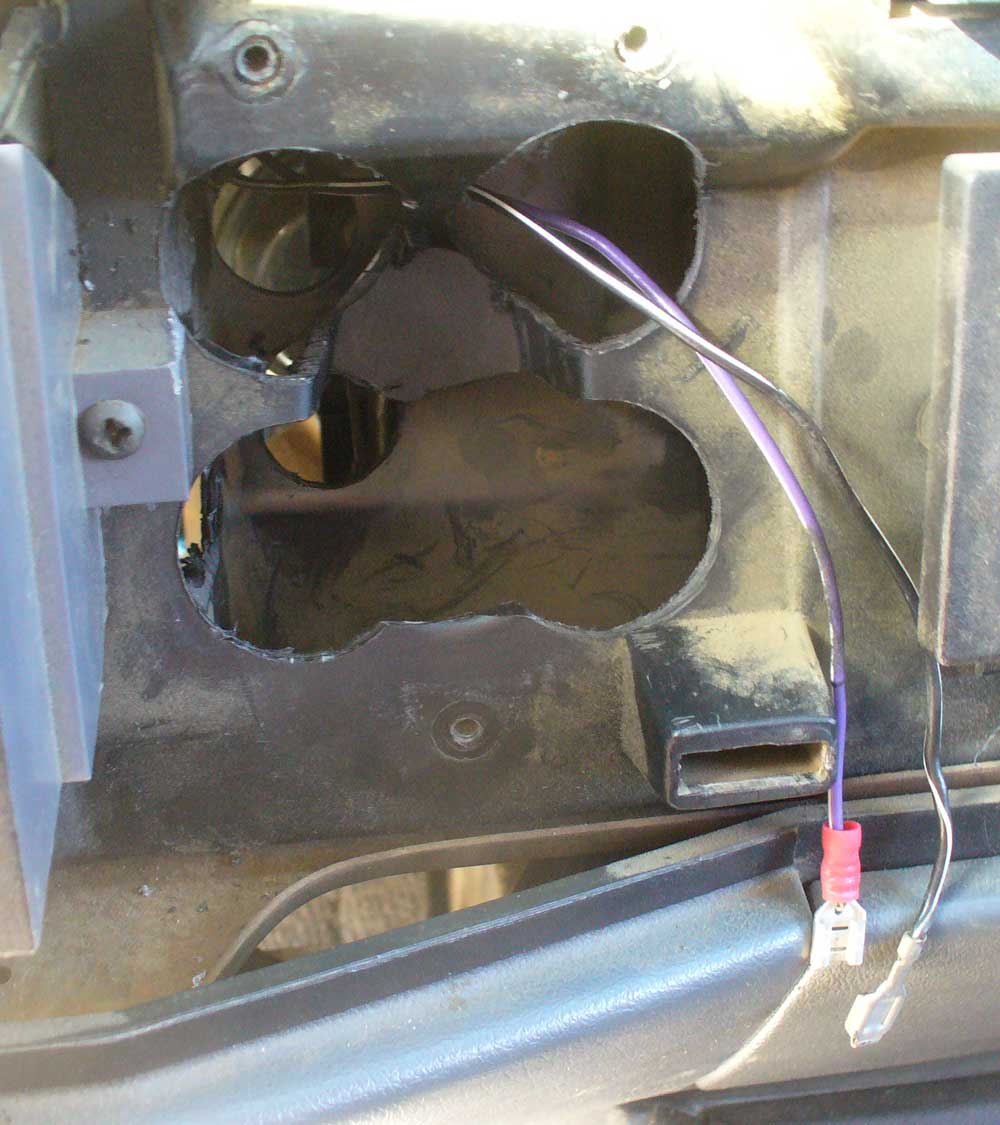
This then left the question of what is further behind there? Where am I relative to all that stuff under the dash. A tentative hole was drilled with a ¼” bit and then located and assessed from the back. Hmm… Not bad. There is a vacuum servo back here for the vent system, but I should have room to work around this. A second ¼” hole was drilled and checked and then the two of them were used with a smaller hole saw to make passages for the wiring. I also removed the bottom part of my support web to allow clearance for wiring behind the panel, and pulled the original cigarette lighter wiring back in so that it can feed one of my outlets.
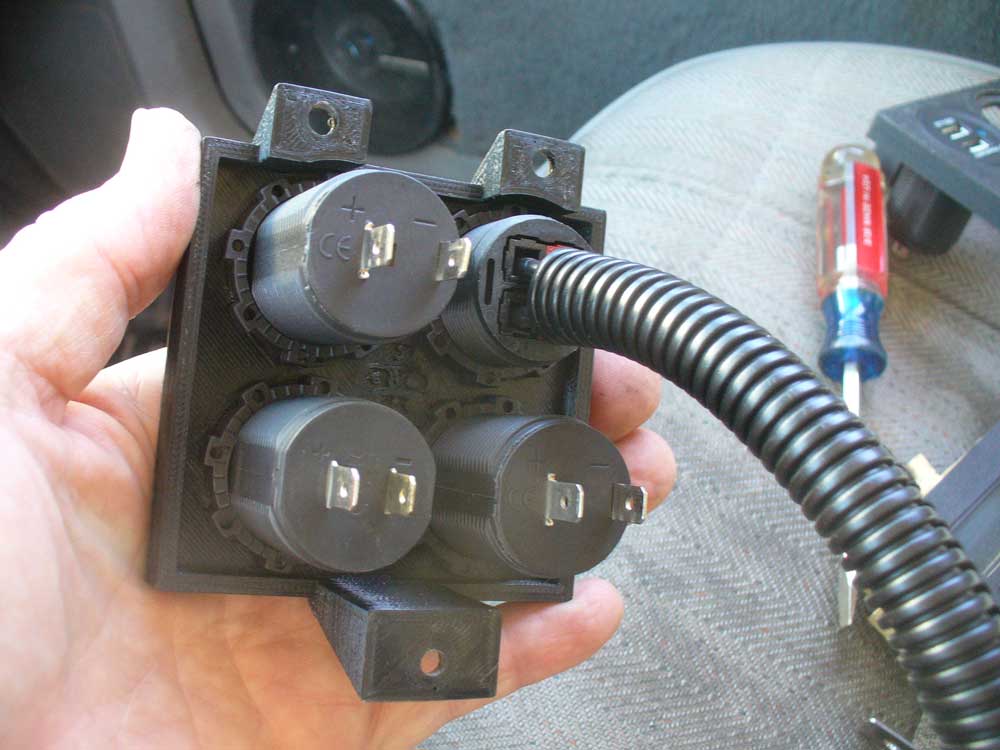
Then it was time to assemble my new panel. I don’t expect many folks are going to opt for the Anderson Power Poles. They are a bit of a pain, and somewhat in the realm of geeks only. However, they are the ticket for many of the ham radio things I run. But while the other components are designed with spade connectors on the back the Anderson Power Poles are intended to be wired straight through to the fuse block. That means their harness needs to go in with them. And will also have to come out with them. Yippee.
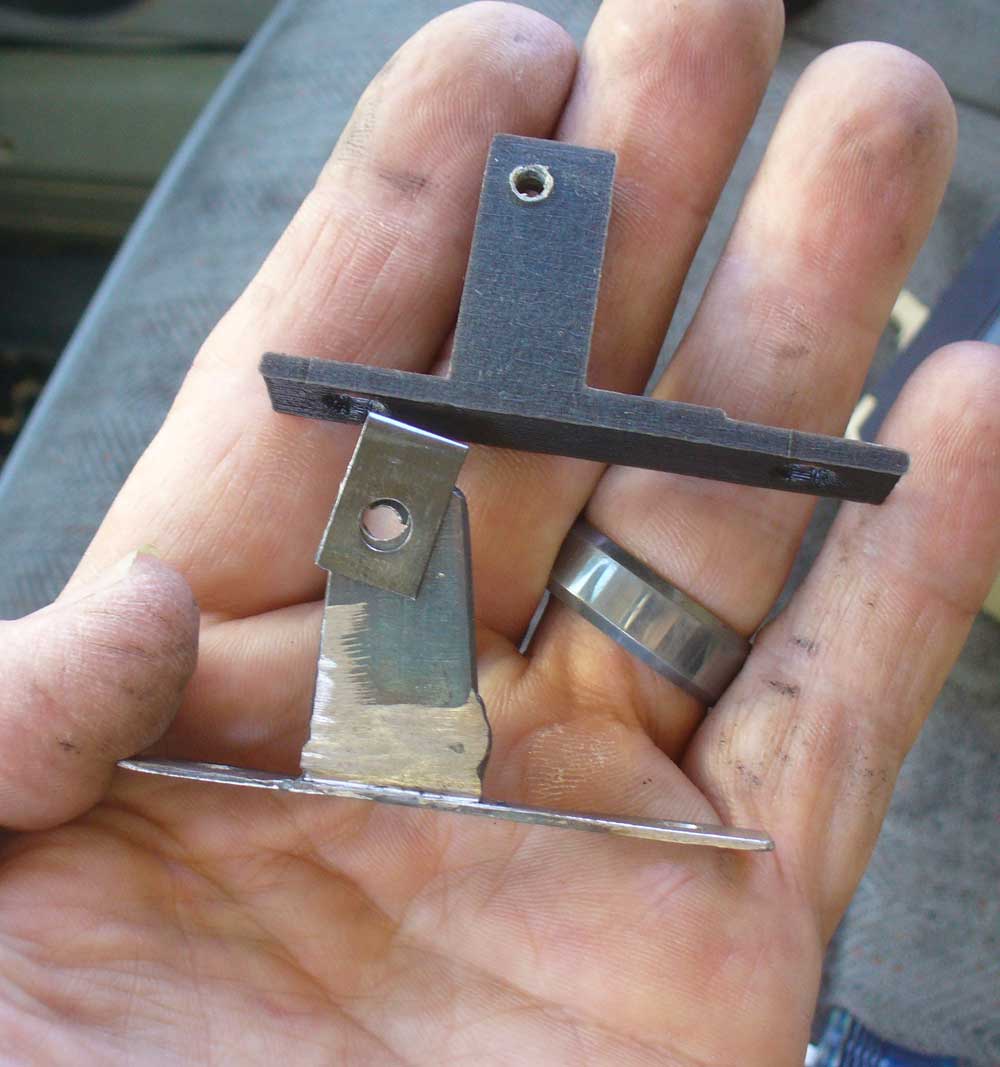
At this point in the installation I noted a missing detail: No forward extension for the screw for the dash bezel. Hmm…
I can see how that particular forward extension would make the printing of this part much more complicated, and in talking to Boot13 it turned out that his design mule was missing that screw anyhow. However, on my dash I have a couple of reasons for wanting that screw to be in place. First, my dash bezel is cracked in half above the steering wheel (I believe a previous owner did this in order to avoid having to disassemble the overgrown shroud around the lock mechanism which comes on ’95 & ’96 airbag equipped XJs), and secondly, another (or the same perhaps) previous owner cut out all radio support and set things up such that the radio is mounted directly to the dash bezel. Brilliant move. And it now means that the support role of that particular screw is important. So I tried to come up with a solution that would return that support back into the picture.
This is what I came up with:
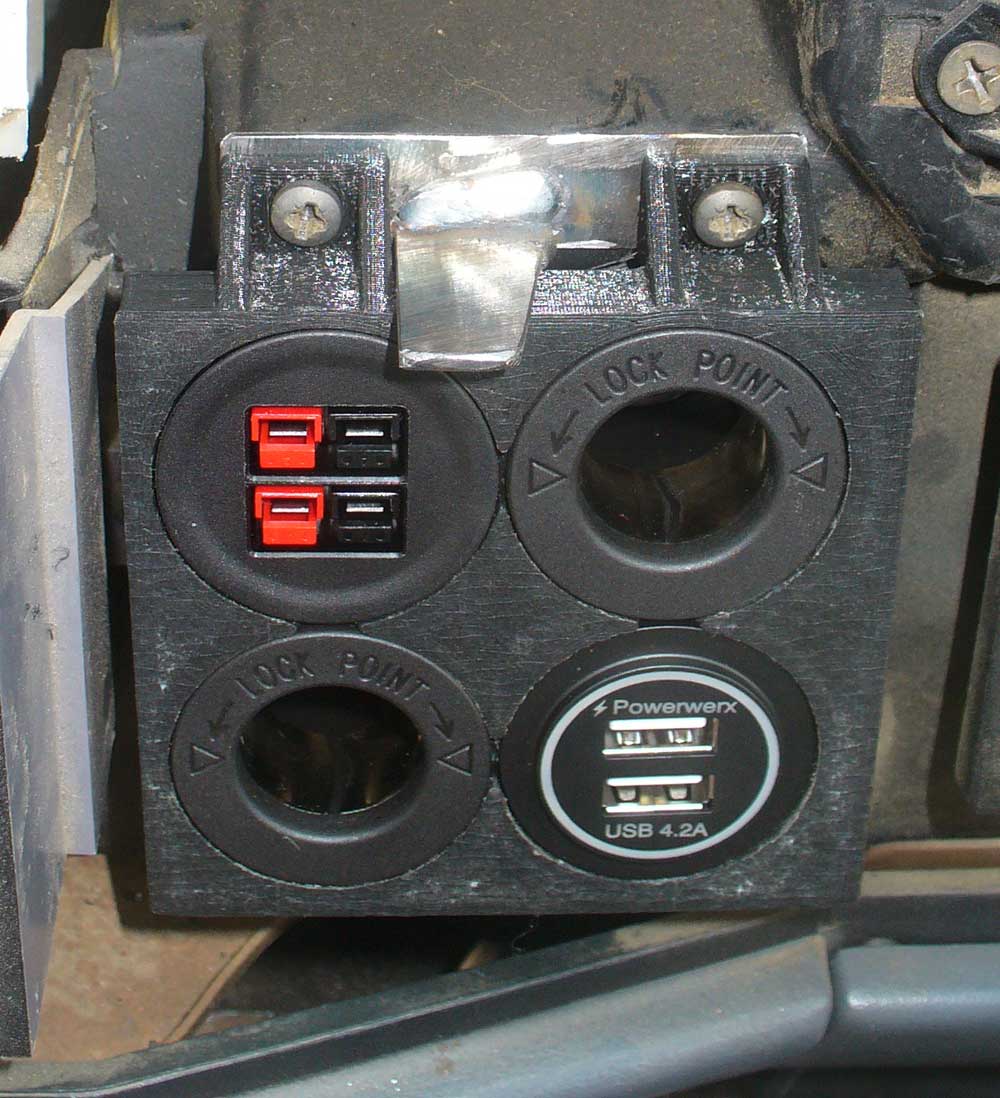
Not yet drilled, just waiting for the bezel to go into place so that I could locate the position of the screw and drill it accurately.
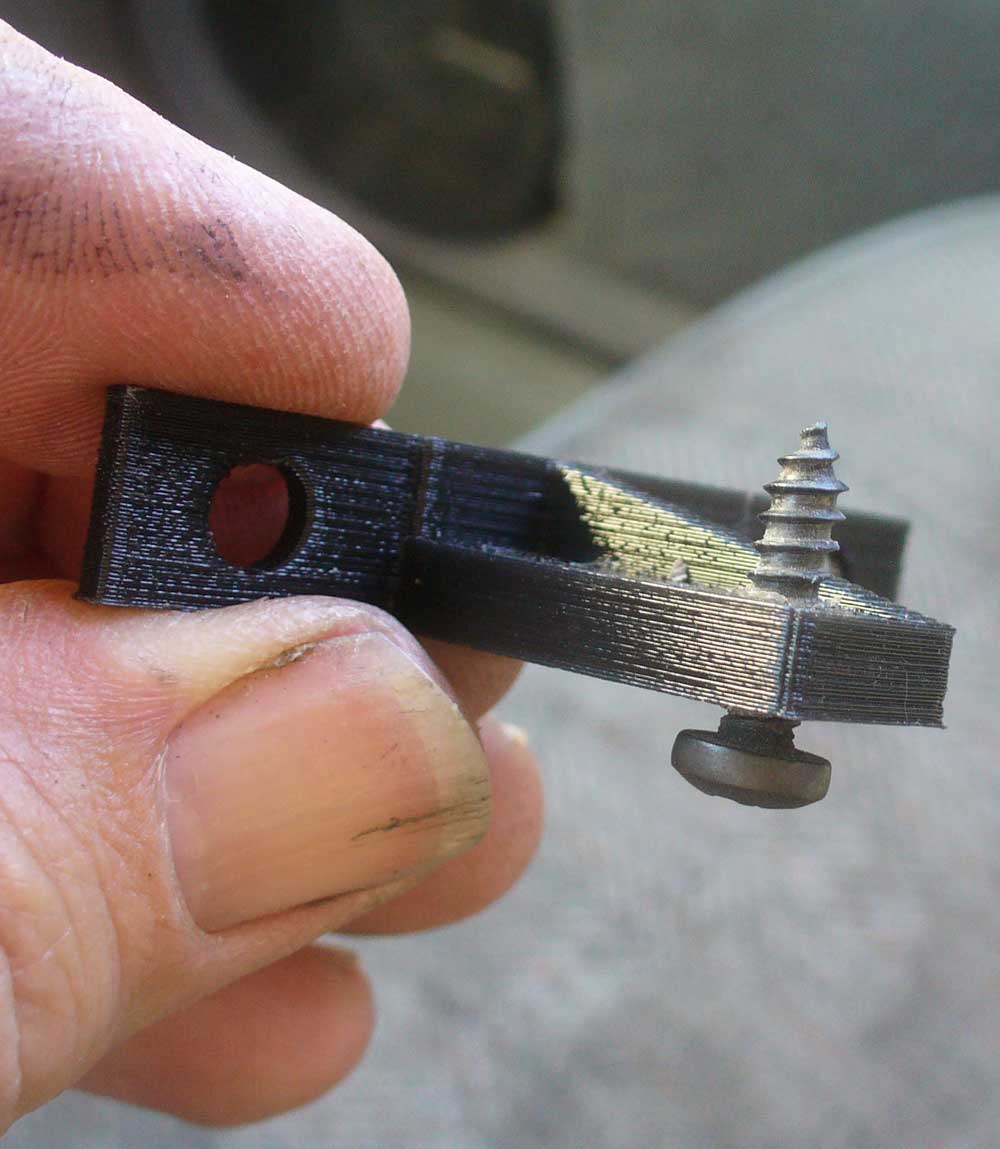
This sort of worked. It got me the support of that screw, but it also pushed the panel forward enough to create funny gaps and rattles in the dash. This wasn’t going to be the long term solution. So I talked to Boot13 about making another version of the panel, but with shorter stand-offs so that this bracket could fit underneath and still not push the dash bezel out of place. He took my request even farther and made this:
And another view:
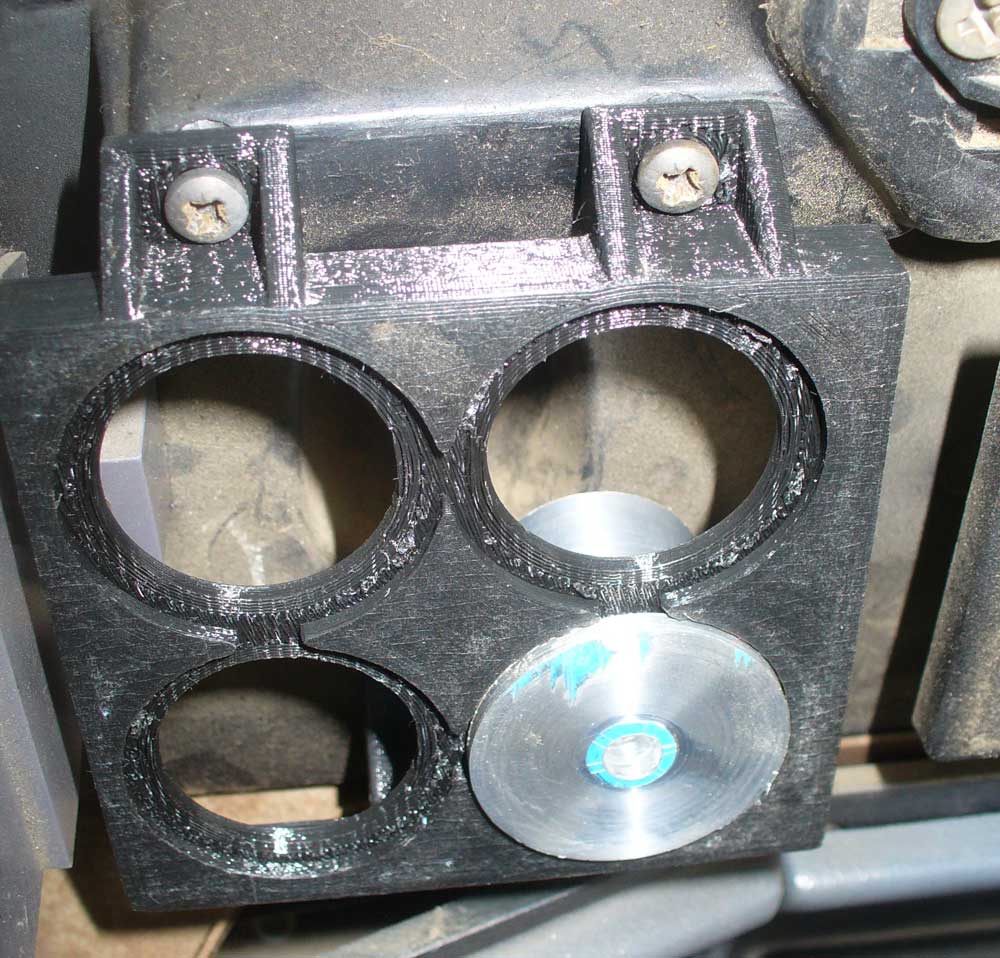
And now we have the second version (at least in my hands) of this panel:
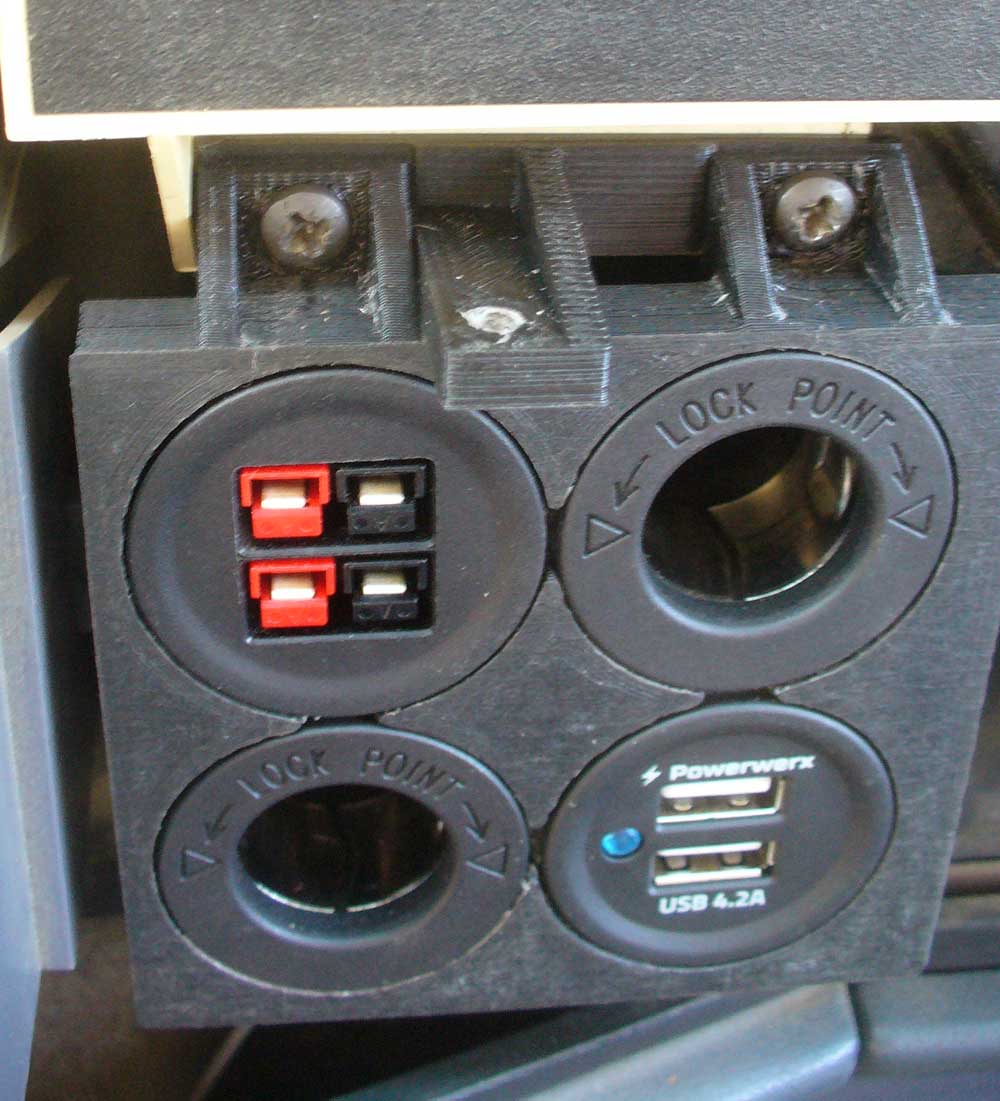
What you can’t see in this picture is the fact that those two upper screw mounts have a little flange along the bottom on the back side for the screw support bracket to register on, making it easier to assemble all the pieces that those screws need to go through. That is a nice touch and shows that Boot13 put more thought into this part than does the average automotive engineer.
And here is the final result:
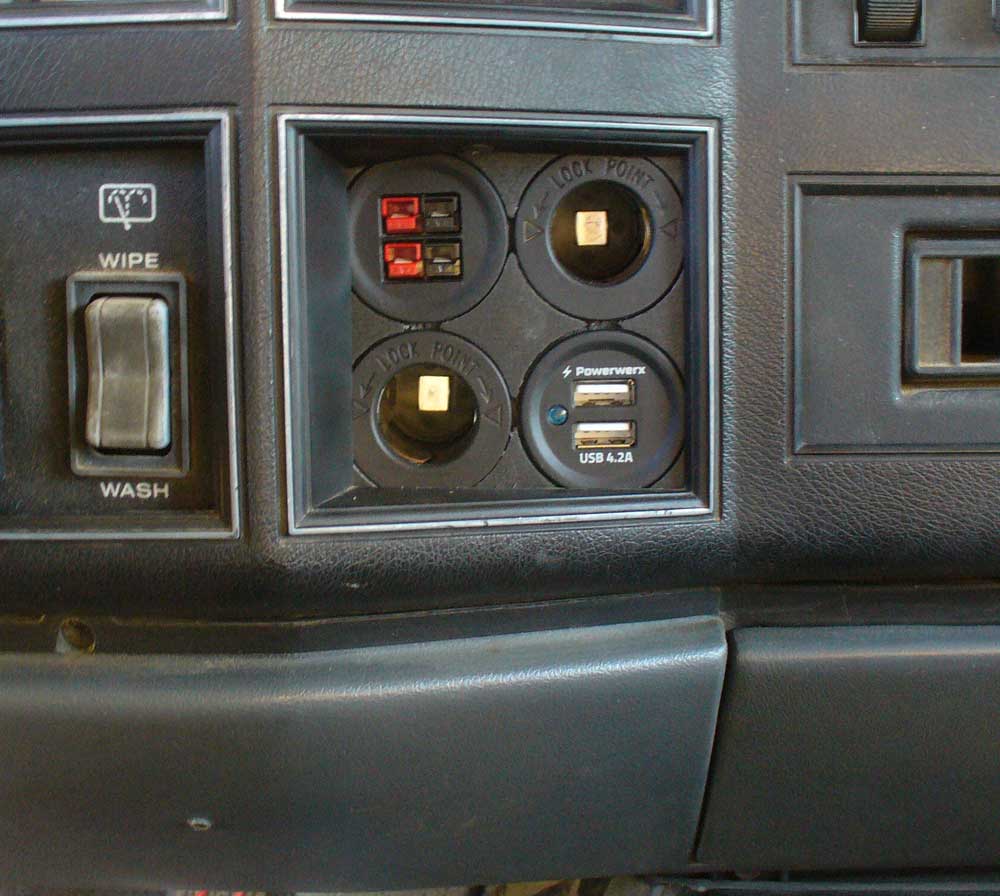
I am very happy with the end result. And now I have a request in for a custom version of the panel above this one.
Thank you Boot13!
I have looked at that panel with the one cigarette lighter in the middle of it and thought “there has to be a way to run more than just one cigarette lighter in that space.” And I found that Powerwerx carries a line of panel mount components: https://powerwerx.com/panel-mounts
It looked to me like it might be possible to fit four of the panel mount components in the space occupied by the one cigarette lighter. The problem was, I knew the dash bezel would have to lap over the flanges. Notching the dash panel did not seem like a graceful solution, and I lack the mill that would be required to machine out the face of what would be needed in order to fabricate a new panel in metal. The best solution I could come up with was to give up on the idea of replacing the cigarette lighter panel and to instead mount pods in the kick panels, and I didn’t particularly care for that solution because I know that between my size 13 feet and Varmint #1’s size 13 feet a pod in the kick panel is not a safe bet. I bought pieces to try to see what sort of clearance I would get, but I wasn’t happy with what I would end up with. So the pieces just sat.
Then Boot13 posted up a thread about 3D printers and his plan to make a replacement panel for the panel just above the cigarette lighter. I glommed onto that like a hungry dog onto a dropped steak, and Boot13 was willing to help make my idea for the cigarette lighter panel a reality. Within 2 days of my suggestion he had already printed out a flat panel and just needed me to provide dimensions for the holes and recesses.
I think the recesses proved to be a bit problematic. The simplest way to print this part is from the face back, but that is done with the part laying on its face. The recesses need to start showing up later in the process, but they need to be supported, and those supports have to be planned from the beginning. You can’t quite print on thin air. And then the supports have to be removed, in as clean a fashion as possible. I don’t know how many iterations of this part Boot13 went through, but I know he tried more than one way in an effort to make the final piece easier to clean up. But he came through with the parts, even traveling across the country to hand deliver them. How is that for service? (I wouldn’t expect that as part of his normal operations though.)
I then got to figure out how to get the necessary clearance behind this particular panel. Boot13 had warned me that there was not adequate depth for the panel mount components, but it didn’t look like an insurmountable obstacle. It was just a question of what was directly behind that location. As the factory built the XJs it is blocked off.
I started by making myself a centering drill guide out of aluminum.
There is a ¼” hole through the center of that dowel which allowed me to drill pilot holes for the four holes I would need.
Here are the four pilot holes:
I then used a hole saw with a ¼” rod as a pilot. If I were to use a drill bit as a pilot it would chew its way sideways into the thin plastic while the cutting teeth of the hole saw were engaged on one side only (sloped surface being cut into), but by using a smooth rod the pilot holes remain intact and keep the hole saw from wandering.
The first pass got me this far.
Notice that I am still a good ways from reaching the bottom of the center recess on the top two. That is because the hole saw bottomed out on the ridge at the top on those ones. I need to remove that ridge, but still keep my pilot hole. Some patient work with a utility knife was my solution there. Just lots of cuts along the same line until it can finally be snapped off.
Final cuts with the hole saw and clean up with a utility knife:
This then left the question of what is further behind there? Where am I relative to all that stuff under the dash. A tentative hole was drilled with a ¼” bit and then located and assessed from the back. Hmm… Not bad. There is a vacuum servo back here for the vent system, but I should have room to work around this. A second ¼” hole was drilled and checked and then the two of them were used with a smaller hole saw to make passages for the wiring. I also removed the bottom part of my support web to allow clearance for wiring behind the panel, and pulled the original cigarette lighter wiring back in so that it can feed one of my outlets.
Then it was time to assemble my new panel. I don’t expect many folks are going to opt for the Anderson Power Poles. They are a bit of a pain, and somewhat in the realm of geeks only. However, they are the ticket for many of the ham radio things I run. But while the other components are designed with spade connectors on the back the Anderson Power Poles are intended to be wired straight through to the fuse block. That means their harness needs to go in with them. And will also have to come out with them. Yippee.
At this point in the installation I noted a missing detail: No forward extension for the screw for the dash bezel. Hmm…
I can see how that particular forward extension would make the printing of this part much more complicated, and in talking to Boot13 it turned out that his design mule was missing that screw anyhow. However, on my dash I have a couple of reasons for wanting that screw to be in place. First, my dash bezel is cracked in half above the steering wheel (I believe a previous owner did this in order to avoid having to disassemble the overgrown shroud around the lock mechanism which comes on ’95 & ’96 airbag equipped XJs), and secondly, another (or the same perhaps) previous owner cut out all radio support and set things up such that the radio is mounted directly to the dash bezel. Brilliant move. And it now means that the support role of that particular screw is important. So I tried to come up with a solution that would return that support back into the picture.
This is what I came up with:
Not yet drilled, just waiting for the bezel to go into place so that I could locate the position of the screw and drill it accurately.
This sort of worked. It got me the support of that screw, but it also pushed the panel forward enough to create funny gaps and rattles in the dash. This wasn’t going to be the long term solution. So I talked to Boot13 about making another version of the panel, but with shorter stand-offs so that this bracket could fit underneath and still not push the dash bezel out of place. He took my request even farther and made this:
And another view:
And now we have the second version (at least in my hands) of this panel:
What you can’t see in this picture is the fact that those two upper screw mounts have a little flange along the bottom on the back side for the screw support bracket to register on, making it easier to assemble all the pieces that those screws need to go through. That is a nice touch and shows that Boot13 put more thought into this part than does the average automotive engineer.
And here is the final result:
I am very happy with the end result. And now I have a request in for a custom version of the panel above this one.
Thank you Boot13!
")
 supporting vendor.