• Welcome to the new NAXJA Forum! If your password does not work, please use "Forgot your password?" link on the log-in page. Please feel free to reach out to [email protected] if we can provide any assistance.

HP44 build for the Xota

87xjco

NAXJA Forum User
Location
Denver, CO
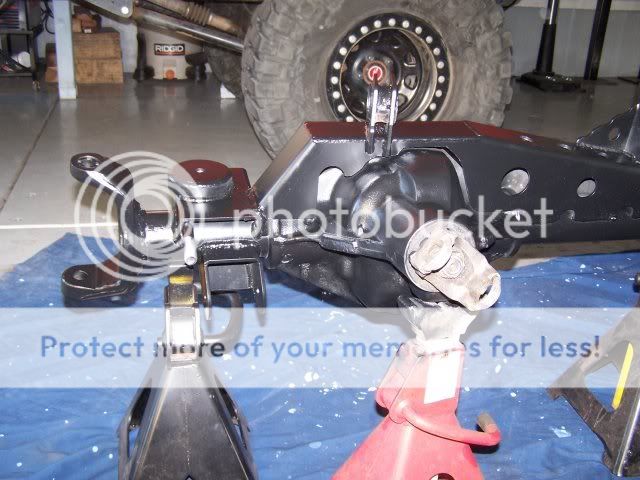
Here's my build that i'm in the middle of, I'm doing mine a little different then i've seen any one else set one up for an XJ.

My truck of course is not an XJ, but I bulit it with very similar bracket positions as an XJ, so maybe some of this will apply to XJ builders.

One of my goals with the HP44 is to have a little wider WMS then the Waggy 44 I currently run, this will give me a little more stability and also get my tires outside the exo-cage a little more, maybe then I can get thru situations where my cage hangs up on rocks and the tires are too far inboard to get traction.

The HP44 is 6" wider then my Waggy 44, but this is a little more then I would prefer, i'd like about 3" wider instead.

Also right now I have a slight problem with my driveshaft occasionally rubbing against the exhaust downpipe, and with the yoke being higher on the HP44, that problem might get worse.


So this first diagram shows the current dimensions of the Waggy 44 that is in my truck now. I'd like to get the center of the yoke in relation to the left spring center, to be about a half to an inch less then the current 8.50" dimension. The 47" measurement is center of ball joint to center of ball joint. The 36.50" spring center to center needs to stay the about the same.

Xota+D44+measurements.jpg


This diagram is the stock dimensions of the HP44 that I have. If I center the axle, the yoke to spring center increases .25". That could be a problem. I also don't like being 6 inches wider.

HP44+measurements.jpg
 
So here's what i'm doing

I am shortening the drivers side tube to Waggy width, i think this will work out better.

The info. I have found says the Waggy axle shafts are 3.11" shorter on the drivers side, and 1.79" shorter on the passenger side.

So when I shorten just the drivers side, I can run a Waggy axle on the drivers side, and keep the Ford axle on the passenger side.

I think I have most of the final dimensions all figured out

HP44+Final+Dimension.jpg


The pinion will be 8" inboard of the spring center, which is still 3/4" less then if I stay full width.
 
I started tearing down the 1 ton housing and I cut off a couple of brackets and the right spring perch.Unfortunately this housing has the left leaf spring perch cast as part of the center section, that will require some of the brackets I need, to be custom, no TnT kit for me.
Dsc03860.jpg


This shock bracket was on the left tube
Dsc03862.jpg


This housing has the 1/2" thick tubes
Dsc03863.jpg


Here is a Waggy axle shaft next to the Ford inner axle shaft.

Dsc03866.jpg


That's strange, I am measuring a difference of 2 13/16" or 2.81". I was expecting a difference of 3.11". That's 3/10ths of an inch shorter then I expected.

So I am going to shorten the tube 2 13/16", and i'm also gonna set the spring width a little wider to have the coils slightly angled outwards on the bottom.


So now the final dimensions are below

HP44+Final+Dimension.jpg
 
Well i'm past the point of no return now. I cut off the drivers side inner C and shortened the tube.

Dsc03869.jpg


I set my calipers at 2 13/16" and sort of used them as a scribe and made a line around the tube. Then I carefully cut about a 1/8" groove all around the tube, staying ouboard of that line about 1/16".

Dsc03868.jpg


Then I used the sawzall to cut it off, it actually went pretty quick and the groove worked good as a guide to keep the blade straight.

I left it a little long on purpose and i'll grind it to the right length.

To make sure it comes out the right length, I first put the other side axle in place and pushed it in all the way until it butts up against the axle tube.

Dsc03870.jpg


Then I can see how it sets in relation to the spider gear inside the carrier

Dsc03872.jpg


Then I put the waggy axle in and butt it up against the tube

Dsc03871.jpg


Here you can barely see, but the waggy axle is not as deep in the bottom spider gear as the Ford axle on the other side is

Dsc03873.jpg


So i'll keep grinding down that tube until the waggy axle fits the same as the other side. I don't really have to worry about being exactly straight or having the tube cut exactly square. it's the position of the inner C that will matter, I have plenty of room for error on the tube.
 
I determined that my pinion angle will need to be about 7 degrees for the driveshaft to line up properly

So I set the pinion at 7 degrees on my cart, o/k 6.9 degrees
Dsc03893.jpg


And then measured the caster angle on the inner C that has not been cut off.

Dsc03894.jpg


The reading I get is only 3 degrees, and that's off from where I want it. I want at least 5 degrees caster and up to 7 degrees would be fine with me. So I will be cutting this C off and i'll rotate it to about 6 degrees.

Went to my favorite steel scrap yard (K&K Surplus) and found some rectangular tube to build a truss out of.

Dsc03904.jpg


That's 1/4" wall - 2" x 5" tube'

Then I started making the truss and brackets
Dsc03905.jpg


Dsc03909.jpg


The above bracket will be welded onto the spring bucket plate and gusseted on the sides.
I took advantage of a hole in the rib of the center section casting. So this bracket can be bolted there, as well as welded to the spring bucket plate.
Dsc03907.jpg


Boxed in the truss where it goes over the center section
Dsc03910.jpg


Making the right LCA brackets
Dsc03917.jpg


Uhg, i'm so tired of cutting and grinding and drilling and metal shavings in my hands and fingers.

But i'm starting to see light at the end of the tunnel.

Rt. LCA bracket is welded to the tubes, i'll box it in on the bottom and probably add a gusset or two.
Dsc03926.jpg
 
i've been working on cutting off and rotating the right inner C.

I used a cutoff wheel and cut all the way around, just inside of the weld. You can feel the difference in the resistance on the cutoff wheel when you are thru the inner C and into the tube, so it's fairly easy to tell when the cut is deep enough.
Dsc03944.jpg


I will just pound the inner C back on checking all the angles as I go.

First I make sure the housing is setting level
Dsc03950.jpg


Then I prop up the pinion so it's setting at the spec. I figured I will want in my truck, 7 degrees.
Dsc03947.jpg


I have already installed the left inner C, and i'm double checking the reading. Looks like it's at 5.5 degrees
Dsc03948.jpg


Then I pound on the right inner C and check my readings as I work it on there. It's easiest if you get it started at the right spec. or at least rotate it with the hammer before it gets very far onto the tube. I ended up with 5.6 degrees and that 1 tenth of a degree won't be any problem. Up to about one degree side to side difference should be fine.
Dsc03949.jpg


I keep pounding it on until I have the thickness of the cutoff wheel left for a gap between the weld and the inner C
Dsc03946.jpg


Before I weld either of the inner C's on, I'm gonna bolt on the knuckles and check the camber and if it's off, i'll try pounding on the inner C, on the top or the bottom as needed, to change the camber
 
I've bolted on the knuckles so that I can accurately measure the camber angle.

Here the right side is setting at .9 degrees positive camber
Dsc03951.jpg


and the left side is at .7 degrees positive camber
Dsc03952.jpg


My own preference for camber spec's may differ from factory spec's. Or other technicians.

But I prefer on solid axle trucks with big tires, that the camber be .5 degrees positive +/- .5 degrees. And maybe more importantly that the side to side difference be less then .5 degrees.

If i were able to get it exactly where I wanted it, both sides would be at exactly .5 degrees. But franklly if I was off a degree or so on either side, it would probably have little effect.

In this case, where i'll be trying to tilt the inner C, that is already pressed on the tube. I don't expect that i'll be able to get more then a couple tenths of a degree movement at the most.

So I smacked the top of the right inner C a few times with the 3lb sledge hammer, but I wasn't able to get that side to move, I would have liked to get it to .7 degrees, but it really should be fine like it is.

Of course I always made sure the axle housing was level, before checking the camber.

More later....
 
Very smart checking the camber before burning the Cs home. I didn't, just put them back the way they were and that was a mistake.
 
Yeah when I did the Waggy 44 the camber ended up a little more then 1 degree on one side, and .5 on the other. At that time, I din't think it would be possible for the camber to be off, as tight as those inner C's press on. But i've heard that it can be off and can be moved a little if needed before the C's are welded on.

I'll be curious to see if the specs match up well to what i'm reading, once it's aligned.
 
My issue was that the tops of the tires leaned out noticeably. I had to use a tapered sleeve for the upper ball joints to correct the problem.
 
When I weld on the inner C's or anything to axle tubes, I like to preheat the metal to get better weld penetration.

So here i'm heating both the tube and the C.
Dsc03955.jpg


I like to get the area heated to between 400 and 450 degrees
Dsc03956.jpg


Not my best welds but they should be plenty strong enough. I don't try to do more than about 1/3 of the weld at one time, it's to hard to move the housing or go all the way around in one pass, especially when i'm by myself.
Dsc03957.jpg


On the other side there is still alot of the old weld left, i also don't normally go thru the trouble to grind the weld all the way off. I just grind enough that there is a good sized area for the weld to be applied.
Dsc03954.jpg


Hum, i'm just not welding that great today, I probably should have warmed up on some scrapp bfore I welded away on these. But I still feel they are plenty strong enough.
Dsc03959.jpg
 
I've welded on the truss to just the long side tube, I'll wait until i've done my gears and used the case spreader, before I weld the other side

Dsc03960.jpg


Then some paint to hide my sins
Dsc03961.jpg


Dsc03962.jpg


Next is probably steering linkage and mounting the ram for hydro assist.
 
one thing to look at before burning that truss all the way home would be the oil pan clearance at full stuff.

my first itiration of axle brackets for my HP44 had a similar height bracket above the diff that looked similar in height above the casting, and my oil pan has a nice little smack in it from the corner of my mount bridge...

I dont know how feaseable it is to bolt your axle in and putt it at full stuff and check for such things, but it may be time well spent...
 
i am in the middle of doing the same thing (or fairly close to ) with my F350 D60 and want to know the oil pan issues because the truss looks mega high. second is are you going to weld the truss to the housing as well?? i always do it as it adds to the strength considerably but let me know what you decide. looking fairly good by the way.
 
XJ_ranger said:
one thing to look at before burning that truss all the way home would be the oil pan clearance at full stuff.

Yeah that's a valid concern, and I may be building a tri-link upper arm mounted to the center of that truss, which could pose even more center oil pan clearance issues.

I have alot of room in my rig, but it could be a problem on some rigs.

I don't think mine is much higher then the TnT truss like below, so there's always that concern with a truss system.
4-4.jpg


Mr.OverKill said:
i am in the middle of doing the same thing (or fairly close to ) with my F350 D60 and want to know the oil pan issues because the truss looks mega high. second is are you going to weld the truss to the housing as well?? i always do it as it adds to the strength considerably but let me know what you decide. looking fairly good by the way.

I've thought about welding to that center section, and back when I did the Waggy housing I welded to the center section without any problem.

I've actually been fighting with that in my head. Here's my long winded thoughts.

I worry that when you weld to forged or cast steel, or iron, you do weaken it some, but then again if the welds were made to ribbing or thicker areas of the casting, that probably wouldn't matter.

I also wonder about when I use the case spreader for the gear install or if I need to spread the case in the future, will welding to the center section resist being spread. I've installed alot of gears without a case spreader, but I prefer using one, for the best set up.

But I also question how much strength I gain from the truss, from the left side to the right side, with no attachment points across that center section.

I still haven't decided, but i'm leaning towards not welding to the center section.
 
Started test fitting the ram

That is not the tie rod that I will end up using, but it's in the right position so I just tack welded one of the brackets on it for mock up.

Left turn to stop
Dsc03964.jpg


Right turn to stop
Dsc03966.jpg


I think I positioned the truss far enough back that clearance wont be a problem. the pictures make it look a little tighter then it actually is, there's pretty good clearance all around the ram.
Dsc03968.jpg


Dsc03971.jpg
 
Got some parts in today.

Man, looking how big and beefy that 9" is, compared to the HP44 ring and pinion, makes me start to second guess my choice to run a HP44. Everyone told me to just go D60 and stop messing around..

Rats !!!!!!!!!!!!!!!

Dsc03973.jpg
 
why are your high steer arms so hammered?
 
I had to take them off to press in new ball joints.

I was surprised how much hammering it took to get the cones to release out of them.

Maybe I over torgued them the first time I put them on. 100 lbs if I remember right.

I'll be getting new cones and filling and grinding the bent areas of the arms before final install. then i'll watch them carefully.
 
Back
Top