• Welcome to the new NAXJA Forum! If your password does not work, please use "Forgot your password?" link on the log-in page. Please feel free to reach out to [email protected] if we can provide any assistance.

Boatsides

its like a trailer hitch, its always gonna bite you...i skate a lot and grip tape does hurt pretty good, i still perfer it to pavement tho
 
Just a warning about doing this. If you wear shorts you WILL kill the back of your legs. I thought it was a great idea on my AJs rails too and now I really wish I wouldn't have done it. Both of my kids and I have been attacked by that stuff. It hurts.

its like a trailer hitch, its always gonna bite you...i skate a lot and grip tape does hurt pretty good, i still perfer it to pavement tho

Im thinking about putting it on the inside of the bars to hopefully prevent my legs from being chewed up. That will come at a later date though.


Alright, so here begins the story.

We had a trip planned to go the the Rubicon trail as a break in run for me as well as it to be my last wheeling trip of the summer before I had to go back to Colorado for school. We were going to leave the Bay Area at 4pm on Saturday and head up to Loon Lake, camp Saturday night, and wheel Sunday and Monday, and finally head home Monday night.


Well, if you look back a couple pages you can see my huge list I had to do before I left. Basically finish the boat sides, and add a breather hose for my front axle.

The front breather was a royal PITA because when I did the T&T truss and ARB air locker, I redrilled the breather hose farther back on the diff, which put it right under the truss. Thankfully a friend of mine has the manual dexterity of a monkey and was somehow able to get it in, and a hose routed to it.

I woke up Saturday morning expecting to get everything done pretty fast. I had to make 48 of these little tabs to mount the plastic onto the supports. Took me forever as I had to drill holes in the metal, cut them to length, and then tack weld a nut onto them.
00115.jpg


Got those all done, and a friend came over to help me install my seats and seat belts. Hypothetically they were all supposed to just bolt right in. Unfortunately it took him/us almost 2 hours to get them in. A combination of welding splatter, not enough space, and general no fitting right.

Then I was able to use a quick little tool I made (piece of angle iron with a hole drilled in it) to get all of the tabs on the supports. Took me a lot less time then I originally thought, but I was still behind schedule.
00215.jpg


00315.jpg


After that, I had to figure out how to get the plastic bolted onto those tabs. My dad came up with a good idea of cutting out a piece of cardboard, spray painting the tabs, and then pushing the carboard onto the tabs. That was then used as a template. It worked well, but most of the holes were about 1/2'' off for some reason. So that took way to long.


Anyway, after 12 hours of working, and 4 hours past our time to get out of town, we finally load my POS on the Uhaul trailer. We threw all things I could grab into boxes and headed out.
00413.jpg


Looked pretty bad ass on the trailer if I do say so myself.


So we left town, and got some gas before heading up Icehouse Road. My little group.
00813.jpg


00910.jpg


01010.jpg


And me
00612.jpg


I barely fit on the trailer. Good thing I had more backspacing then I had before.
0118.jpg


So we get up to Loon Lake at 12pm, had a couple of beers and passed out.

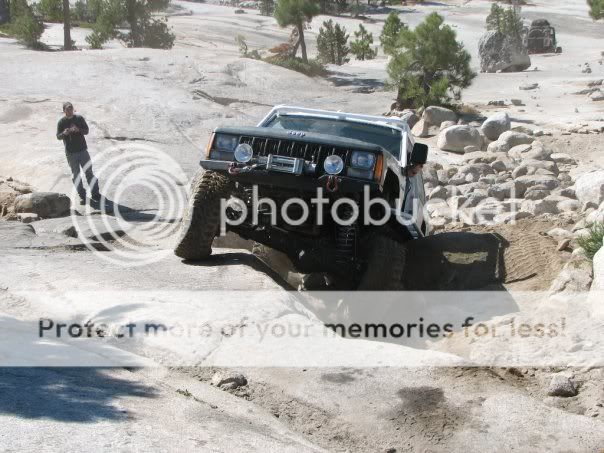
Sunday morning we get up and have to finish my Jeep real quick. Luckily it was just finishing up some seat belt bolts and putting the ARB air lines in. Got all that done, and went wheeling. We got all the way to the slabs, and I started to have trouble with my ARB. It seemed like it wasnt working all the time. I tried a ledge, and then had to stop because I didnt have a front locker for some reason.

So this is the only picture I have of me wheeling, and right where I had to stop. We look at my air line going to my front axle and find that at full compression my drivers side upper control arm was hitting my trackbar which then pinched my air line. Quick fix got that fixed, but then I realized that my upper part of my radius arms was hitting my yoke and breaking the ujoint Ubolts. I figured it had self clearanced itself, and put a new ubolt in. Start to pop back up the ledge, and bang, there goes the Ubolt. We decide that if we use the trackbar to shift the axle over to the side so the ubolt wont hit.
5720_118343614889_563914889_2130134.jpg


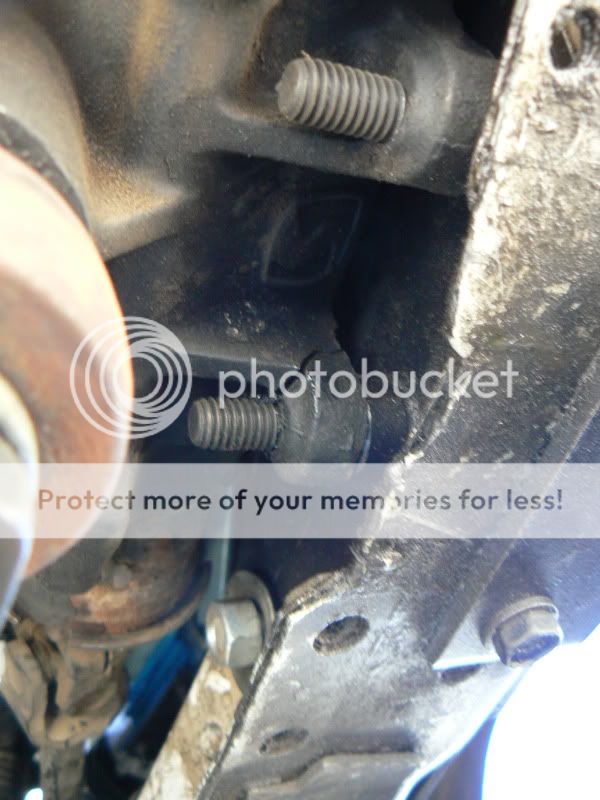
I drive off the ledge, back onto the slabs so we can work on the flat. A friend looks under my Jeep and he sees this:
0127.jpg


0136.jpg


One of the tabs that bolts the steering box on sheared off. Meaning my weekend was done. I wheeled for about 30 minutes and had this happen. Thankfully I was able to get it back to the trailer with nothing else breaking.


And so ends my story. I had a dang good time, but it sucks that I spent all that time and busting my balls to get it on the trail and that happens.

And it now sits in my garage while I am 1200 miles away in CO for school. Over Thanksgiving break I will be swapping in a new steering box and shifting the axle.


Sorry about the long story.
 
Last edited:
:shocked: yikes!!! That sucks, sorry to hear you worked so hard only to have something not related to the boatsides/cage ruin your weekend!

On the upside though, the Jeep is looking great. I agree with it looking pretty badass on the trailer :thumbup:
 
Love the long story Matt!!

The Rig look top notch! I am sorry to hear that the inagural run did not go as smoothly as one would hope but at least you got it out and it only busted 30min into the trail.

Cant wait to see the the T-Day updates. Good luck in school.

Oh and I have that tow strap if you need to borrow it :p
 
oh damn! figures
 
As sucky as that is, at least it wasn't something that you just fabbed up. I think it would have sucked more if something you just did broke.
 
Matt, nice work.
So now that you have done boatsides would you do it again? Any good advice to someone starting in on them? Any dos or don'ts I should look out for? (Yeah not my junk an XJ)
 
Im going home in a couple weeks, so Im looking forward to not only finishing the project but also to go wheeling. During that time Ill also do a bit more tech on this, but for the time being, I found a link.


I was struggling to figure out how to get the holes lined up for my plastic, and I found this on Pirate. They are doing it on aluminum siding, but the same principle will work. Its also cool how the simple tool I used (angle iron with a hole in it) is the same thing Bent Fabrications is using to mount his tabs.

http://pirate4x4.com/forum/showpost.php?p=9697392&postcount=105

That's a good idea, provided you've already drilled the holes and you can access the back (which I believe you have and you can?). I was going to use riv-nuts in the 2x2 legs, so I won't have access to the back. My plan is to use clear Lexan. Drill pilot holes through the Lexan into the legs. Once all the legs are drilled, I'll remove the Lexan and use it as a template for the skin.
Billy

riv-nuts were what I used on my 2x2 supports. They work okay, but one has worked loose, and a few pop out now and then... Probably an install error, but I dont really worry about it much.

I just lined mine up by measuring and drawing lines in the plastic, drilling it first, and then using that as the template for the metal. It worked fine for me. A couple of holes weren't perfectly centered, but it's just for holding plastic on, not a big deal really...

Do you recall the size of the riv-nuts? And if they were the steel or aluminum ones?
Thanks,
Billy
 
They are steel, 1/4" by whatever grip thickness over .120 I found. I just got them from McMaster and used a crappy HF tool for the install. The tool is pretty messed up after all the pulls - I'm sure a better tool would make the install more pleasant...

Like I said, for what they have to do, I don't worry about them at all. I have twenty or more per side, so a couple of failures is no big deal.

A huge piece of Velcro would probably work, but you might not ever get it off again...

Travis
 
Alright, so some Turkey Day break updates.


On the Rubicon this last summer I had issues with my yoke hitting the Y link when the drivers tire is stuffed. So my dad and our friend replaced my steering box for me, and also shifted my front axle over to the passenger side a bit so things wouldnt hit. Well, I took the Jeep to my old high school and flexed it out.
011-3.jpg

:yelclap:


But then you looked at the yoke, and they obviously have interference issues
012-3.jpg


Took it home, and adjusted it a bit more, and now it has self clearanced, so I think that problem is taken care of.


Went down to Hollister Hills SVRA for the Sierra Chapter Toys for Tots run, and not only did I get to wheel my Jeep, but I only broke a trailer tie down strap.

Some wheeling pics, thanks to Hiimered for the pics
CIMG0048.jpg


CIMG0044.jpg


Had a blast and felt good being able to wheel my Jeep finally.


So now Im working on other things.


Due to how high I cut my door, it is impossible to get a new window into a door. So, I ended up cutting a slit in the bottom of my door, and slid the window in from the bottom. I duct taped a piece of metal over the hole, and hopefully thats that.
002-9.jpg


Next up: Im in the process of ripping out my dash, moving my trans shifter backwards ~5'', rewire all my assecories, and wire up some rock lights. It just never ends. :facepalm:
 
:clap: awesome! Glad you got out to wheel it, and glad your only issue was the tie-down :laugh: Happy Turkey Day, and good luck with the current projects. Jeep looks great
 
I had the same problem with my TNT crap and front driveshaft when I dropped my HP44 in, however my yoke contacted the bolt connecting the UCA to the LCA.

I think my front axle is shifted to the pass side about 1/2-3/4", but I never really measured.

Glad you got it straightened out!

Those boatsides are definitely sweet...would you go through the effort of raising them up that high again now that you've done it?
 
Nice to see it get a good work out at hollister, backing down white rock to go up the hard line was Sweet! :thumbup:

Your jeep is the coolist!
(I told you I would be your sack rider)

Now we just need to get you into some real rocks. .!. :D .!.
 
Ive fallowed your build for a little while now, and great build. You need to bring that back to CO and have some fun up here lol. Hope to see you out here wheeling with us again soon.
 
A few pics of Matt's rig in action at Hollister Hills.

standard.jpg


So that is what those wings are for...(being a poser)...:doh:
standard.jpg


On projects like this it is all about the little details. Notice how he used back duct tape here, blends right in... :laugh2:
standard.jpg
 
Back
Top