bimmerjeeper
NAXJA Forum User
- Location
- USA
I have recently been researching just how complex replacing shocks on an XJ really is, and if it's possible for a non-professional mechanic to undertake with just basic "regular person" tools (which does not include specialty equipment like a torch, air compressor, grinder, dremel, awls, punches, bench vice, and other advanced "shop" tools that casual "driveway oil change and air filter" guys never ever touch)
This thread is for other beginners like me who have never done shocks. This are some notes that may help others who come this way.
If you've ever replaced shocks, please skip this thread, as it will do nothing but annoy you.
---------
So, I'm getting hugely conflicting stories on how hard replacing the shocks on an XJ actually is. On the one hand, forum braggarts predictably say it can be done by a blind 6 year old in 10 mins. with just a screwdriver and a stick of butter. But, anyone with any experience in mechanics knows these posters are generally full of crap, mostly because after 30 years, they have understandably forgotten what it was like to do anything on the car for the first time. Unfortunately, this type of forum simplification is actually a detriment to those trying to ascertain whether a particular repair is risky to undertake at home.
nah it's pretty simple. Air tools help but aren't required. Hardest thing is getting the weld nut off if you break the bolt(s). I did mine in my buddy's driveway with basic tools.
If they do break, you'll have to pound out the old weld nut with a drift punch or air chisel, then fish the new bolt through from the top with some mechanics wire, and put the nut on the bottom
Ok, so, once you dig further, you then see stories of frozen bolts needing torches, welded bolts needing to be air chiseled off, rusted bolts snapping off, new brackets needing to be re-welded, and new holes being drilled/tapped. Yea, a far cry from a 6 year old doing this job with a $10 socket set and a few screwdrivers.... and starts sounding really more for hardcore gearheads and pro mechanics, not some "tune up" n00b who can turn bolts with his basic $1000 tool set (which does not include specialty stuff like a torch, air compressor, grinder, dremel, awls, punches, bench vice, and other advanced "shop" tools that casual mechanics never ever touch)
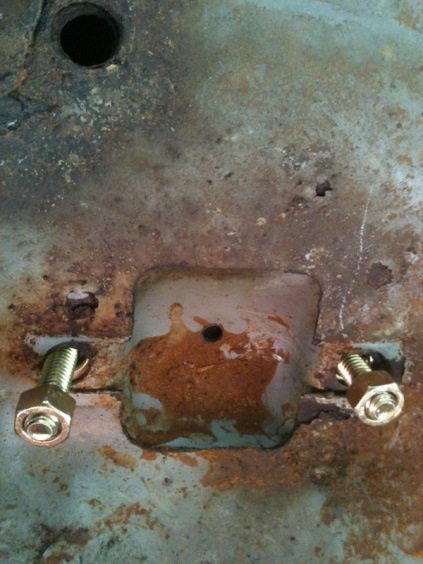
First, here are some photos:


The problem you will likely run into is the top bolts on the rear shocks breaking, if they do break it's not a big deal. You just get a hammer and a punch and knock them out, then get some tie wire and fish new bolt in. It's easy,
Ok, but here is what I don't get. Is the bolt threaded into that hole in the frame, or does it just slide through? If it's threaded through, then how can you punch it out? Don't you need to somehow unthread it and back it out? Screw extractor? Or a drill and tap/die set? If it just slips through the frame hole, then why do you need to hammmer/punch it out in the first place? Can't you just push it up and out with a finger?
there are nuts welded on to the back side of the holes that the bolts thread into. by punching them out you are actually breaking off that nut in the back.
Ahh. So, how the heck does everyone here use an air hammer/chisel to remove that rear welded nut? Just by doing what the awl/punch is doing on the remaining bolt? Ok, so the welded nut is behind the frame. It gets popped off when you air chisel the sheared bolt off.
So, what do you use when you put all the new stuff in? Clearly, you can't weld a new nut back there. There no room for a welder. So, do you just not have a nut back there? It sounds impossible to place a new nut back there, and then try to thread a new bolt through the un-welded nut.
Iv read people tape a nut in the box end of a wrench and slide the wrench into the spall openings on each side if the jeep. If you look there are like cubby access to slide a wrench in and then just bolt on the shocks. Id use some sort of loc tite to make sure they dont loosen up on you.
Ok, so you then stick the wrench up in that spall, and then fish a bolt in that same spall, and then how are you supposed to spin the bolt thru the taped nut? Is there room for your entire hand? I assume not if you need to fish the bolt in that spall instead of just sticking your hand in there and pushing it through.
Much easier to pull a new bolt through the jole from the top using some mechanics wire wrapped around the threads, and put the nut on the bottom. Most times you don't even need to put a wrench on it to tighten It down.
So you remove the welded nut and simply never replace it? You just put a nut on the bottom side of that panel? So, you will have one nut holding the bolt to the frame. Then you will have the shock. Then you'll need a 2nd nut to hold the shock to the bolt? Do you use washers all around?
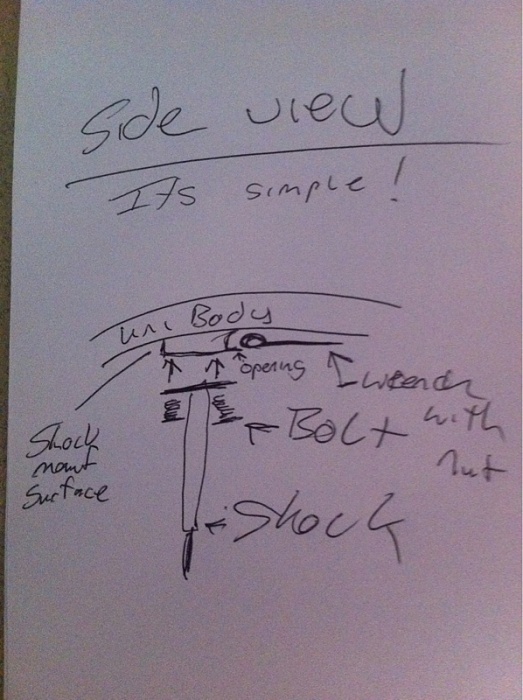
If this is correct, this is how I envision everything, from top to bottom:
Someone told me this is the order. Can anyone figure out what orientation he's implying? Is the bolt pointing upwards, like OEM, or is it pointing downwards, as in the replacement photo?
One for each side before the nut/bolt head.
So it'll go bolt, lock washer, washer, shock, frame, washer, nut
Stop the presses! Is your bolt facing UP??? That is totally opposite of the photo that was posted earlier where the bolt faces downwards.
In the photo, how would you thread this bolt through the nut up in the cavity?
LOL, this is a great example of why this stuff takes 2 hours to learn online vs. 60 seconds mins. if you had someone show you in real life.
What's the right way? To put the bolt facing upwards like you said,or to make the bolt point down like in the photo. If you make it point down, there's no way in hell you're getting a wrench and nut above that hole and threading the bolt through it before it pops down through the hole.
Another confusion is the direction of the bolt. As you can see, the replacement bolt in the photo points down. However, if there was a welded nut up above the hole, in the spall cavity, that means the original bolt must have pointed up? Or was it threaded somehow thru the weld nut and then pointed down through the hole?
Also, can someone list ALL the hardware needed to replace all 4 shocks? Every bolt and washer and nut? I do not reuse any stuff like this once it's already out, and know to be rusted/frozen/cracked. I prefer to be prepared for the worst. I will just buy (8) 5/16"x1½" bolts. Just get washers that will fit on the bolt?
How exactly does an air chisel work in this task? Do you put the chisel against the broken bolt? What if it broke up high, flush with the hole? Do you put the air chisel onto the punch/awl? Doesn't it just slip right off?
Still curious how you break the bolt loose with an air chisel.
Once the bolt is flush with the hole, then what???
Do you chisel the awl punch?
Air hammers come with different attachments one is pointed use it. But if you dont have an air compressor than it wont work so just use a punch and hammer
Thanks for the clarification about using a point tool with the air hammer.
It sounds like you can get away with having the nut below the frame, and good tip about grabbing the excess bolt with a vice grip to tighten the nut into the frame. I think it's about time I get myself a decent set of ratcheting wrenches.
I don't own a punch. I can not operate an air compressor from my garage with no electricity. Can I just use a hammer and screwdriver? Or do I really need to get the punch? Which one for a single use?
http://www.harborfreight.com/catalogsearch/result?q=punch
I still don't get one thing. If the bolt breaks in half, how the heck do you air hammer that with a point? The point will just slide right off. It's like trying to hammer a nail on the end of another nail. No way. Do you need to air chisel the protruding bolt down to flush with the hole, and THEN use the point tool to pop it out? You can't use the point tool to pop out a bolt protruding 1 inch out of the hole.
Thank you, this seems like a good compromise. I will let a professional at Sears handle the rears.
This seems like one of the areas where the $100 labor is totally worth the potential nightmare avoided.
The next stage of this research project is ordering the parts, which is also not a slam dunk.
Not sure of what replacement hardware I need, or if the shocks come with all of it. I replace everything.
Why do some shock photos have a pin sticking out, and others do not?
MONROE Part # 37083 ..These are of the SAME model ! Which is real?


This thread is for other beginners like me who have never done shocks. This are some notes that may help others who come this way.
If you've ever replaced shocks, please skip this thread, as it will do nothing but annoy you.
---------
So, I'm getting hugely conflicting stories on how hard replacing the shocks on an XJ actually is. On the one hand, forum braggarts predictably say it can be done by a blind 6 year old in 10 mins. with just a screwdriver and a stick of butter. But, anyone with any experience in mechanics knows these posters are generally full of crap, mostly because after 30 years, they have understandably forgotten what it was like to do anything on the car for the first time. Unfortunately, this type of forum simplification is actually a detriment to those trying to ascertain whether a particular repair is risky to undertake at home.
nah it's pretty simple. Air tools help but aren't required. Hardest thing is getting the weld nut off if you break the bolt(s). I did mine in my buddy's driveway with basic tools.
If they do break, you'll have to pound out the old weld nut with a drift punch or air chisel, then fish the new bolt through from the top with some mechanics wire, and put the nut on the bottom
Ok, so, once you dig further, you then see stories of frozen bolts needing torches, welded bolts needing to be air chiseled off, rusted bolts snapping off, new brackets needing to be re-welded, and new holes being drilled/tapped. Yea, a far cry from a 6 year old doing this job with a $10 socket set and a few screwdrivers.... and starts sounding really more for hardcore gearheads and pro mechanics, not some "tune up" n00b who can turn bolts with his basic $1000 tool set (which does not include specialty stuff like a torch, air compressor, grinder, dremel, awls, punches, bench vice, and other advanced "shop" tools that casual mechanics never ever touch)
First, here are some photos:
The problem you will likely run into is the top bolts on the rear shocks breaking, if they do break it's not a big deal. You just get a hammer and a punch and knock them out, then get some tie wire and fish new bolt in. It's easy,
Ok, but here is what I don't get. Is the bolt threaded into that hole in the frame, or does it just slide through? If it's threaded through, then how can you punch it out? Don't you need to somehow unthread it and back it out? Screw extractor? Or a drill and tap/die set? If it just slips through the frame hole, then why do you need to hammmer/punch it out in the first place? Can't you just push it up and out with a finger?
there are nuts welded on to the back side of the holes that the bolts thread into. by punching them out you are actually breaking off that nut in the back.
Ahh. So, how the heck does everyone here use an air hammer/chisel to remove that rear welded nut? Just by doing what the awl/punch is doing on the remaining bolt? Ok, so the welded nut is behind the frame. It gets popped off when you air chisel the sheared bolt off.
So, what do you use when you put all the new stuff in? Clearly, you can't weld a new nut back there. There no room for a welder. So, do you just not have a nut back there? It sounds impossible to place a new nut back there, and then try to thread a new bolt through the un-welded nut.
Iv read people tape a nut in the box end of a wrench and slide the wrench into the spall openings on each side if the jeep. If you look there are like cubby access to slide a wrench in and then just bolt on the shocks. Id use some sort of loc tite to make sure they dont loosen up on you.
Ok, so you then stick the wrench up in that spall, and then fish a bolt in that same spall, and then how are you supposed to spin the bolt thru the taped nut? Is there room for your entire hand? I assume not if you need to fish the bolt in that spall instead of just sticking your hand in there and pushing it through.
Much easier to pull a new bolt through the jole from the top using some mechanics wire wrapped around the threads, and put the nut on the bottom. Most times you don't even need to put a wrench on it to tighten It down.
So you remove the welded nut and simply never replace it? You just put a nut on the bottom side of that panel? So, you will have one nut holding the bolt to the frame. Then you will have the shock. Then you'll need a 2nd nut to hold the shock to the bolt? Do you use washers all around?
If this is correct, this is how I envision everything, from top to bottom:
- Bolt head (pointing down)
- Washer
- Frame/Unibody
- Washer
- Nut (to secure bolt to unibody)
- Shock "bracket"
- Washer
- Nut (to secure shock bracket to bolt)
Someone told me this is the order. Can anyone figure out what orientation he's implying? Is the bolt pointing upwards, like OEM, or is it pointing downwards, as in the replacement photo?
One for each side before the nut/bolt head.
So it'll go bolt, lock washer, washer, shock, frame, washer, nut
Stop the presses! Is your bolt facing UP??? That is totally opposite of the photo that was posted earlier where the bolt faces downwards.
In the photo, how would you thread this bolt through the nut up in the cavity?
LOL, this is a great example of why this stuff takes 2 hours to learn online vs. 60 seconds mins. if you had someone show you in real life.
What's the right way? To put the bolt facing upwards like you said,or to make the bolt point down like in the photo. If you make it point down, there's no way in hell you're getting a wrench and nut above that hole and threading the bolt through it before it pops down through the hole.
Another confusion is the direction of the bolt. As you can see, the replacement bolt in the photo points down. However, if there was a welded nut up above the hole, in the spall cavity, that means the original bolt must have pointed up? Or was it threaded somehow thru the weld nut and then pointed down through the hole?
Also, can someone list ALL the hardware needed to replace all 4 shocks? Every bolt and washer and nut? I do not reuse any stuff like this once it's already out, and know to be rusted/frozen/cracked. I prefer to be prepared for the worst. I will just buy (8) 5/16"x1½" bolts. Just get washers that will fit on the bolt?
How exactly does an air chisel work in this task? Do you put the chisel against the broken bolt? What if it broke up high, flush with the hole? Do you put the air chisel onto the punch/awl? Doesn't it just slip right off?
Still curious how you break the bolt loose with an air chisel.
Once the bolt is flush with the hole, then what???
Do you chisel the awl punch?
Air hammers come with different attachments one is pointed use it. But if you dont have an air compressor than it wont work so just use a punch and hammer
Thanks for the clarification about using a point tool with the air hammer.
It sounds like you can get away with having the nut below the frame, and good tip about grabbing the excess bolt with a vice grip to tighten the nut into the frame. I think it's about time I get myself a decent set of ratcheting wrenches.
I don't own a punch. I can not operate an air compressor from my garage with no electricity. Can I just use a hammer and screwdriver? Or do I really need to get the punch? Which one for a single use?
http://www.harborfreight.com/catalogsearch/result?q=punch
I still don't get one thing. If the bolt breaks in half, how the heck do you air hammer that with a point? The point will just slide right off. It's like trying to hammer a nail on the end of another nail. No way. Do you need to air chisel the protruding bolt down to flush with the hole, and THEN use the point tool to pop it out? You can't use the point tool to pop out a bolt protruding 1 inch out of the hole.
Agreed about the forum braggarts. The short answer is the fronts are pretty easy and the rears are not. Do the fronts yourself and take it to Sears when they have a sale or any other place that is reasonable. Tough to screw up rear shock install on an XJS...just a simple but tough job without a lift and some air tools.
Thank you, this seems like a good compromise. I will let a professional at Sears handle the rears.
This seems like one of the areas where the $100 labor is totally worth the potential nightmare avoided.
The next stage of this research project is ordering the parts, which is also not a slam dunk.
Not sure of what replacement hardware I need, or if the shocks come with all of it. I replace everything.
Why do some shock photos have a pin sticking out, and others do not?
MONROE Part # 37083 ..These are of the SAME model ! Which is real?
Last edited:


")
")