• Welcome to the new NAXJA Forum! If your password does not work, please use "Forgot your password?" link on the log-in page. Please feel free to reach out to [email protected] if we can provide any assistance.

Project Jep: Overbuilt Overland XJ Stage 1 Build Thread

I hope you haven't driven this yet. Based on the pic you posted the front pinion is way too deep. This will overheat your front ring and pinion gears and cause premature failure. You need to take about .010" of shim out from behind the large pinion bearing cup and see what kind of pattern that gives you. If you need some more help please PM me and I will help you get it setup.
 
i don't know about that.. .010 out from behind the bearing would put the contact pattern WAY up off the top landing of the gear tooth.

maybe you are confused? here is another pic: notice sexy contact pattern centered between the root & top landing of the gear teeth

Jep10.jpg


gears should be set up centered between root & top landing of gear tooth slightly on the tight & deep side (+/- .002 or so)so when the carrier tries to roll out under load it moves contact pattern right into the sweet spot.

id say running 10 thou less than what I have now is what would lead to 'premature ring & pinion failure'.


Randy Lyman, CEO Randy's Ring & Pinion puts it nicely.

"The biggest myth I continually encounter has to do with contact patterns for setting pinion depth. Although many disagree, I have found that the method used by General Motors, Dana Spicer, Richmond Gear, the Gleason Gear Company, and many others works best. The method that they use involves centering the contact pattern from root to top land and not from heel to toe."
 
jeeperjohn is one of the better gear guys I know of on here, I suspect he just couldn't get a very good look at the pattern from your last pic.
 
i don't know about that.. .010 out from behind the bearing would put the contact pattern WAY up off the top landing of the gear tooth.

maybe you are confused? here is another pic: notice sexy contact pattern centered between the root & top landing of the gear teeth

Jep10.jpg


gears should be set up centered between root & top landing of gear tooth slightly on the tight & deep side (+/- .002 or so)so when the carrier tries to roll out under load it moves contact pattern right into the sweet spot.

id say running 10 thou less than what I have now is what would lead to 'premature ring & pinion failure'.


Randy Lyman, CEO Randy's Ring & Pinion puts it nicely.

"The biggest myth I continually encounter has to do with contact patterns for setting pinion depth. Although many disagree, I have found that the method used by General Motors, Dana Spicer, Richmond Gear, the Gleason Gear Company, and many others works best. The method that they use involves centering the contact pattern from root to top land and not from heel to toe."
Just trying to help here. I have alot of experience doing gears and I stand by my assessment that your pinion is too deep.
 
ok fine.. why do you say that?

could you be more specific pls.

maybe a pic w/ explanation of how you do it?

i've done lots of gear work too, with .010 less shims the contact pattern would bleed off the top flank of the gear tooth, i know because i tried it.

are you saying the gear pattern isn't centered in between root & top flank?

or that it shouldn't be centered between root & top flank?
 
Last edited:
Top flank of the gear tooth...? What are you talking about?

If you take .010 out (which I agree the pinion is too deep, but I'm not expert) then you have to reset your backlash as it will increase.
 
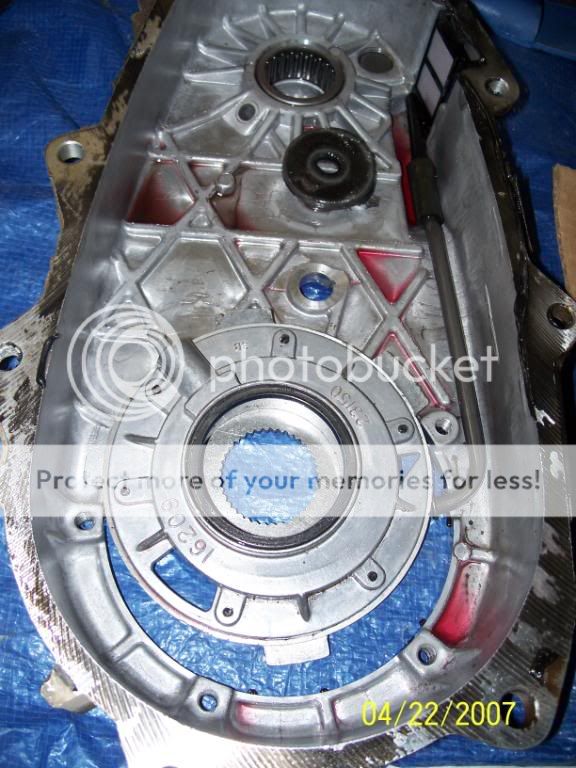
hmm .. so i'm trying to figure out how to remove the np231 front output shaft rear bearing. it is a torrington-style (needle) bearing that sits in a sealed recess in the back half of the case. there is maybe .125 gap between the back of the bearing and the case. FSM has an illustration of a puller, but i've never seen one that would be able to fit into such a tiny gap. my only bright idea i have right now is pry the needles out and then collapse the race with a punch... has anyone done one of these ?

100_0325.jpg


its the one in the upper part of this pic
I made a tool with a coupler nut and a big washer. Cut the nut in half longways, cut the washer and use it to go under the bearing. There is space under there. Get some allthread, put a socket over the coupler nut, thread the allread into the whole thing, then use a big socket, a 44 spindle nut socket works, and use a nut the pull it all out. Ill grab a pic of the tool if i can find it. Basically you make a home brew version of the dealer tool.
 
Top flank of the gear tooth...? What are you talking about?

If you take .010 out (which I agree the pinion is too deep, but I'm not expert) then you have to reset your backlash as it will increase.


my bad, what i meant is the contact pattern is centered between top landing & root (aka flank)

toothterms.gif


pattern-ok.gif


pattern-sp.gif.
 
Last edited:
ok fine.. why do you say that?

could you be more specific pls.

maybe a pic w/ explanation of how you do it?

i've done lots of gear work too, with .010 less shims the contact pattern would bleed off the top flank of the gear tooth, i know because i tried it.

are you saying the gear pattern isn't centered in between root & top flank?

or that it shouldn't be centered between root & top flank?
The wear pattern should wear off the compound as close to the center between the bottom of the groove (root or flank)and the top edge of the tooth (top land) as possible. In the pic you posted you can see that the tooth has worn off the compound only at the bottom of the tooth face. I suggested .010 because when I have done gears and had them that deep before, .010 got me very close and I think it will put you closer to an ideal pattern. I wasn't suggesting that it would make it perfect. A perfect pattern will have a very thin line of compound along the top edge of the tooth face. If you'd like, I can PM you some pictures of good gear patterns to use as a guide. If you PM me I will give you my cell # if you would like to talk with me about it, sometimes it is easier to get my point across verbally.
 
Last edited:
I made a tool with a coupler nut and a big washer. Cut the nut in half longways, cut the washer and use it to go under the bearing. There is space under there. Get some allthread, put a socket over the coupler nut, thread the allread into the whole thing, then use a big socket, a 44 spindle nut socket works, and use a nut the pull it all out. Ill grab a pic of the tool if i can find it. Basically you make a home brew version of the dealer tool.
HPIM1402.jpg

Use a short socket tho. The nut on the top is welded. You could also use 2 nute up there to hold to prevent the whole thing from spinning while you pull the bearing out. Use a little heat where the bearing goes and it will pop right out.
 
jeeperjohn is one of the better gear guys I know of on here, I suspect he just couldn't get a very good look at the pattern from your last pic.


Yeah, he has been in a lot of naxja members' rear ends.:scottm:
 
so I hear :roflmao:

(no lastara)
 
One thing I forgot to mention, you must have the backlash within specs to get an accurate gear pattern. It may require resetting the backlash to get a pattern each time.
 
I went ahead and re-adjusted my ring & pinion today.

Before specs: (pattern already shown)

Depth: .013"

Preload: .041" shim, 12 in/lbs

Backlash: .010"-.011"

AFTER specs (pics shown below, these are after I drove the 2 initial break-in periods, 4-range low traction condition, let them cool the second time and went to shop around the corner to check out my t-case in, drove home and then re-shimmed.)


Depth: .003"

Preload: .031" 10 in/lbs

Backlash: .012"-.013" all the way around

drive1.jpg


drive2.jpg


drive3.jpg


coast1.jpg
 
still not thrilled with the pattern, gonna try tightening the backlash by moved the carrier about .010 towards the pinion. if im still not happy with that, then I'll pull the last .003 depth shim
 
I went ahead and re-adjusted my ring & pinion today.

Before specs: (pattern already shown)

Depth: .013"

Preload: .041" shim, 12 in/lbs

Backlash: .010"-.011"

AFTER specs (pics shown below, these are after I drove the 2 initial break-in periods, 4-range low traction condition, let them cool the second time and went to shop around the corner to check out my t-case in, drove home and then re-shimmed.)


Depth: .003"

Preload: .031" 10 in/lbs

Backlash: .012"-.013" all the way around

drive1.jpg


drive2.jpg


drive3.jpg


coast1.jpg
I know this has been alot of work for you and the pattern is much better but I recommend trying .003" less shim for best gear life. The pattern is still just slightly deep. They will probably be fine like they are but could get noisy. Glad you got it done, it sure is a lot of work. :cheers:
 
the OME shocks are nitro shocks same construction as skyjacker, given valve rate would probably be more appropriate for a stock xj with ome parts..

i had all 4 corners with the skyjacker nitro shocks at 4.5" of lift and it was a stiff ride.

aside from control arm angle in my case, the skyjacker shocks were just too stiff for me. handled great, but too stiff for my liking.

switched to bilstein 5100's and it was a night and day difference.
 
Back
Top