• Welcome to the new NAXJA Forum! If your password does not work, please use "Forgot your password?" link on the log-in page. Please feel free to reach out to [email protected] if we can provide any assistance.

Project CRD MJ is born:

Got the Windshield Washer tank mounted. The 97+ tank is under the fender, but starting in 1995 the metal was punched out for it, so no MJ has it already.

Hole saw and then slotted with the grinder.
IMG_6569.jpg

IMG_6570.jpg

IMG_6571.jpg

IMG_6572.jpg

IMG_6573.jpg


This hole had to be blocked, I realized one of the plugs already in the firewall was a perfect fit, 1-1/4". Just need to get another to replug the firewall.
IMG_6574.jpg

IMG_6575.jpg


Final scrub of the engine bay before primering:
IMG_6576.jpg

IMG_6577.jpg


Also pressure washed the inside out:
IMG_6578.jpg

IMG_6579.jpg

IMG_6580.jpg
 
New stainless brake lines finally arrived, There are some for the rear and from the prop valve to the rear that I don't think I will be using, but they came in the kit.....so I guess I use them on something else, or see if they can be adapted at all for my needs with the disk 8.25.

IMG_6600.jpg

IMG_6601.jpg


****ty photo, but sanded A pillars, body part of the cowl, firewall, inner fenders, etc.
IMG_6604.jpg

IMG_6605.jpg


Drying, then spraying primer tomorrow.

I have to drive down to Denver to pickup paint, since the local Finishmaster is closed due to covid. Picking up the red base and the clear coat. So I guess that means spraying it saturday morning, then trying to get it curing in the sun ASAP, and then probably waiting a few days to install engine bay stuff.

I might spray some sound deadening while the engine bay paint cures. Fresh paint is very easy to scratch and mar, and installing things like wire harnesses will do lots of that.

Going with PR4 Flame Red. This is the aesthetic I am going for:

red_freedom1.JPG
 
I got my paint today, then swung by the junkyard since I saw a 96XJ was just put out and the fuel pump should work in my MJ tank. Turns out that XJ also had a lift. Got drop brackets, lower control arm, swaybar drop bracket, and fuel pump for $65.

YJTZ1055.jpg


Then I got home and did a final wipe of the engine bay for dust, then started spraying primer. Started with self etching primer for the areas with bare metal, which is the sort of greenish primer, then sprayed some high fill on areas where the paint was flaky and had imperfections, which is the more white looking primer.

IMG_6627.jpg

IMG_6628.jpg

IMG_6629.jpg

IMG_6630.jpg

IMG_6631.jpg

IMG_6632.jpg

IMG_6633.jpg

IMG_6634.jpg

IMG_6635.jpg

IMG_6636.jpg


Now for the drop bracket, haven't IDed the maker yet on these, but they are fairly pricey to buy. The coils had a PN that a google search shows to be 3" lift springs.

https://colorado4wheel.com/images/1988_MJ/build/content/images/large/IMG_6637.jpg/img]
[img]https://colorado4wheel.com/images/1988_MJ/build/content/images/large/IMG_6638.jpg
IMG_6640.jpg

IMG_6643.jpg


The timing of the drop brackets and coils is excellent, Ive been putting off ordering something because I wasn't sure exactly what I wanted to do for suspension, but now that I picked this up I'm going to use it. One bit of good luck that I will happily take right now.
 
I bought a 160amp alternator with a 20% off, it turns out its the wrong year. All the stuff you see online about this says you can use up to a 2003 Durango 160 amp alternator. This is not correct, 2001 is the last year of the 5.9L 160 amp Durango alternator you can use. Ended up buying one locally from Autozone with a lifetime warranty.

No way this one was going to work:
IMG_6661.jpg

IMG_6662.jpg

IMG_6663.jpg


This is the paint I am using, Omni Plus basecoat, and Axalta Chromebase "4 to 1" Clear.

The base coat gets mixed 1:1 with the base and reducer. The clear gets mixed 4:1 clear coat to "activator" The activator is just basically reducer and hardener mixed together.

IMG_6660.jpg


Correct one:
IMG_6665.jpg

IMG_6666.jpg

IMG_6667.jpg

IMG_6668.jpg


Needs some trimming to fit. I guess I'll work on that tomorrow.
IMG_6669.jpg

IMG_6670.jpg


Put it on jackstands to lower a bit and get the wheels out of the way of overspray:
IMG_6671.jpg

IMG_6672.jpg

IMG_6677.jpg


IMG_6678.jpg

IMG_6680.jpg


Basecoat:
IMG_6683.jpg

IMG_6684.jpg

IMG_6685.jpg

IMG_6686.jpg


First full coat of clear:
IMG_6691.jpg

IMG_6689.jpg


Final coat #4:
IMG_6695.jpg

IMG_6697.jpg

IMG_6698.jpg

IMG_6699.jpg

IMG_6700.jpg

IMG_6701.jpg


So the paint turned out decent, more orange peel than I would like, and more runs. Its been something like 8 years since I have painted anything, and this is entirely new paint, so I'm a little out of practice with this.

Still, its good enough for the engine bay, and the visible bits would look very smooth with a bit of wetsand as the orange peel is minimal.
 
Rolled it out into the sun to help the paint bake in the heat. I had the garage turned up to 80 overnight, but full sun will really get metal hot and help it bake.

It looks fukkin amazing out in the sun. Indoors the color looks dark, more like a cardinal red, but out in the sunlight.......main it really pops. Been in love with this color, PR4 - Flame Red, for 20 years. Dennis I think your JK is Flame Red as well IIRC.

IMG_6707.jpg

IMG_6708.jpg

IMG_6709.jpg

IMG_6710.jpg

IMG_6711.jpg

IMG_6712.jpg

IMG_6713.jpg

IMG_6714.jpg

IMG_6715.jpg

IMG_6716.jpg

IMG_6718.jpg


IMG_6721.jpg

IMG_6722.jpg

IMG_6723.jpg


Time to pressure wash again. I pulled a HP D30 today, 04 WK Akebono calipers and brackets, extended bump stops, and carbon canister and lines.
IMG_6724.jpg

IMG_6725.jpg

IMG_6726.jpg


Grabbed the track bar with the axle, mostly because I couldn't find the track bar brackets I've had saved forever, so I needed that. Track bar looks pretty new and in good shape, so I guess I can use that, unless I need to get an adjustable one.

IMG_6727.jpg
 
I dug out my spray on sound deadener, I ordered 10 gallons of this stuff in 2009 and was using it on my dads van extensively, I have had this unopened 5 gallon batch in the basement for a long time, I opened it to check it out and its still look good, just needs to be mixed up. So I'll be spraying that inside the cab tonight.

IMG_6774.jpg

IMG_6776.jpg


Then I masked off to spray the frame rails and cross member black:
IMG_6777.jpg

IMG_6778.jpg

IMG_6779.jpg

IMG_6782.jpg


I got the 160 amp alternator to fit last night, lots of grinding, and some of the alternator too, but its in place now! Pics of it finalized later.
 
Got to spraying the sound deadener tonight, I'll do some more coats tomorrow and then call it good.

Floor looks kinda dirty, combination of UV fading POR15, overspray etc. Cleaned it up before spraying.

IMG_6789.jpg


Cleaned up the old foam around the shifters so the spray will stick there. Taped off the holes going to the engine bay to keep the sound deadener from getting sprayed all around. on the fresh paint.


IMG_6790.jpg


IMG_6791.jpg


IMG_6792.jpg


IMG_6793.jpg


IMG_6794.jpg


IMG_6795.jpg


IMG_6798.jpg


IMG_6808.jpg


IMG_6815.jpg


IMG_6805.jpg
 
Did some sound deadener in the wheel wells as well.

IMG_6825.jpg


Some of the original firewall plugs were Caplugs from buffalo NY, this set I bought on Amazon also has some from them. Sort of fitting that a plug made in 1987 and a plug made in 2019 will find its way onto the MJ.

IMG_6827.jpg


Butyl sound deadener:

IMG_6828.jpg

IMG_6829.jpg


Did a couple of more coats of the spray on Quietcoat, then started on the mat:

IMG_6830.jpg


I ended up putting a piece in the oven after making a pizza, it made it nice and warm which means soft and easy to apply, but cooled down quick since the body metal was in the lower 60s while pressing it down. Using the warm oven worked great to heat them up and make them easy to apply. This is as much as I will do for now, and will switch to installing the dash and engine bay stuff. I want to get the engine installed!

IMG_6834.jpg


IMG_6836.jpg


The sound deadener is water based, so any place it can be exposed to water it needs to be coated to prevent contact, so I sprayed rubberized undercoating in several light coats to cover the sound deadener.

Plus, I cannot imagine the **** I would get if I painted it red.
IMG_6837.jpg

IMG_6838.jpg


Having a blast working on this. So glad to be bringing this project back home again. Been too ****ing long. I miss doing epic builds like this all the time.
 
Started reassembling the engine bay. I need to get a little foam to seal around the large airbox opening for the heater core and AC evaporator before the HVAC box can go in. Otherwise I am just running all the little lines and such that I can around in the engine bay. Wiring harness's, etc. I will install the engine wiring harness onto the engine and trans combo, and then slide the transfer case, transmission, and engine in as one unit all connected, this is much easier than trying to install the wiring into the body and then into the engine once in situ.

So I am very close to getting the dash installed, and very close to getting the engine installed.

I am really looking forward to seeing some things look complete, engine bay, dash, both are within striking distance and will be awesome to see installed.

IMG_6862.jpg

IMG_6863.jpg

IMG_6864.jpg

IMG_6865.jpg

IMG_6866.jpg

IMG_6867.jpg
 
Ok, I'm pretty proud of this one. This is the XJ vin on the donor dash:
IMG_6869.jpg


And this is the Vin plate from the MJ dash:
IMG_6870.jpg


So I cut the vin plate out of the dash with the plastic around it:
IMG_6872.jpg


No pics of the next part, but what I did was heat up the old dash bit untill the vin plate with rivets was able to come out. So then I had a vin plate that was loose. So I went to my new dash and carefully drilled on the rivets untill the vin plate came off. However I was left with a bit of rivet in the plastic that refused to come out. So I heated it up a little and pushed it out the back.

Then with my intact rivets and vin plate I put it up on the new dash, heated the rivet up while pushing on it with one leg of needle nose pliers, and used fireplace lighter to heat up the needle nose, the heat transferred down the plier leg to heat up the rivet, and then me pressing it at the same time pushed the rivet into the ABS plastic of the dash. The result is my original vin plate, with intact special rivets, firmly affixed to the new dash, as if it came from the factory that way.

So I have 3 vin plates, firewall, dash, and the vin plate on the upper radiator support.

IMG_6871.jpg


Looks factory:
IMG_6877.jpg


Ok, I got the bigger foam cut for the HVAC box and the HVAC box installed.

IMG_6874.jpg


And then I got to installing stuff:
IMG_6873.jpg


IMG_6875.jpg


IMG_6876.jpg


So I'm cranking along. Pushing hard. I'm fukkin tired. Getting frustrated at little stuff. I got so many things going on at once and trying to get multiple things figured out at the same time, got my head spinning a little bit.
 
IMG_6878.jpg


Junkyard punches a hole in the pan to drain fluid. Which sucks because there is a drain plug. Its really hard to find a pan without a hole punched in it. I cut a small bit of steel to try and patch it. We will see how that goes.

IMG_6880.jpg

IMG_6883.jpg


Took awhile but I got the shifters installed, had to be careful, line them up with the holes that do cross over, and then drill some new ones. Little things can be a big PITA to get.

IMG_6884.jpg

https://colorado4wheel.com/images/1988_MJ/build/content/images/large/IMG_6885.jpg]/img]

Got the holes drilled for the shifter linkage pivot, transfer case shifter in place.

[img]https://colorado4wheel.com/images/1988_MJ/build/content/images/large/IMG_6886.jpg

Non-faded needles! Looking forward to seeing that power up.
IMG_6887.jpg


Ok this is the XJ parking brake setup, ill be using the center part with adjustment, with the MJ bracket, the KJ rear parking break cables, and the XJ front parking brake cable and handle. The MJ bracket is the exact some length as the XJ so this will work nicely. I will use some box steel to drop the bracket down into the right plane.

IMG_6891.jpg


MJ and XJ parking brake brackets:
IMG_6908.jpg


So there are two ways to do the parking break, some of the guys reuse the original parking brake cable, which I dont have in good order, mine was broken so I dont have that to start with. When they reuse the MJ cable they cut off the portion of the handle that sticks down through the floor and then make an "L" bracket that holds the cable inside, and the cable exits in the usual MJ location.

I cut the lower portion off the handle to help me set it flat, so I could figure the correct places to mount the parking brake handle. Since I had more than one handle I took the more beat up one and cut it up, making it a sacrificial park for mock up. Here is the mockup handle in place so I could figure out where it needed to be for mounting.

IMG_6897.jpg

IMG_6893.jpg

IMG_6892.jpg

IMG_6899.jpg


IMG_6902.jpg

IMG_6903.jpg


Bolted down on two bolts, have to bend the ear down a little on the 3rd:
IMG_6905.jpg


Then after much trial and error, and looking at the Yellow Jeep, I tweaked the airbag computer bracket so the airbag computer sits level. Then I marked the center of the holes, center punched, pilot drilled, main drilled, and then put in stainless steel M6 inserts.

Interior harness, I started working on this a few years back, I need to finish up with the modifications for the interior harness and then figure out where to run it.

IMG_6909.jpg

IMG_6912.jpg

IMG_6914.jpg
 
Getting more and more complete, some interior stuff will need to come back off, but it makes me feel good seeing it installed in the truck.

IMG_6910.jpg

IMG_6915.jpg


Fresh washed parts, ready to be installed:
IMG_6916.jpg

IMG_6921.jpg


Fresh painted track bar and bracket:
IMG_6917.jpg


This NV242 from a KJ has something like 12K miles on it:
IMG_6918.jpg


Pressure washed some used carpet, seemed like it cleaned up pretty good, so I should be able to use it and cut it down.

IMG_6919.jpg


Tow hook bumper brackets waiting to be installed:
IMG_6920.jpg


Getting to be a real mess around here, projects tend to reach a critical mass where its in dissaray, and then they sort of come together and things start to align and clean up happens, Im at the worst of the mess right now I think.....should get better from here.

IMG_6922.jpg

IMG_6923.jpg

IMG_6924.jpg
 
Rivnuts installed for parking brake and airbag computer bracket, marked where I knew I needed to cut the floor for the parking brake to exit.

IMG_6936.jpg


Mounted:
IMG_6938.jpg


IMG_6940.jpg


I'm pleased with how this one turned out, about as nice as they come. The cables are in the stock MJ parking brake bracket, Its moved forward between the two more forward rails compared to where it was. I cut a piece of 3x2" box steel and sliced the ends so I could get to the bolts. There were already 4 bolt holes in the bed, 2 were used for the stock bracket, and 2 were unused. After a quick cleanout with a tap all 4 holes were ready for use. I cut the box and mounted it. Then I placed the stock bracket on this new spacer bar, and connected up the XJ parking brake cable, marked my forward/backward spacing, and then went to the bench top to drill it. Drilled and tapped 3 holes, using the same threads as the bed did. The bracket was already notched to clear the gad tank pickup. So its possible to remove and install the gas tank pickup with this bracket in place, maybe the short bed setup is a little different, but the stock bracket looks like its meant to go there.

IMG_6941.jpg


I used some cable clamps to help hold up the brake cables at the back going toward the axle. The cables are the stock KJ parking brake cables, plenty of length, feels like a factory setup.

IMG_6942.jpg

IMG_6945.jpg

IMG_6946.jpg


Brake cables routed through the factory MJ cable holder:
IMG_6947.jpg

IMG_6948.jpg


All I'm missing is the stock XJ adjuster to connect the parking brake to the rear cables. Another minor junkyard part that I'm sure I have hiding in a bucket somewhere.

Trying to use the 96XJ fuel pump and sensor assembly, it hits the slosh pan. Need some modification work to get this one going.

IMG_6970.jpg


Console mounted, screwed down to the plastic support bracket. This is where the console should sit in the final iteration, after the carpet and everything is installed finally.

IMG_6972.jpg


LP out, sitting on jack stands, going to roll the engine in from the front and then raise it up.

IMG_6973.jpg

IMG_6974.jpg


Finished up with the new stainless steel line, I ended up modifying the rear XJ line to fit the MJ and then running it to the back. It gets me closer than the original MJ line did, which was patched with a compression fitting to get to the rear end. So even in I tried to use it I would need to correct the splice, but even then I was going to need to do some custom brake stuff in the rear since I have KJ disks with a SUA. Overall pretty good solution. The complete new stainless kit was like $120 from rock auto. Totally worth it for nice new stainless lines!

IMG_6975.jpg


Old fuel feed line will feed fuel now, old fuel return line will be part of the EVAP line back to the canister. Old vent line from tank vents removed, and new stainless brake line from XJ routed as the MJ line was. Just need a short bit of hose to connect the evap line to the back.

IMG_6976.jpg


Running all back like factory:
IMG_6977.jpg


This is where the XJ line ends, I'll likely straighten in, and then make a new custom line to connect with this XJ line:
IMG_6978.jpg


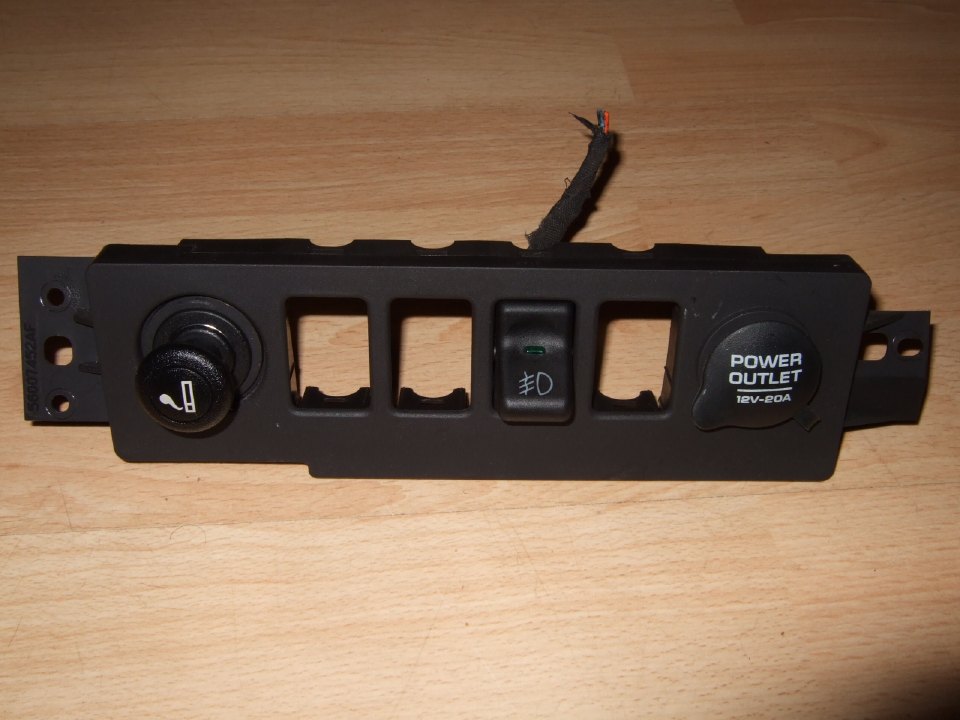
Heated mirror and foglights, no wiper. I have a 3 position panel around here, and I should have a 4 position panel hiding in some stuff somewhere.

IMG_6981.jpg


Mmmmmm stainless:

IMG_6983.jpg


Carpet cleaned up pretty good all things considered:
IMG_6986.jpg
 
Ok after seeing what one person on naxja did for this I tried to follow suit, I bent the pickup to the right and then it cleared the baffle.

IMG_6989.jpg


Then I put the pump and sender back on to test fit, clearing the baffle, but the sender was hitting the side of the tank.

IMG_6993.jpg


So then I had to bend the sender and the pump mount back to the left.

IMG_6999.jpg


So it basically went like this, bend pickup to the right, bend pump and sender to the left. this way the pump and sender end up in parallel to where they were, just offset.

This is the final bends:
IMG_7004.jpg


IMG_6994.jpg


IMG_7006.jpg


Using a camping pad to help level the floor so the carpet will sit a little flatter.

IMG_7002.jpg


IMG_7003.jpg


New sway bar brackets, should clear the WJ steering. Beefy, though this is the type of thing I really should have spent some time to draw up and cut with the plasma table, but in the sake of time I just purchased.

IMG_7007.jpg


IMG_7011.jpg


I also bought this rotor drilling guide to help drill the WJ rotors to fit the 5x4.5 unit bearings.

IMG_7012.jpg


IMG_7013.jpg
 
So I pressure washed the underside of the cab so I could undercoat it:

IMG_7014.jpg


Painting some things:
IMG_7015.jpg


IMG_7016.jpg


Starting to undercoat:

IMG_7022.jpg


IMG_7023.jpg


More paint:

IMG_7024.jpg


IMG_7025.jpg


Just about done with kilmat:

IMG_7032.jpg


Kilmat on roof, and then foam stuck to kilmat:
IMG_7033.jpg


IMG_7043.jpg


IMG_7035.jpg


IMG_7036.jpg


About done undercoating:

IMG_7037.jpg


Gears arrived, master install kit, and I have my 3.73 and up carrier. All ready to install and regear.

IMG_7039.jpg


I need to start installing some stuff to clear out this mess, I want to get the axle on the bench for doing the gears:

IMG_7040.jpg


IMG_7045.jpg


I got the upstream O2 sensor moved in the harness to connect to the correct spot in the 99 exhaust.

IMG_7046.jpg


IMG_7047.jpg


All the stuff I need to build the axle, except 1 ton steering stuff.

IMG_7048.jpg
 
Comparing driveshafts, the painted one is a KJ driveshaft, which is basically the same length as XJ when you include the flange that bolts to the KJ 8.25.

IMG_7053.jpg


Undercoating on, fuel lines and brake line reinstalled, need a new fuel filter and some fuel injection hose.

IMG_7054.jpg


Need to bend the lines a little to clear, only one will be used for fuel supply, the other will be a vapor line to the charcoal canister.

IMG_7055.jpg


IMG_7056.jpg


Man there is just something nice about clean stainless:

IMG_7057.jpg


IMG_7058.jpg


IMG_7060.jpg


IMG_7061.jpg


IMG_7062.jpg


Getting the seats cleaned up:

IMG_7063.jpg


I'll be getting the seats setup with the XJ power bases, this will help level the seats since the MJ floor raises at the back. This gives the feeling of sliding forward in the seat, with the power pedestal I can adjust and lower the back as needed. My seats also have the 2 door fold forward mechanism, which is nice for getting to stuff behind the rear seats.

IMG_7064.jpg


IMG_7065.jpg


IMG_7066.jpg


IMG_7067.jpg


IMG_7068.jpg


IMG_7069.jpg


IMG_7070.jpg


Had freerider weld in an 02 sensor bung in the 2001 XJ cat pipe, this will be needed for the rear 02 sensor since I am setting this up to be a 99/00 style for emissions.

IMG_7071.jpg


Stock transfer case skid that I suppose I will use.

IMG_7072.jpg


Engine goes in tomorrow!
 
So I used the lift to raise the front of the truck, raised the jackstands up, and rolled the engine under. Then I used the lift to lower the truck down onto the jackstand at a lower point.

IMG_7074.jpg


IMG_7075.jpg


IMG_7076.jpg


Sitting on the motor mounts:

IMG_7078.jpg


IMG_7079.jpg


IMG_7080.jpg


IMG_7081.jpg


IMG_7082.jpg


Had to get my laptop out to mess around with wiring and figure some things out. I had a blown fuse in the PDC, then I tracked down a ground that wasn't there to a couple of loose ground wires on the engine by the alternator I forgot to tighten.

After I did that I got CCD bus comms working and was able to read DTCs and reset the CELs. Got all cleared except for the fuel gauge voltage out of range.

IMG_7083.jpg

IMG_7084.jpg


And........I messed around with the 96XJ fuel pump sender and the gauge, whoever said the 96 sender works was full of $hit. The ohms range is totally off. I have no idea how anyone has ever been able to use it and have it ready anywhere near correct.

After messing with it......I am able to remove the float arm from the 96 XJ sender and install it into the 97+ XJ sender.

Now the 97+ xj sender wont fit the 96XJ fuel pump at all.....So I am going to cut the sender bracket out of the 97+ assembly, screw to down to the modified 96 XJ pump, and then attached the 97+ sender with the 96XJ float arm.

I have to say, out of all of this fuel pump crap, I'm really not happy with the solution. Depending on how it works out I might have to revisit the fuel pump implementation.
 
Slow progress, some things have been fighting me.

One small step forward, fuel pump sender.

Whoever said you could use the fuel pump sender from a 96 was smoking crack. The resistance ranges are completely wrong for the 97+ gauge cluster.

What I did was swap the float arm from the 96 XJ sender, since it seems to have the correct travel for the MJ tank, on to the 97+ sender, then I cut the mounting bracket off of the 97+ Xj pump body so it will hold the sender. Then I cut away some metal on the 96XJ sender mount to clear the XJ sender plastic. Then I mounted the XJ aluminum mount for the sender onto the 96Xj steel mount where the XJ sender was.

So now the 97+ XJ sender is mounted in the 96XJ pump housing, which is bent to the right to clear the baffle.

I'm going to grab another 96XJ pump assembly, and then look at cleaning up my MJ sender, and hybridizing them with a 97+ sender to sit inside the baffle. But that will come later, I think I have a "get it running solution" right now.

IMG_7103.jpg

IMG_7104.jpg

IMG_7105.jpg

IMG_7106.jpg

IMG_7107.jpg
 
So I'm picking up this switch panel for the MJ:

MJ127.jpg


The 4 position panel I'm buying has the rear fog switch! So when I get this installed in the MJ I will have from left to right, Mirror defroster, Front fog, Ext Idle, Rear Fog.

Now, what is Ext idle and Rear fog you may ask? Good question! For those not aware the police version XJs came with a switch from the factory that raised the idle while the Jeep was running. There is a wire on the PCM that when grounded will raise the idle rpm up. Factory switches for the extended idle are very rare, maybe someday I will find one. But for now aftermarket will have to do. Aftermarket switches with custom text can be purchased relatively cheap. However the text on these switches is not illuminated like a factory switch is.

Rear fog? Yup! Rear facing fogs are a common thing on european market vehicles, as in every vehicle has them. The rear fog switch is functionally the same as the front fog switch, however the icon is different. Front fog faces left, as in the above picture, and rear fog faces right. Subtle difference I know, but what it means is that I will have factory switches for forward facing fog lights and rear facing fog lights.

I don't know exactly what I will control with the rear facing fog lights, might even just use it to control my backup LED flood pods at times other than reverse. But I have the option, and its going to be clean and factory like. I hate seeing holes drilled in random places for all sorts of mis matched and janky switches and wiring around.

Other uses of the switch panel could be to have a switch that runs your cooling fan for awhile after shutoff, heat soak is definitely an issue for me and I tend to leave the jeep idling for awhile when I get to the top of a pass.
 
Back
Top