My Jeep Grows Up

Ha Alex, naw I was driving past your house since Hannah just moved in down the street from you.


But ya, I have the 1/2" ball at my house, ordered it from RE after talking to mjma, but I'm up at school now away from my Jeep so I don't have any time or means of getting home to put it in yet.
 
DAMNIT! I knew you were going to do this.

I hate you so much Ross. At least this "Piece of crap" can drive and wheel, unlike your pile of Junk that sits on jackstands in your yard. And you can't say crap back, I built mine in less time than yours is taking, and you aren't even close to being done.
 
Last edited:
lol its funny reading the first few pages of this thread

"i really like begsters jeep"

"thanks RCman"
 
And you can't say crap back

CRAP!!!!


What now bitch?!?! :D


I like this one:

i really like what begster has done, but i also give you a lot of credit for not just ditching the wrecked jeep and getting another one and starting over.
 
A couple dents add character... hopefully my jeep is working again next time you go wheeling!

I will be able to, but legally and registered? Not a chance.
Oh well...

I really wish I hadn't gotten rear ended then I would have been able to do something like Begster.
reading this post amuses me greatly
 
Haha, ya I love the comments from the beginning of the thread. I can't believe that was back in '08, seems like yesterday I was building it.

Any updates?
Well since Ross did bump this, and it is my build thread, I'll post some updates for anyone that cares.


[size=+1]April '09: [/size]
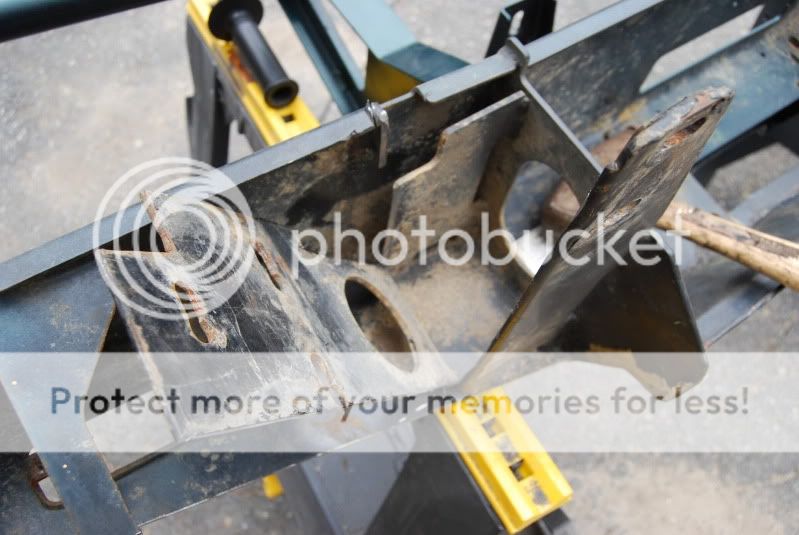
Bent the ARB bullbar on a few rocks one trip, then nearly ripped it off being recovered on the NAC snow run a few years ago. I took off the ARB and unbent it/cut it up to make it high clearance, add stronger mounts, and recess some IPF lights in it, but never got around to finishing it.

Glad there wasn't a winch in there, and couldn't fit one in now. (Can't tell, but the mounting locations were no longer flat or parallel)
DSC_2865.jpg


Old, bent, enlarged mounts cut off,
DSC_2965.jpg


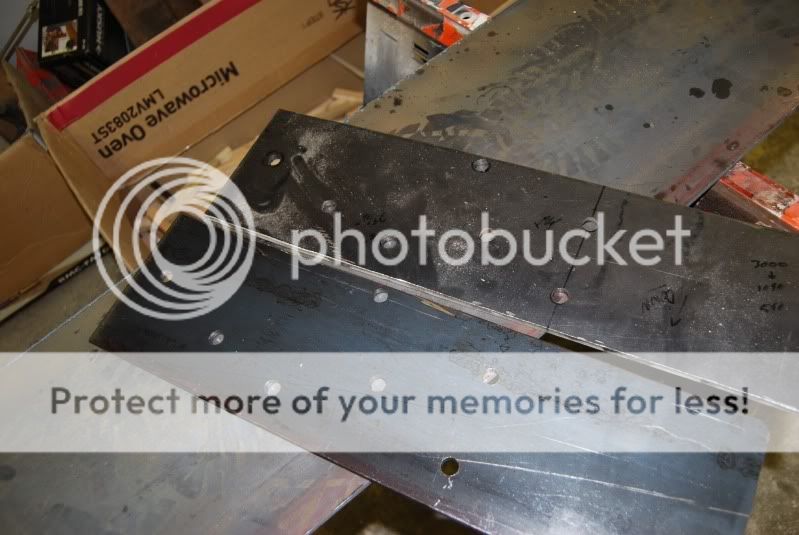
What the new mounts were going to be. 1/4" steel with 3/4" tabs welded to it (not pictured) for adequate recovery points.
DSC_2980.jpg


Clearanced and holes for the lights.
DSC_3044.jpg


[size=+1]May '09:[/size]
After completely disregarding my cooling system for the longest time, (I could open the petcock on the radiator fully and not a drip would pour out, > 1" thick layer of gunk in the bottom of overflow bottle, ran at ~220 every time and smelled like burning) my water pump finally gave up and started making bad noises. A complete system overhaul was in order, and I decided to replace my header that was cracked in multiple places.

DSC_0060.jpg


Cooling system was replaced with all aluminum radiator, Flowkooler water pump, 195* thermostat, replaced all lines, and a ZJ fan clutch was added last summer. Now it runs at 195 on the highway all day long.

1 of 3 cracks. Replaced with APN header.
DSC_0032.jpg


Seeing this prompted Brown Dog rubber motor mounts.
DSC_0020.jpg


[size=+1]Feb '10 - June '10 [/size]
Was down for a bunch of fixing and rework.

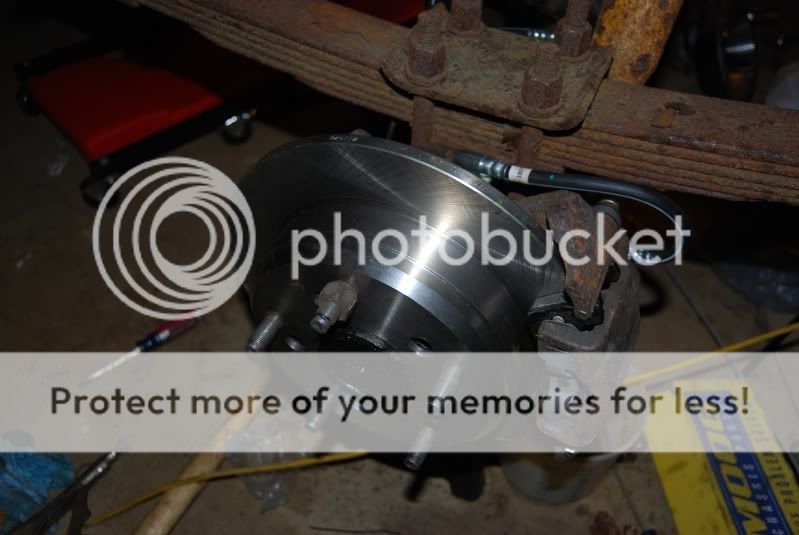
Brakes: Replaced front pads & rotors, as well as every hard and soft line.
DSC_0963.jpg


Had enough of the very sh*tty braking I had with the rear D44 drums, so it was time to finally install the Explorer disc brakes I had sitting around. Calipers, brackets, e-brake hardware, pads from junkyards for $75. Redrilled new ZJ rotors for 5x5.5 pattern, and decided to buy new pads.

Teraflex spacer tacked to new Crown retaining plates for ease of installation (So glad I did this).
DSC_0567.jpg


Final product
DSC_0966.jpg


Adjustable Ball Joint
Also installed an adjustable ball joint sleeve to compensate for the bent inner C, that was causing the camber in the driver's side tire in the following picture. Needed to grind a little of the high steer arm for clearance.
DSC_0972.jpg


CopyofDSC_2568.jpg


Rear Axle
It was also time I replaced the bearings in the rear axle, I knew the pinion bearings were shot from all the noise that was going on after taking my foot off the gas. Really happy I got a master install kit, as I needed to replace every bearing, reset the pinion bearing preload, and carrier bearing preload.

When removing the carrier, I'm extremely lucky that I left one bearing cap bolt threaded in. All of a sudden the OX carrier and ring gear dislodged itself from the case and was half hanging out of the diff, the single bolt being the only thing keeping it from crushing me since I was laying under the diff.

Ya, that pinion looks sweet. Notice how far the bearing looks to be loose pushed out; I hadn't loosened the pinion nut yet.
DSC_0559.jpg


Video of the play
 
[size=+1]Feb '10 - June '10 Cont. [/size]

Pinion, meet OX.
DSC_0556.jpg


I don't know who set up that axle since I bought it used, but the gears weren't set up well, and every bearing in that thing was shot. If I knew they were that bad, or bad at all, I would have replaced them before I put the axle in.

Steering
Initial pictures of the axle when first done were with 7.5" coils and 1.75" coil spacers.

I removed the spacer, and when I had the 7.5" coils in, any driving on the highway was white knuckle, and I would be playing ping-pong between the lines. It did not want to go straight. I had removed the 7.5" coils, and put the 4.5" coils back in, and HOLY CRAP I COULD DRIVE STRAIGHT AND WITH ONE HAND AGAIN.

I did run into a bottoming out issue though, so I moved the axle as far forward as I could, and put the spacer back in with the 4.5" coils to bring it back to level with the rear.
DSC_0985.jpg


New steering angles:
CopyofDSC_0059_1.jpg


[size=+1]June '10:[/size]
I finally removed my shot 242, and installed a 241OR. 4:1 lo is awesome!
DSC_1067-1.jpg


[size=+1]July '10[/size]

Frame Crack
When leaving Ross's I started hearing a creaking when turning. When I got home and investigated it, I found a nice little crack starting behind the steering box, where the drivers inner rail meets the crossmember. Red arrow indicated the crack.

Crack.jpg


One of the things that probably caused the crack was no longer having the ARB bumper on, the joint indicated by the blue arrow was able to move all around, it was gross.

When installing the ARB, there are two bolts on the bottom of the frame: one uses an existing hole, and the other you have to drill. The whole you need to drill happens to be the spot weld that holds the bottom of the crossmember to the bottom of the frame rail, so when the bumper was off, that joint could move, fatiguing the metal and leading to the crack.
DSC_2788.jpg


Stiffeners I got off Travis. I only installed the driver side since I only had two days to do everything, (man that took forever to weld on. Plug welds on vertical surfaces with TIG SUCKS!) I did have to make a cut so they would fit flush.

DSC_1148.jpg


Ready for welding.
DSC_1142.jpg


Almost done welding.
DSC_1151.jpg


[size=+1]August '10[/size]
Well, I realized I've been way too busy, and living at school rather than home, so I finally bought some bumpers rather than make/finish them.

Rear Bumper

Great condition Detours bumper I picked up for half of retail price. I colormatched it, just as I had done with my ARB.
DSC_0013.jpg


I had to modify the tire mount to accommodate the 5x5.5 pattern. When test fitting it, I noticed that the bottom two 5x4.5 lugs just fit perfectly inside the hub opening on the rim, so I could leave those, and just add two new studs for my rim. This way, if I go to sell the bumper in the future, it can be easily converted back to 5x4.5.

I started by grinding notches where I would need to place the bolts.
DSC_1383.jpg


Then I took a piece of plate and made a little tab to enclose those bolts, and make a surface the rim can be tightened against. (I was holding the tab backwards, I swear it fit better the other way, and it was before I opened up the holes so the bolts could fit)
DSC_1386.jpg


After welding
DSC_1391.jpg


DSC_1392.jpg
 
[size=+1]August '10 Cont.[/size]

Front Bumper

I then bought Ross's big old front bumper so I had something I could mount my winch to.
DSC_1359.jpg


The thing was, Ross never put a winch on it, so I had to do some internal bracing, drill the holes for the winch, and make fairlead mounts.
DSC_1387.jpg


1/4" steel I cut a slit in, then bent
DSC_1398.jpg


Then welded up the slit.
DSC_1399.jpg


Then attached to the bumper
DSC_1402.jpg


Installed and painted with Warn M8000, which was recessed into the grill some.
DSC_0017.jpg


I decided there was really no good place to mount the solenoid box on top of the winch, or anywhere really, so I found it fit absolutely perfectly behind the crossmember. I used one existing hole, drilled a second, and the crossmember even had holes conveniently located that allowed the cables to run through the member, and allow the box to sit flush against the member. It was almost as if it was designed to go here.

DSC_0417.jpg


That is a crappy place to plug the wand into if I ever need to winch, so I decided to mount the connector on the header panel, in a nice and easily accessible place. You can see the extended wires in the picture above.

Hole drilled, wires connectors, and connector attached to header panel.
DSC_0420.jpg


Wires connected and heat shrinked, and you can see the location of the connector.
DSC_0421.jpg


While I had the front all off, I decided to at least mount the Explorer tranny cooler Colin picked up for me so long ago. (never plumbed it because winter was coming, although I'm sure my tranny would have liked it last weekend in the snow)
DSC_1361.jpg


[size=+1]August 11th, 2010: The Beginning of the End[/size]

It had been 1 year, 7 months, and 3 days since I had last been offroad, so I was itching to get up to Lobster's for the get together he was having in his backyard.

Ross was very kind to trailer me up there. If only I knew what was going to happen later that day in this picture... (at least I took the stupid TJ bushwackers off)

DSC_0059_1.jpg


One of my Warn hubs wasn't engaging properly, and I ended up blowing it up, on a class VI road.
DSC_01310001.jpg


It felt good to be wheeling again.
DSC_0065_1-1.jpg


DSC_02020001.jpg


And then I made the mistake of listening to Ross...
 
My first body damage
DSC_02090001.jpg


DSC_02160001.jpg


DSC_02350001.jpg


b48d896f.jpg


A short while later that same day, I decided I needed a little symmetry, and took out the other rear quarter window.
DSC_0290.jpg


Video of the carnage:
Begster Body Damage


Nice and straight
DSC_0337.jpg


The C pillar took the brunt of the force. If you look close, you will see the gap between the closed door and the pillar, it was enough to stick your fingers through.
DSC_0343.jpg


A come-a-long, a strap, and a tree made that pillar nice and straight again. A hammer made both window seams straight enough to allow me to replace the windows.

Vacuuming glass sucks!
DSC_0327.jpg


I went wheeling one more time a month later, once again ripping the exhaust off, breaking an o2 sensor, and ripping a rear shock mount off. Due to a heavy school work load with my Senior design project, I wasn't able to fix it or even see it for a few months.


[size=+1]December '10[/size]
I fixed up all the broken stuff, and decided to install my Viar constant duty OBA set up I bought second hand. (before I got the 90* fittings I needed to complete the install.

DSC_0750.jpg


That is pretty much it, that brings me up until today as far as I know. I'm sure there is some small stuff I forgot.

IMG_0318-1.jpg
 
Best build thread so far.

Sucks I missed the snow wheeling fun, but no big deal.

Keep your jeep in one piece so we can wheel together again.

The last time that happened was back in '08.

:D
 
nice build! Good work on the cooling system. IMO working on the cooling system is actually the most fun thing to work on because it is so straightforward. Also because you get instant gratification!

And I always thought ARB bumpers were indestructible, guess not!
 
People might actually stop making fun of Mark for this...
 
Thanks guys.

Best build thread so far.

Sucks I missed the snow wheeling fun, but no big deal.

Keep your jeep in one piece so we can wheel together again.

The last time that happened was back in '08.

:D
Haha, thanks Colin. Ya that was a damn long time ago. I make no promises about keeping anything in 1 piece though.

And I always thought ARB bumpers were indestructible, guess not!
Definitely not. That is one reason why most people don't like them, they are overpriced and easily destructible. They are great if you aren't doing rock crawling.

People might actually stop making fun of Mark for this...
That's the world I hope to one day live in.

Get back to complaining loudly about how awesome your parts sitting in your bedroom are, while your "build" doesn't go anywhere and collects dust.

:D
 
Back
Top