- Location
- In a strange land
How to Slot the CPS
This is in response to this thread: New to my XJ and Wrenching...
Trying to get meaningful photos in situ is beyond my skills and resources, but with a spare tranny on hand I figured I could do this justice.
For starters, there is the need to remove the CPS from the Jeep. If you can plan this in advance these are the tools I prefer for this job:
.jpg")
That is a 3/8” ratchet, two 12” (or maybe 14”) extensions, a universal, a 12” wobble extension, an 11mm 6 pt socket and an 11mm magnet. If you are not familiar with a wobble extension it is one of these:
.jpg")
And the magnet fits in the socket like this:
.jpg")
The purpose of the magnet is to try to make sure neither of the bolts fall into the hole in the bellhousing. Ideally there should be a plastic insert which would prevent that from happening, but in the real world that insert may be missing. A dropped bolt means you need to get access to the very bottom inside of the bellhousing and that generally means pulling the transmission. Not optimal.
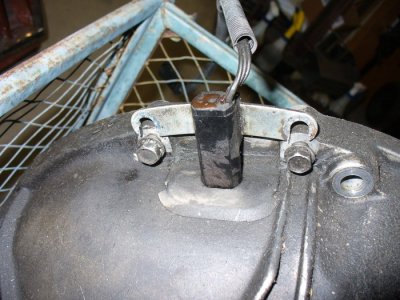
Good luck getting a good look at the full picture of the CPS mounting while it is in the vehicle, but this is what you are trying to access:
.jpg")
Note that the bolts thread only into the transmission bellhousing, not the engine block. IOW the bolts are threaded into aluminum. Most XJs leak enough oil from the valve cover to prevent electrolysis problems, but keep that risk in mind. I generally find those bolts to be extra snug.
My strategy for accessing the CPS bolts is to lay crosswise under the Jeep, my head under the area of the driver’s seat, my feet sticking out from the area under the front passenger door. That allows me to use my right hand to control the ratchet (which will be back past the transmission crossmember) and my left hand to direct the socket onto the bolt heads and keep it firmly seated. I do not disconnect the wiring (plug or harness clamp (which BTW will probably require a 10mm deep socket)) until after I have removed the bolts. That ensures the wiring stays out of my way while I deal with the bolts.
Once you have the bolts out and the wiring disconnected you can try to fish the CPS up from the top, probably find it hangs up on something and then let it try to drop, which it will probably only do part way, and then go underneath and try to fish it down from whatever it hung up on. SOP in my world.
With the CPS out this is what things will look like if you still have the plastic shield in place:
.jpg")
Here is the CPS crudely marked for where I need to cut (also note the design of the bolts—they have a shoulder like an axle bolt—not a standard hardware store bolt, you really don’t want to lose them):
.jpg")
There are lots of ways to make these cuts. I have used a Dremel with a cut-off wheel, a 4-1/2” angle grinder and a bandsaw. A hacksaw or Sawzall could do the job if you had nothing better—just be sure to support the CPS well if going that route. My preference is a bandsaw because it provides the best control and the best reference for keeping the cuts parallel to the CPS itself. Keeping the cuts parallel is the important thing because you need the CPS to drop straight down into the bellhousing.
.jpg")
I deliberately cut a bit less material than is needed. I don’t want the slots to be too wide and thereby get the CPS shifted out of its correct position.
.jpg")
Slots that are too narrow are relatively easy to widen. A file is all that is needed, but belt on a band sander is quicker:
.jpg")
This is a good fit:
.jpg")
With the CPS slotted and fit checked the bolts should be loosely installed back in the bellhousing. Once again, this is a time to not drop a bolt, and this is the time when there is probably the greatest risk because there is now definitely a hole into which you could drop them. If you are known to have problems that way then it may make sense to clean the area and tape over the hole. But this should be the last time those bolts ever get a chance to fall into that hole.
And evidently I can only post 10 pics in a single post.
This is in response to this thread: New to my XJ and Wrenching...
Trying to get meaningful photos in situ is beyond my skills and resources, but with a spare tranny on hand I figured I could do this justice.
For starters, there is the need to remove the CPS from the Jeep. If you can plan this in advance these are the tools I prefer for this job:
That is a 3/8” ratchet, two 12” (or maybe 14”) extensions, a universal, a 12” wobble extension, an 11mm 6 pt socket and an 11mm magnet. If you are not familiar with a wobble extension it is one of these:
And the magnet fits in the socket like this:
The purpose of the magnet is to try to make sure neither of the bolts fall into the hole in the bellhousing. Ideally there should be a plastic insert which would prevent that from happening, but in the real world that insert may be missing. A dropped bolt means you need to get access to the very bottom inside of the bellhousing and that generally means pulling the transmission. Not optimal.
Good luck getting a good look at the full picture of the CPS mounting while it is in the vehicle, but this is what you are trying to access:
Note that the bolts thread only into the transmission bellhousing, not the engine block. IOW the bolts are threaded into aluminum. Most XJs leak enough oil from the valve cover to prevent electrolysis problems, but keep that risk in mind. I generally find those bolts to be extra snug.
My strategy for accessing the CPS bolts is to lay crosswise under the Jeep, my head under the area of the driver’s seat, my feet sticking out from the area under the front passenger door. That allows me to use my right hand to control the ratchet (which will be back past the transmission crossmember) and my left hand to direct the socket onto the bolt heads and keep it firmly seated. I do not disconnect the wiring (plug or harness clamp (which BTW will probably require a 10mm deep socket)) until after I have removed the bolts. That ensures the wiring stays out of my way while I deal with the bolts.
Once you have the bolts out and the wiring disconnected you can try to fish the CPS up from the top, probably find it hangs up on something and then let it try to drop, which it will probably only do part way, and then go underneath and try to fish it down from whatever it hung up on. SOP in my world.
With the CPS out this is what things will look like if you still have the plastic shield in place:
Here is the CPS crudely marked for where I need to cut (also note the design of the bolts—they have a shoulder like an axle bolt—not a standard hardware store bolt, you really don’t want to lose them):
There are lots of ways to make these cuts. I have used a Dremel with a cut-off wheel, a 4-1/2” angle grinder and a bandsaw. A hacksaw or Sawzall could do the job if you had nothing better—just be sure to support the CPS well if going that route. My preference is a bandsaw because it provides the best control and the best reference for keeping the cuts parallel to the CPS itself. Keeping the cuts parallel is the important thing because you need the CPS to drop straight down into the bellhousing.
I deliberately cut a bit less material than is needed. I don’t want the slots to be too wide and thereby get the CPS shifted out of its correct position.
Slots that are too narrow are relatively easy to widen. A file is all that is needed, but belt on a band sander is quicker:
This is a good fit:
With the CPS slotted and fit checked the bolts should be loosely installed back in the bellhousing. Once again, this is a time to not drop a bolt, and this is the time when there is probably the greatest risk because there is now definitely a hole into which you could drop them. If you are known to have problems that way then it may make sense to clean the area and tape over the hole. But this should be the last time those bolts ever get a chance to fall into that hole.
And evidently I can only post 10 pics in a single post.
.jpg")
.jpg")
.jpg")
.jpg")