Here it is, the answers you've been looking for!
Here it is, the answers you've been looking for!
I just finished installing an Extended Idle Switch in my '99 Cherokee Classic 4.0 A/T. It functions properly, the backlit icon dims with the rest of the dash, and the indicator light comes on when the switch is activated. After reading through this thread a number of times, I feel there's still a lot of confusion out there as to how to wire this properly. I know I was still confused until I read a few different threads about this mod. Let's see if I can pull all the information together and clear it up for future reference.
1. All the necessary parts (minus the wiring pigtail) can be purchased from your dealer or any of the online Mopar parts sellers. I looked at just about every site and the one that consistently came up the cheapest was Mopar Discount Parts dot Com. They also had great customer service and the cheapest shipping rates I could find. Jeromy is a one man show, is very helpful on the phone, ships quickly, and kept me up to date on my order status every step of the way. Just to give you an idea of the expenses you may incur if you choose to do this mod, I have listed the prices from the above mentioned supplier at the time I made my purchase.
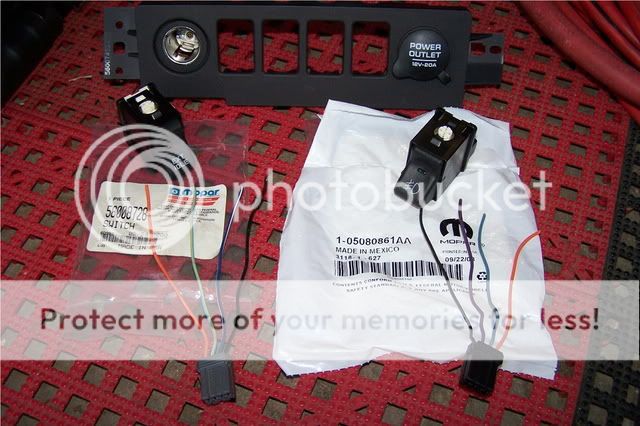
Extended Idle Switch - Part# 56008728 ($27.50)
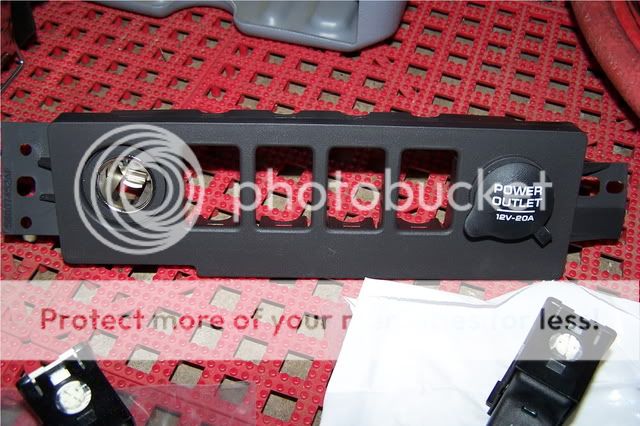
4 Switch Bezel - Part# 4897505AF ($48.58)
Finally found out this part is so damn expensive because it comes with both the cigar lighter and power outlets!
(Also, be aware that these 4 switch bezels have been discontinued and are therefore in limited supply)
and if your Fog Light Switch has burned out like everyone else's (and you still want to use your OEM switch)...
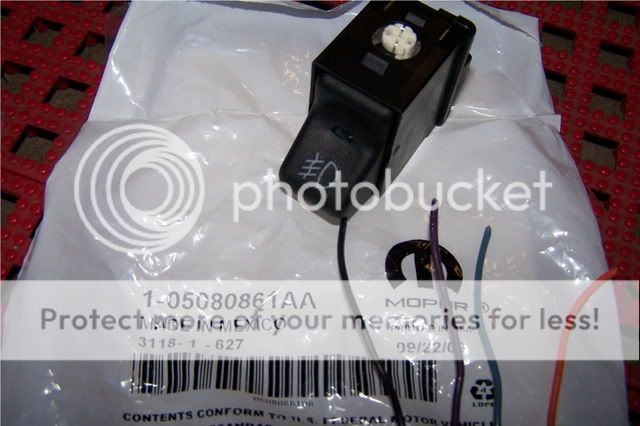
Fog Light Switch - Part# - 5080861AA ($27.70)
If you want it to last this time, wire it correctly with a relay
after the switch.
Mopar Fog Light Wiring Repair Kit (Part# - 5066442AA $111.22) is available if you've got the funds and you're not comfortable with making the upgrades yourself.
The other part you will need is a pigtail for your new switch. You can use either a fog light pigtail, or a window defroster pigtail. I removed both from an XJ that was getting parted out. Both are shown in the following picture. You will notice that the orange and black leads are opposite each other. It really doesn't matter which one you use as the pinouts are numbered on the body of the connector for reference. Grey plug is the Defrost pigtail, black plug is the Fog Light pigtail.
2. The Idle Actuator wire that gets connected to Pin A12 on the PCM has been pretty well covered. I did however follow the wiring schematic in hopes of tracking down the closest possible spot to tap into the existing (Solid Grey) wire. Turns out that it doesn't get much better than right next to the PCM. Unless you have the Police Package (in which case you probably don't need to do this mod) the Solid Grey wire runs from Pin A12 on the PCM to Pin 11 on Connector C107 which you will find right next to the transmission dipstick. That's it, it stops there. This connector is actually further away from the driver's side firewall hole than the PCM is. I guess you could split the loom, find the Solid Grey wire, and splice into it right next to the firewall hole if you really wanted to.
This brings me to my next point. As this Solid Grey wire is not connected to anything other than A12 on the PCM, it doesn't matter whether you choose to cut or splice the Solid Grey wire to make your connection. Electrically speaking, it's the same either way.
3. Extended Idle Switch wiring is as follows (per the FSM):
Pin #1 - Ground (Black on the OEM Ext Idle pigtail)
Pin #2 - Idle Actuator (Grey on the OEM Ext Idle pigtail)
Pin #3 - Fused Ignition Switch Output (RUN) (Dark Blue w/ White stripe on the OEM Ext Idle Pigtail)
Pin #4 - Fused Panel Lamps Dimmer Switch Signal (Orange on the OEM Ext Idle Pigtail)
Unless you managed to score a pigtail from a Police Package XJ, your pigtail will not match up. I chose to use the Defrost pigtail since the #1 & #4 (Black & Orange) leads are the same as the original pigtail. Here's the easiest way to wire it all up:
Connect Ext Idle Switch Pin #1 to Fog Lamp Switch Pin #4 (Black)
Connect Ext Idle Switch Pin #2 to your wire leading to A12 on the PCM
Connect Ext Idle Switch Pin #3 to A/C Heater Control Pin #2 (Dark Blue / White stripe)
Connect Ext Idle Switch Pin #4 to Fog Lamp Switch Pin #1 (Orange)
So why do you tie into A/C Heater Control Pin #2 instead of the hot lead on the Fog Lamp Switch? Because if you use the Fog Lamp Switch as your power source, your Ext Idle indicator light will only come on when your Fog Lights are allowed to come on (i.e. headlights on, high beams off). If you use the Fog Light Switch lead, your Ext Idle indicator light won't come on when your headlights are off and it will turn off anytime you turn on your high beams. Best reasons of all though... the A/C Heater Control wire is close enough that you don't need to extend your Ext Idle pigtail and it is the power source used when Ext Idle is a factory option as shown in the diagram below.
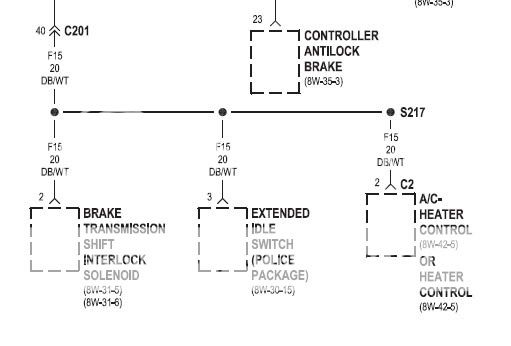
You're probably saying, great, now I've got to figure out where the heck A/C Heater Control Pin #2 is too... It actually couldn't be easier. Directly above your new Ext Idle switch is the A/C Heater control knob (Hot/Cold). On the back of the knob you will find a plug with three wires. Follow the wires down and you will see they run right past the back of the Ext Idle Switch. The middle one is the Dark Blue with White stripe that you are looking for. Splice into it and connect it to Ext Idle Switch Pin #3. Easy as pie.
4. To get all the parts to fit together, you're going to have to do a little modifying.
Unless you managed to score the OEM Ext Idle pigtail, you're going to have to cut the little key tab off the plug in order for it to fit into the Ext Idle Switch. This is easily done with a razor blade as the plastic is quite soft.
For some reason, the Ext Idle Switch itself comes keyed the same as the Fog Light Switch. This being the case, both switches will only fit in hole #3 on the switch bezel. Not a problem if you eliminated your fog lights and are using the 3 switch bezel, but if you're using the 4 hole switch bezel, you will need to shave the key tab off the switch. This can again be done with a razor blade but is a bit more difficult as the switch housing plastic is much harder.
Well, I hope this clears up all the misconceptions and muddy information about performing this mod. Enjoy and happy extended idling... :greensmok
 ...just wondering
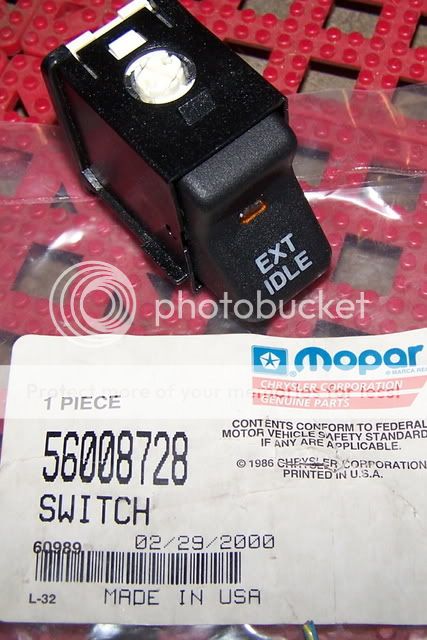

")