You are using an out of date browser. It may not display this or other websites correctly.
You should upgrade or use an alternative browser.
You should upgrade or use an alternative browser.
4.6L stroker in the works
- Thread starter Talyn
- Start date
Talyn
NAXJA Forum User
- Location
- Radford, Communistwealth of Virginia
I checked the valve to piston clearance today. I used some weak springs I found at lowes to replace the stock springs so my lifters didn't bleed down and didn't put any stress on the cam. I did it with out the head gasket (.044") and then put some feeler gauges between the rocker and valve tip to increase it to about .064". Put some silly putty in the piston dish to measure how far the valves stick in them. What a waste of time that was! The valves didn't even touch teh silly putty which was about 1/6" thick at least. At least I know that there won't be a clearance issue.
Other than that I put the main girdle on.. noticed that one of the rod caps only have .020" of clearance between the cap and girdle. Enough? Installed the oil pump and pickup. Torqued down the cam bolt. I was going to install the timing cover but I didn't have the correct size woodruff key for the harmonic balancer. I picked up a 3/16" x 7/8" woodruff key from Home Depot... it appears to be the correct size.. can anyone verify that?
No pics today.. you are probably getting tired of all the images and I forgot my camera at home.
I was thinking about installing the head, but don't want to take a chance that I do something stupid like rotate the engine on the stand with out anything holding the lifters in and they all fall out. I'll wait until I have the timing cover on and the oil pan sealed up.
Is till need to check the push rod length though. But I can check it then install the engine if I need to order pushrods.
Talyn
NAXJA Forum User
- Location
- Radford, Communistwealth of Virginia
Some more progress. Took off work an hour earlier.
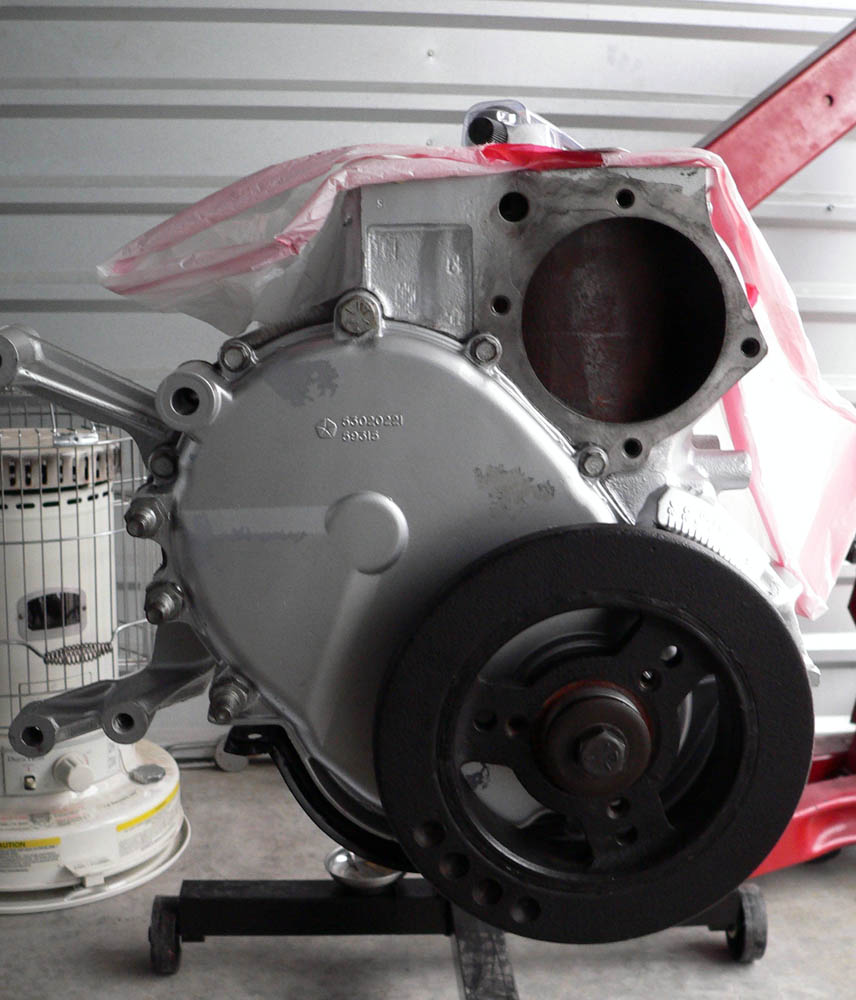
Last shot of the timing gear before cover goes on. Hope I don't have to see them for a long time.

Timing cover and balanced installed:
Oil pan was then installed... its an oil pan..
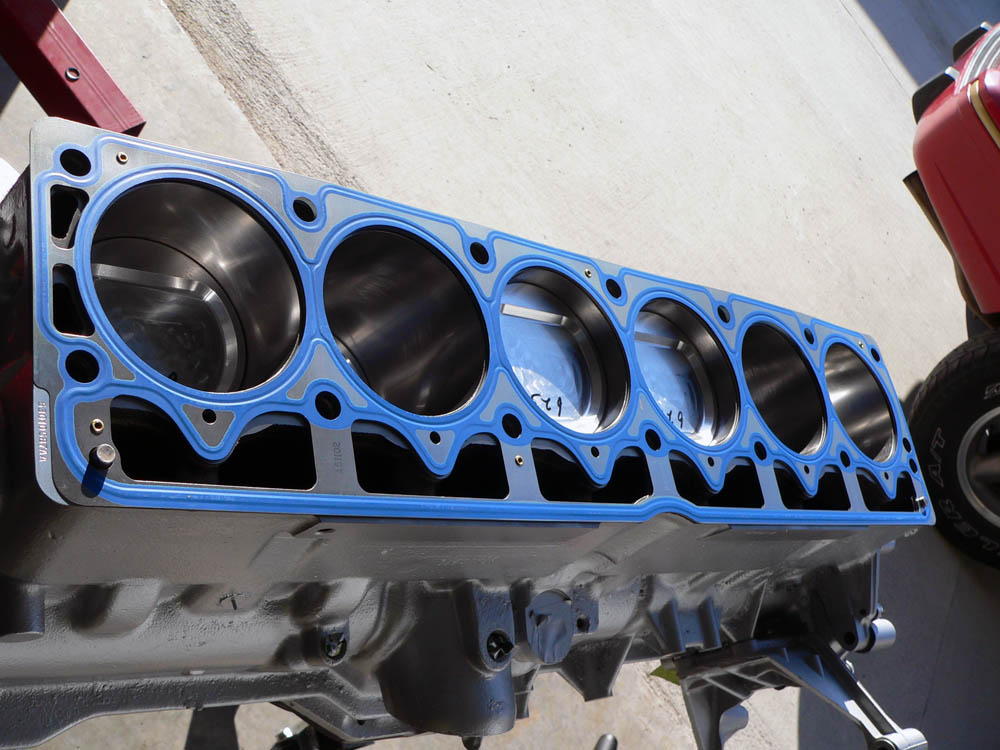
Last shot of the pistons bfore the head goes on:

.044" head gasket:
Head installed:

Intake manifold, exhaust manifold, water pump, water pump pulley, t-stat housing and spacer installed, oil filter adapter all installed:


And then there was a moment of sheer panic. While cleaning up I couldn't find the cap for the bottle of oil I had opened. Last place I remember seeing it was on top of a piston in the block! Tried to look into the pistons with a flashlight, not much to see. I eventually checked through the garbage and put all the tools away, and finally found the cap.
And I do need to order new pushrods. The stock ones are too long. I need some 9.600" rods. I'll probably run a shim under the rocker until I get the rods.
Last shot of the timing gear before cover goes on. Hope I don't have to see them for a long time.
Timing cover and balanced installed:
Oil pan was then installed... its an oil pan..
Last shot of the pistons bfore the head goes on:
.044" head gasket:
Head installed:
Intake manifold, exhaust manifold, water pump, water pump pulley, t-stat housing and spacer installed, oil filter adapter all installed:
And then there was a moment of sheer panic. While cleaning up I couldn't find the cap for the bottle of oil I had opened. Last place I remember seeing it was on top of a piston in the block! Tried to look into the pistons with a flashlight, not much to see. I eventually checked through the garbage and put all the tools away, and finally found the cap.
And I do need to order new pushrods. The stock ones are too long. I need some 9.600" rods. I'll probably run a shim under the rocker until I get the rods.
Talyn
NAXJA Forum User
- Location
- Radford, Communistwealth of Virginia
Those mounts are for my Light Force RDML 140 lamps. The lens is similar to a maglight where you can unscrew it. I decided it would be better to take them off than damage them.
I am going to be running shims under the rockers until I get my correct length pushrods, but that won't be long. I have the rockers adjusted with the shims, the engine mounts on, oil sender installed, oil adapter and filter installed and a few other minor things today. I was thinking about dropping the engine in today but I did want a pic of it fully assembled and ready to go, but I forgot my camera. It was late anyhow so I cleaned up the storage unit and got the tools ready for tomorrow...
I also purchased some Valvoline VR1 10w30 for after the cam break in. Also modified an old cam sensor drive to use as a priming tool.
Almost forgot... I had another "oh shit" moment today. I dropped a shim and it fell through a push rod hole. I thought they were a bit bigger than the pushrod holes, but I guess not. Ran over to carquest and got a small magnet pickup as the larger one I have won't fit through the hole (hey.. thank chrysler... you don't make the pushrod hole big enough for a magnetic pick up nor a lifter, but it is just the perfect size for a rocker arm shim to fall through). Retrieved it with the pickup.
So tomorrow it goes in. I doubt I will be able to break it tomorrow in but we shall see.
Talyn
NAXJA Forum User
- Location
- Radford, Communistwealth of Virginia
It's in. Not running yet. Most stuff is hooked up. It went pretty smoothly, but had a bit of hang up getting engine connected to the tranny, and the engine mounts. I Filled the cooling system tonight and found that I need a new rad cap. I was filling from the Tefba filter which is positioned higher than the rad cap and coolant started coming out of the port for the overflow bottle. I also installed some larger battery cables and it took a bit to route them correctly, longer than I planned on. Whats left to do is install the rockers and push rods, seal the valve cover spacer, install the valve cover, connect the wiring for the TB sensors, connect the header to the exhaust, connect the injector wiring, connect the head ground strap, connect the O2 sensors, route the wide band harness away from the exhaust, install the battery, install the electric fan, top the coolant off, bleed the fuel rail, prime, and break the cam in.
Tomorrow will be finishing the install up and then I plan to break the cam in on Wednesday.
I have pics but I will probably put them on tomorrow night. Right now I will enjoy my Sapphire and tonic and watch Breaking Bad.. I'm spent.
-Chris
Tomorrow will be finishing the install up and then I plan to break the cam in on Wednesday.
I have pics but I will probably put them on tomorrow night. Right now I will enjoy my Sapphire and tonic and watch Breaking Bad.. I'm spent.
-Chris
Talyn
NAXJA Forum User
- Location
- Radford, Communistwealth of Virginia
Its in and running. It didn't want to start at first due to the fact that i forgot to plug the coil rail in (did I mention I hate the coil rail with a passion.. I'm going to have to fix that). Broke the cam in for 30 minutes using Joe Gibbs breakin oil. Drained it, used Valvoline VR1 10w30 and a M1-301 filter.
However, I have a problem. The AFR shoots to 17-19:1 around 3000rpm. Going to try to locate a fuel pressure gauge today and check the fuel pressure. I checked the cam sensor and it is where it should be. All the other sensors look good.. didn't concentrate on the O2 sensors very much, but at idle, cruise, and basically closed loop below 3000 rpm the AFR stays around 14.7:1, where is should be (most of the time). I haven't hit the gas hard enough to get it in to open loop yet.

That shows what is happening. its the curves in the black circle. The spikes to the right are just decel lean, which is normal.
I have a lot more pics to post, but have just been too busy to do so. I will eventually.
-Chris
However, I have a problem. The AFR shoots to 17-19:1 around 3000rpm. Going to try to locate a fuel pressure gauge today and check the fuel pressure. I checked the cam sensor and it is where it should be. All the other sensors look good.. didn't concentrate on the O2 sensors very much, but at idle, cruise, and basically closed loop below 3000 rpm the AFR stays around 14.7:1, where is should be (most of the time). I haven't hit the gas hard enough to get it in to open loop yet.
That shows what is happening. its the curves in the black circle. The spikes to the right are just decel lean, which is normal.
I have a lot more pics to post, but have just been too busy to do so. I will eventually.
-Chris
seanyb505
NAXJA Forum User
- Location
- Simpsonville, SC
Congrats on the start!
Talyn
NAXJA Forum User
- Location
- Radford, Communistwealth of Virginia
Well... I don't think there is a problem with any of the sensors. And teh fuel pressure tested at a steady 42 psi. The lean condition comes and goes. I believe it has to do with the injector sizing (they are 23.7 lbs, but I had 27lbs in my previous storker and they were too large) and open or closed loop. I can't figure out which loop it is in when it does it either as I said before I am having problems with the Auto Enginuity interface (I tried it on two computers and two different vehicles and same results.. yet the clowns want me to diagnose it further.. so much for support.. they get an F). I did up the levels on the Apexi for the RPM range where it happens and it appears to help, so perhaps it does it in closed loop.. more tuning needs to be done there though. Any how I found that I can drive through it and since the little bit of tuning I did seems to have helped. I'll keep messing with it, but for now I have decided to just drive the damn thing.
So, the pics as I promised from the installation:
Finished on the engine stand and ready to go in:


Chained up and ready to go:

On the driver side I couldn't find a place to put a chain that went at the ends of the block that didn't put pressure on the manifolds... so what I did was run one chain from a bolt on the front to a bolt on the rear then one that went from the middle of that chain up thought the manifolds.

I really wished I had parked it a bit further back at this point


Torquing down the flex plate bolts.. that tool makes it so easy:

Going in

Rear clearance:


Almost in:

Touch down:

So, the pics as I promised from the installation:
Finished on the engine stand and ready to go in:
Chained up and ready to go:
On the driver side I couldn't find a place to put a chain that went at the ends of the block that didn't put pressure on the manifolds... so what I did was run one chain from a bolt on the front to a bolt on the rear then one that went from the middle of that chain up thought the manifolds.
I really wished I had parked it a bit further back at this point
Torquing down the flex plate bolts.. that tool makes it so easy:
Going in
Rear clearance:
Almost in:
Touch down:
Talyn
NAXJA Forum User
- Location
- Radford, Communistwealth of Virginia
Almost completed:

Done and done:

Custom S&B intake, which I would NOT recommend/ Without modifying it the hood wouldn't even close. I had to redrill the air box to clear the radiator cap, cut the flange where the tube meets the throttle body, and cut the silicon gasket form the throttle body to the tube. And I just bought it because it had an enclosed box which I could further enclose to the front. At least it was only $99.

Its fast, but I am not pushing it much now. I want it to break in then tune it then push it. The exhaust sounds good. A little valve noise is audible, but I am use to that. I may have an exhaust leak someplace.. not sure yet. If so its not very large.
Now to just getting use to driving it again. The ZJ isn't quite as still in the suspension nor the steering department, nor are the breaks as good nor is it as fast.
I will be putting some miles on it and hopefully this one will hold up better that the Titan 4.Fail.
I still have a few minor things to do: install the new push rods (correct length so I can take out the shims), clean up some wiring, relocate the IAT to the air box, modify the air box more so it gets more cold air, check the transmission fluid, eventually change the coolant, take care of that lean part (larger injectors? just run the apexi? have the computer tune changed?), play with the spark plugs (different heat range maybe? change gap?) and get rid of that damn coil rail... probably more things that I can't remember at the moment.
Now I just need to clean the storage unit up a bit, put away.find some missing tools and sort the pile of crap in the back (boxes, spare parts, parts from the previous stroker, etc).
-Chris
Done and done:
Custom S&B intake, which I would NOT recommend/ Without modifying it the hood wouldn't even close. I had to redrill the air box to clear the radiator cap, cut the flange where the tube meets the throttle body, and cut the silicon gasket form the throttle body to the tube. And I just bought it because it had an enclosed box which I could further enclose to the front. At least it was only $99.
Its fast, but I am not pushing it much now. I want it to break in then tune it then push it. The exhaust sounds good. A little valve noise is audible, but I am use to that. I may have an exhaust leak someplace.. not sure yet. If so its not very large.
Now to just getting use to driving it again. The ZJ isn't quite as still in the suspension nor the steering department, nor are the breaks as good nor is it as fast.
I will be putting some miles on it and hopefully this one will hold up better that the Titan 4.Fail.
I still have a few minor things to do: install the new push rods (correct length so I can take out the shims), clean up some wiring, relocate the IAT to the air box, modify the air box more so it gets more cold air, check the transmission fluid, eventually change the coolant, take care of that lean part (larger injectors? just run the apexi? have the computer tune changed?), play with the spark plugs (different heat range maybe? change gap?) and get rid of that damn coil rail... probably more things that I can't remember at the moment.
Now I just need to clean the storage unit up a bit, put away.find some missing tools and sort the pile of crap in the back (boxes, spare parts, parts from the previous stroker, etc).
-Chris
Last edited:
Root Moose
NAXJA Forum User
- Location
- ON, Canada
What's wrong with the coil rail?
Talyn
NAXJA Forum User
- Location
- Radford, Communistwealth of Virginia
Its a pain to get in and out. Its just a half assed stupid design. Instead of doing either a proper coil on plug or a remote coil with plug wires they do this stupid design. The rail is covered by the AC compressor, heating hoses, throttle body cables, etc. Makes changing and checking the plugs difficult. For a stock engine this wouldn't be too much of a problem, but for a modified engine where one will be playing with different plugs, different plug gaps, removing the plugs to rotate the engine over by hand, etc it then becomes a pain. And if I just wanted to remove one plug, instead of just unplugging that single coil or wire, the whole rail needs to come off. Also, for diagnosis purposes you can't just unplug a single cylinder to isolate that cylinder.
Root Moose
NAXJA Forum User
- Location
- ON, Canada
Its a pain to get in and out. Its just a half assed stupid design. Instead of doing either a proper coil on plug or a remote coil with plug wires they do this stupid design. The rail is covered by the AC compressor, heating hoses, throttle body cables, etc. Makes changing and checking the plugs difficult. For a stock engine this wouldn't be too much of a problem, but for a modified engine where one will be playing with different plugs, different plug gaps, removing the plugs to rotate the engine over by hand, etc it then becomes a pain. And if I just wanted to remove one plug, instead of just unplugging that single coil or wire, the whole rail needs to come off. Also, for diagnosis purposes you can't just unplug a single cylinder to isolate that cylinder.
I think you are being a whiny b!tch (I mean that in the giving crap over beers sense, not that you actually are a WB).
It takes what, 5 minutes to pull the rail? The hardest part is the weather clip at the firewall end. Once you've done it a few times it is no big deal.
Root Moose
NAXJA Forum User
- Location
- ON, Canada
Btw, love what you're doing with this.
Sherman_thetank
Keep it pinned!
- Location
- omaha, NE
I love that intake box, very clean install man!
Boostwerks.com
NAXJA Forum User
- Location
- Colorado
Honestly... Your build is the cleanest stroker build I've seen. Congrats on getting it in and running!
What WB and tuning mechanism are you using? That jump in AFR seems like it happens right when the tranny shifts. I remember CSaddict mentioning something like this happening with his turbo build which is odd. Hrmm.
What WB and tuning mechanism are you using? That jump in AFR seems like it happens right when the tranny shifts. I remember CSaddict mentioning something like this happening with his turbo build which is odd. Hrmm.
Talyn
NAXJA Forum User
- Location
- Radford, Communistwealth of Virginia
I think you are being a whiny b!tch (I mean that in the giving crap over beers sense, not that you actually are a WB).
I don't know what "beers sense" is but I will assume it is some Canadian saying. I'm just being picky, I know, but its still a stupid design. And I've done it more than a few times.
Btw, love what you're doing with this.
Thanx. It took a long time and too much money but hopefully it will pay off.
Clean is easier to work on, goes together better.. and I don't like things looking hacked.Honestly... Your build is the cleanest stroker build I've seen. Congrats on getting it in and running!
What WB and tuning mechanism are you using? That jump in AFR seems like it happens right when the tranny shifts. I remember CSaddict mentioning something like this happening with his turbo build which is odd. Hrmm.
I'm using a Daytona Sensors Wego II. At the time it was the cheapest unit with data logging. I didn't feel trying to drive and read the display and trying to adjust the Apexi later from memory was a good idea so I wanted logging. That drop you see looks like a down shift, but it isn't. It is when the engine bogs form the AFR change.
I need to decide if I want to keep the current 23.7 Injectors or go back to the 27 ones... the 27 ones may be too rich, but I don't know... But its nearly adjusted out with the Apexi for now.
Talyn
NAXJA Forum User
- Location
- Radford, Communistwealth of Virginia
A few impressions since I have been driving it for.. oh.. two days or so... There is definitely some piston slap on start up. Its not the piston slap that I am familiar with on older 4.0Ls. In fact if you weren't listening for it you wouldn't know its there. It isn't a good sound but its not very loud and it goes away shortly. I think I have a minor exhaust leak some place.. probably at the header collector.. meh.. i'll deal with that later.
It appears this engine requires a bit more fuel than the short rod stroker I had. The short rod one never had that lean spot around 3k rpm even when running stock injectors. I was able to use the AE OBD II scanner long enough today to find that the long term fuel trim is at +35%. The injectors I have now flow about 23.8lbs. Now on the old 4.6L short rod I had a set of 27lbs injectors that ran too rich(10:1 and lower AFR w/o adjustment). These 23.8lbs obviously run too lean. However, using the 27lb injectors I was able to lean out the mixture to acceptable with the Apexi on teh old engine. I just didn't think that was necessary so I swapped the injectors out. Now with the 23.8lbs I feel that I would be better off with the 27lb ones as 1) the engine seems to need more fuel and 2) I think its safer to run a rich injector than a lean one... opinions on that?
Going from a mostly stock ZJ 4.0L to my XJ is a shock. I have gotten use to the ZJ and getting back in my XJ is just well.. weird.. Suspension stiffer, steering firmer, less play, smaller inside but also a higher ride. Oh.. more power and better brakes.
Talyn
NAXJA Forum User
- Location
- Radford, Communistwealth of Virginia
One more shot of the engine bay:

Similar threads
- Locked
- Replies
- 0
- Views
- 1K
- Replies
- 20
- Views
- 2K
- Replies
- 101
- Views
- 12K