- Location
- Southern Maryland
As we all know there are a couple of problems with the XJ default belt layout. For one the alternator is down in the muck and hard to change, for another the mechanical fan nub sticks out a mile and causes problems when switching to electric fans. One thing I've been thinking about as a possible help here is to switch to an accessory bracket from a YJ or ZJ, since they had the same basic layout but only had one fan that was driven by the water pump directly instead of having an offset secondary fan pulley. This provides more clearance up front for those vehicles, and also allows the alternator to be higher in the engine bay.
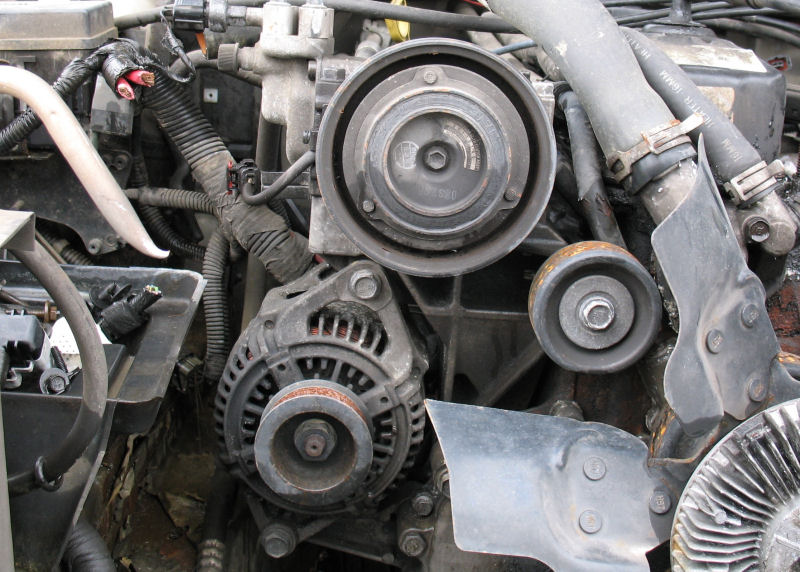
For illustration here is a pic of the ZJ 4.0 engine layout. As you can see the alternator is in the middle of the bay instead of down at the bottom, and the single fan is in the center of the belt leaving the side clear.
I wasn't sure if I would be able to switch to this layout so I have been working on gathering up pieces as a side project with the expectation that I would do whatever heavy mods were needed over the long holiday weekend. However it proved to be really simple with only one very small modification needed.
The first time I started looking at this I got an accessory bracket from a ZJ and started measuring distances. I then noticed that the A/C compressor bolt pattern for the ZJ was 5"x5" while the XJ compressor has a 5"x3.5" bolt pattern. The ZJ is more of a luxury vehicle so it makes sense that it has a higher capacity A/C compressor, but I did not want to replace compressor and hoses and deal with all of that crap if I didn't have to. Thinking about it, the YJ also has optional A/C and parts lookup confirmed that it has the same part number as the XJ so I went and tracked down an accessory bracket for one of those. Luckily the local jeep junkyard had a clunkered 2.5L with the bracket, and they let me exchange the ZJ bracket at no charge.
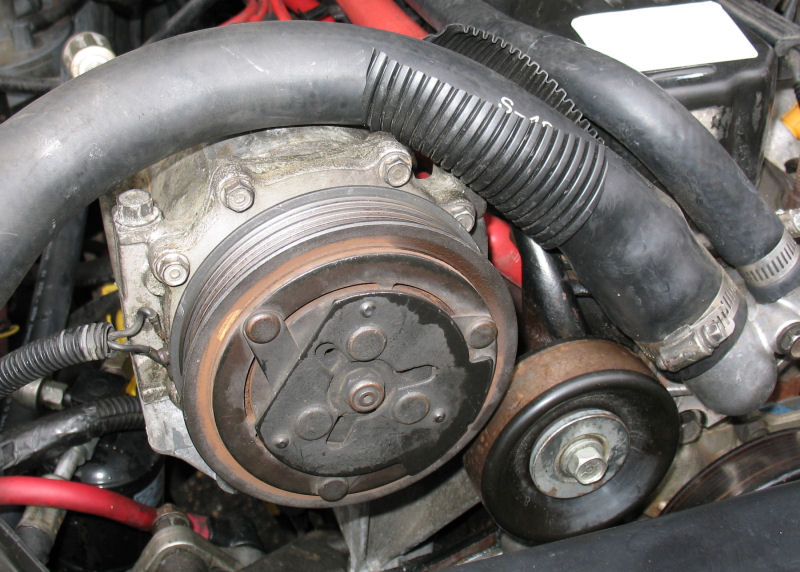
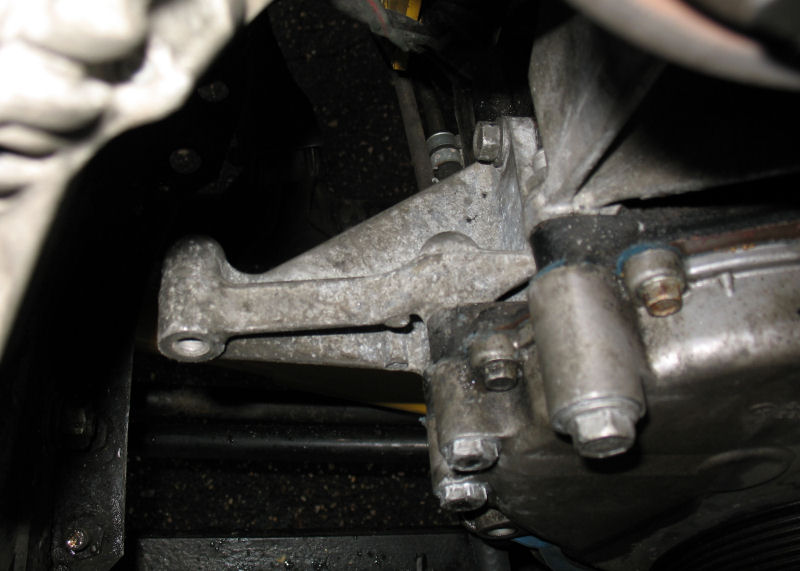
Trial fitting showed that the bracket fit right into place after the XJ A/C compressor bracket was removed, even while the original XJ alternator bracket was still installed. Note that the compressor is closer to the valve cover by about 1.5". This puts the coolant hose on top of the bolt so some kind of shielding is needed there (I am planning to cut some old hose and double up the bottom), and the compressor also partially blocks the #1 spark plug wire (you can see the red wiring boot in the pic) which will make it harder to reach the plug, but does not seem to cause any other problems. The hose may be making contact with the hood, but it seems to close fine, so I don't think so.
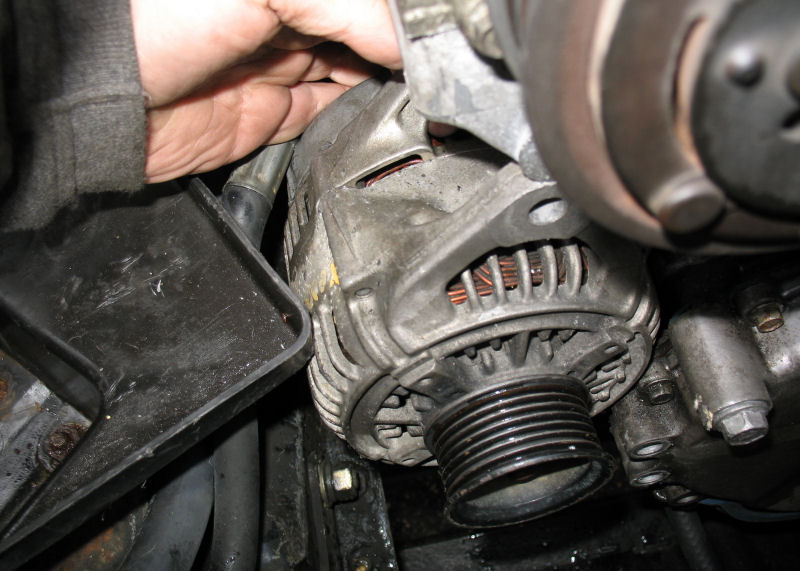
With the YJ/ZJ brackets, the alternator bolts to the bottom of the bracket instead of using its own separate brackets. This pulls the alternator inboard about 1.5" and upwards about 5". Checking for clearance the first obvious thing is that the battery tray is in the way. However by knocking off about 1" of the corner there is plenty of room, and my battery does not go that far over so this is all that's required. If you have a larger battery you will either need to rotate or relocate the battery tray. Also note that this is the high-output alternator from the ZJ 5.9L V8 so it is a bit bigger than the stock alternator.
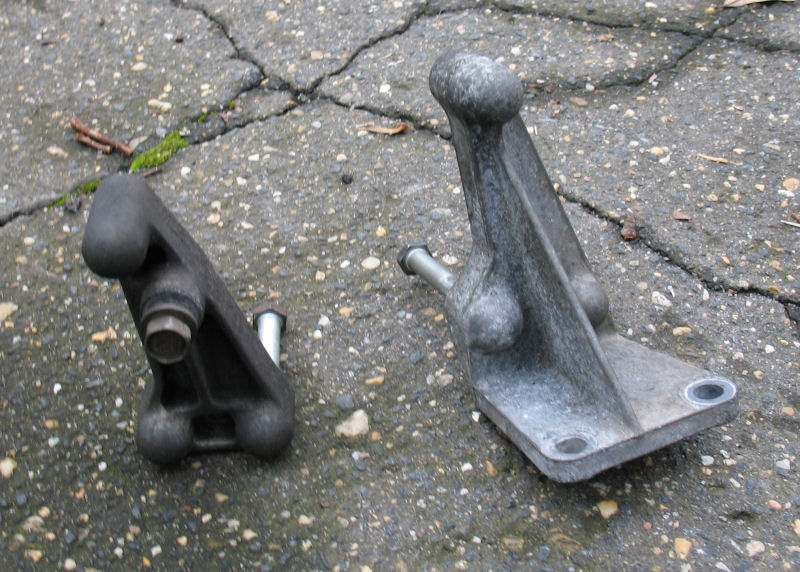
Although the top of the alternator bolts to the main bracket, the bottom of the alternator has a separate stub bracket that keeps it in position. The ZJ and the YJ have different brackets here, and near as I can tell they both mount through the timing cover similar to the XJ front bracket. This pic shows the two brackets as viewed from the rear, with the YJ version on the left and the ZJ version on the right. I chose to use the ZJ version since it had the extra bolt holes for mounting against the block, which I figure will help to prevent damage to the timing cover, and the following pic shows it installed
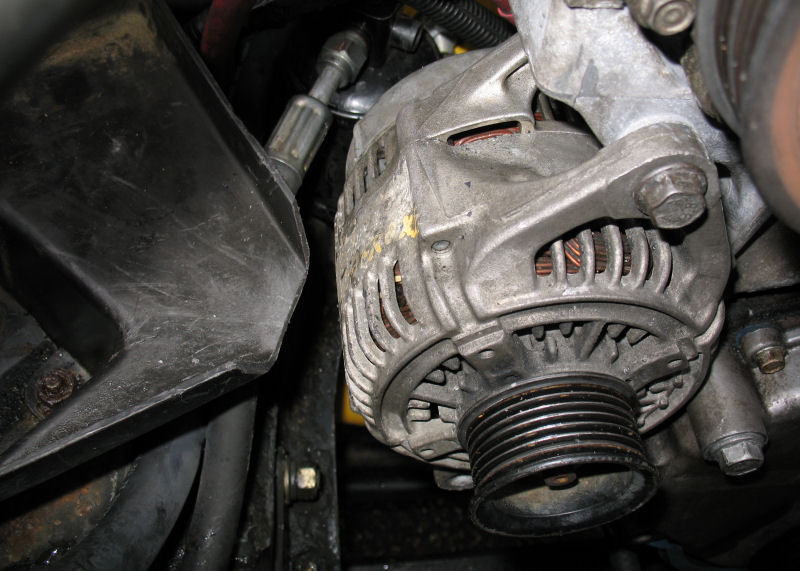
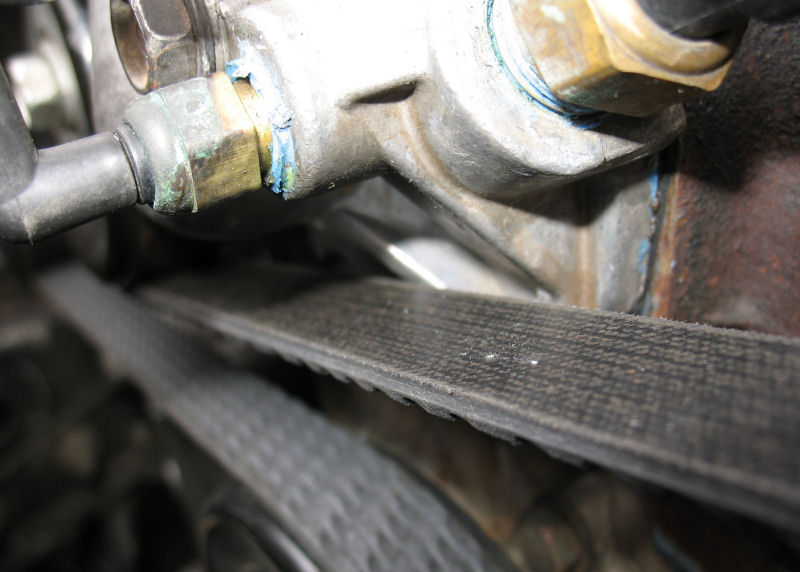
With the alternator installed, a tape measure wrapped around the belt with tensioner pulley at half showed about 91.5" distance. The closest match I could find to this was a 1998 YJ with all accessories, which has a 91" belt (or just slightly longer). With a 91" Gatorback I had to roll the tensioner all the way down and roll the flat back of the belt over the smooth water pump pulley to get it installed, but it cranked down just fine. The large bolt on the timing cover is almost in the way but seems to have about .5" gap so I'm not worried about the belt making contact there. However the belt does come really close to the thermostat housing, and it probably does make contact when warbling, so I will clearance the housing with the Dremel the next time I change coolant unless problems appear sooner.

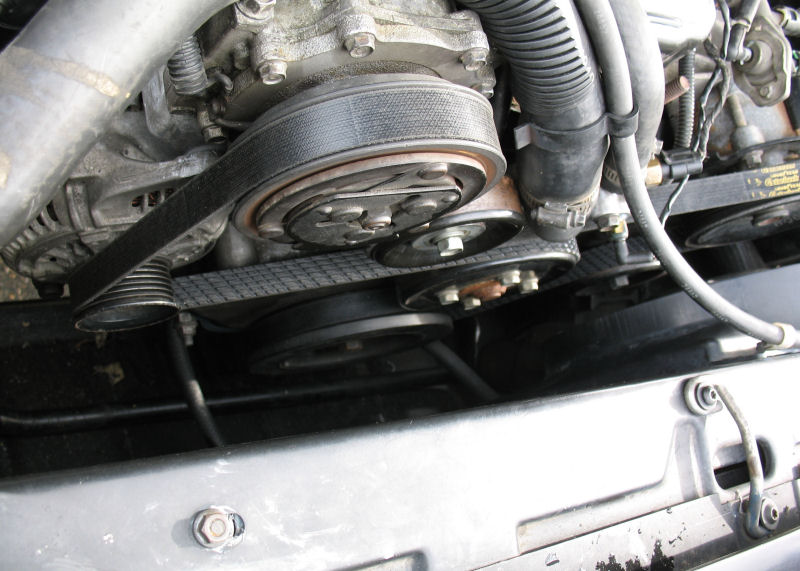
Lots of room between the belt and radiator for electric fan of my choice.
So that's it. A bracket from a YJ with either the 2.5 or 4.0 engines will bolt right in where the XJ compressor bracket is usually installed, and the lower alternator support bracket from either a YJ or ZJ (preferably the latter) will bolt in to where the XJ alternator brackets are usually installed. You can also use the A/C bracket from a ZJ if you want to run a larger compressor. Making the switch lets you pull the alternator up higher into the engine bay and also eliminates the mechanical fan nub. It also makes working on the alternator MUCH easier (I did not even have to remove the engine skid for this project). You can use a YJ belt, and you can delete the A/C compressor and run a short YJ belt if you like. The downsides is that the battery tray has to be notched to clear a high-output ZJ alternator, and the thermostat housing may also need some clearance work.
For illustration here is a pic of the ZJ 4.0 engine layout. As you can see the alternator is in the middle of the bay instead of down at the bottom, and the single fan is in the center of the belt leaving the side clear.
I wasn't sure if I would be able to switch to this layout so I have been working on gathering up pieces as a side project with the expectation that I would do whatever heavy mods were needed over the long holiday weekend. However it proved to be really simple with only one very small modification needed.
The first time I started looking at this I got an accessory bracket from a ZJ and started measuring distances. I then noticed that the A/C compressor bolt pattern for the ZJ was 5"x5" while the XJ compressor has a 5"x3.5" bolt pattern. The ZJ is more of a luxury vehicle so it makes sense that it has a higher capacity A/C compressor, but I did not want to replace compressor and hoses and deal with all of that crap if I didn't have to. Thinking about it, the YJ also has optional A/C and parts lookup confirmed that it has the same part number as the XJ so I went and tracked down an accessory bracket for one of those. Luckily the local jeep junkyard had a clunkered 2.5L with the bracket, and they let me exchange the ZJ bracket at no charge.
Trial fitting showed that the bracket fit right into place after the XJ A/C compressor bracket was removed, even while the original XJ alternator bracket was still installed. Note that the compressor is closer to the valve cover by about 1.5". This puts the coolant hose on top of the bolt so some kind of shielding is needed there (I am planning to cut some old hose and double up the bottom), and the compressor also partially blocks the #1 spark plug wire (you can see the red wiring boot in the pic) which will make it harder to reach the plug, but does not seem to cause any other problems. The hose may be making contact with the hood, but it seems to close fine, so I don't think so.
With the YJ/ZJ brackets, the alternator bolts to the bottom of the bracket instead of using its own separate brackets. This pulls the alternator inboard about 1.5" and upwards about 5". Checking for clearance the first obvious thing is that the battery tray is in the way. However by knocking off about 1" of the corner there is plenty of room, and my battery does not go that far over so this is all that's required. If you have a larger battery you will either need to rotate or relocate the battery tray. Also note that this is the high-output alternator from the ZJ 5.9L V8 so it is a bit bigger than the stock alternator.
Although the top of the alternator bolts to the main bracket, the bottom of the alternator has a separate stub bracket that keeps it in position. The ZJ and the YJ have different brackets here, and near as I can tell they both mount through the timing cover similar to the XJ front bracket. This pic shows the two brackets as viewed from the rear, with the YJ version on the left and the ZJ version on the right. I chose to use the ZJ version since it had the extra bolt holes for mounting against the block, which I figure will help to prevent damage to the timing cover, and the following pic shows it installed
With the alternator installed, a tape measure wrapped around the belt with tensioner pulley at half showed about 91.5" distance. The closest match I could find to this was a 1998 YJ with all accessories, which has a 91" belt (or just slightly longer). With a 91" Gatorback I had to roll the tensioner all the way down and roll the flat back of the belt over the smooth water pump pulley to get it installed, but it cranked down just fine. The large bolt on the timing cover is almost in the way but seems to have about .5" gap so I'm not worried about the belt making contact there. However the belt does come really close to the thermostat housing, and it probably does make contact when warbling, so I will clearance the housing with the Dremel the next time I change coolant unless problems appear sooner.
Lots of room between the belt and radiator for electric fan of my choice.
So that's it. A bracket from a YJ with either the 2.5 or 4.0 engines will bolt right in where the XJ compressor bracket is usually installed, and the lower alternator support bracket from either a YJ or ZJ (preferably the latter) will bolt in to where the XJ alternator brackets are usually installed. You can also use the A/C bracket from a ZJ if you want to run a larger compressor. Making the switch lets you pull the alternator up higher into the engine bay and also eliminates the mechanical fan nub. It also makes working on the alternator MUCH easier (I did not even have to remove the engine skid for this project). You can use a YJ belt, and you can delete the A/C compressor and run a short YJ belt if you like. The downsides is that the battery tray has to be notched to clear a high-output ZJ alternator, and the thermostat housing may also need some clearance work.
Last edited:

