Project "Deerslayer"

KJWildman

NAXJA Forum User
Location
Toledo, Ohio
Thought I would finally get a build/project thread going here for my '91 XJ. Yes it has been named "The Deerslayer and it has EARNED that name! I'll get in to the specifics of that in a later post.
First I'll post a couple pics of what I started with.


Found it locally for $1500. When I got it, it had an unknown 4" lift, a steel aftermarket front & rear bumper and decent seats. Not much else good to say about it at that point. It had been terribly neglected.
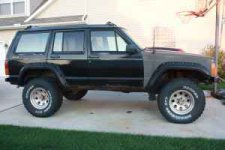
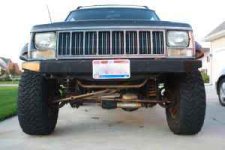
XJSideView.jpg XJFrontView.jpg
 
Last edited:
The weekend I bought it I took it over to a buddys house and we went through it. Gave it a good tune-up, plugs, wires, cap, oil change and filter, changed the diff fluids and raised the breathers.

Within a couple weeks I decided I had no tow points so bought some D-ring attachment points.


After that I decided to add a stinger

 
Last edited:
So next up, I threw on some rattle can hammered black spray paint on the front clip. Also painted up the grill.


Then did some more neglected maintenance.

I live in NW Ohio and make a 40 mile one way trip through farm country to work and back everyday. Since I work 2nd shift, my trip home (depending on O.T.) is somewhere between midnight and 4AM. On one of the trips home I hit a deer. Didn't do hardly any damage to the bumper but I hit it because these headlights SUCK!

So I added a couple lights to the bumper.


Took it out and played some with it a few times at Bundy Hill Off Road Park.
 
6 months went by and I hit another deer! Again, not much damage.

Took it to Bundy a couple more times and then one night on the way home from work at 1AM IT happened!
Hit another deer and this was THE ONE! Nice big buck, 4 points on each side, jumped right out from the corn field on the right! He got caught up in my left front and pulled the wheel left and off I went. Through a 3' culvert, across a farmer's front lawn with the tires locking up (locked up half bald tires don't slow you down on grass!) Through half a big Lilac bush in his yard, across his dirt driveway, over a 2' pile of concrete rubble he had laying there, through a split rail fence and head on into a big 12' tall juniper tree. The buck had dislodged as I went over the culvert. As I tried to get out I realized the the 4' phone pole/fence post was only 8" from my driver's door. I looked over and on my right was a phone/power pole at my passenger front door! Couldn't have steered between them at that speed if I tried, but sliding out of control I had spit them both with only inches of clearance!
Damage assessment: Bent the steering stabilizer, tie rod, right lower control arm, sway bar link attachment points, bumper, broke the welds on the stinger and pushed it in to the grill and a broken right turn signal lens.


And the gap I shot , and the tree I took out by the root ball.


And so the building of "The Deerslayer" begins!!!!!!!!
 
Within just a couple days, the insurance guy came by the house to check the damage. After walking around it and looking under it, he said he would have to total it! I talked to him for a while and explained that I was going to do all the work myself and I just had to buy parts, that it was not "totaled" just a few parts bent. I finally talked him out of totaling it and he wrote me a decent sized check. The check was actually for more than I had paid for it AND what I had in to it!! :cheers:

So I got online and started ordering parts:

Skyjacker 1-1/4" tie rod, new tie rod ends, 4" IRO Long Arm kit, JKS adjustable tie rod, JKS sway bar discos, Rough Country shocks, Rough Country dual steering stabilizer. That took care of the suspension. Then I found Down 'N Dirty Off Road out of Pennsylvania and he had an online special going for both front and rear bumpers. Front winch bumper with shackle attachment points and prerunner hoop AND a rear bumper with 2" receiver, shackle tabs and a swing away tire carrier for $500 for both! SOLD AND ORDERED!
Within a week, parts started arriving.
 
Parts in the living room didn't really make my wife happy, but it was Christmas in July for me!!
 
Drove it (with the steering wheel about 120 out) about a half mile down to a buddy's house and we started tearing stuff down and replacing it.


New rear bumper

 
And here's the DnD Off Road front bumper with the old cheap HF lights I bought before.
 
Then it was time for tires. Bought 5 Wild Country MTX in 33x12.50/15s to go on the old 15x10 Mickey Thompson rims.


and one of them mounted, in this one you can see the tire and also the clear markers I got for free from a guy at work that sold his XJ.

 
Pic of the spare mounted up on the carrier.
 
Next thing was moving the license plate down to the bumper and getting a lite on it. (after getting pulled over and getting a warning about 1AM!)
 
Then I got some warn Fog lights with the remote control relay. I installed the fogs on the front bumper hooked up to the factory driving light switch.

 
That brings us to about April of this year. About that time, I hit ANOTHER deer! That brings us to 4 now with the XJ and 1 in the Caddy since moving from "the city" to "the country".
So I had to decide whether to swap the fogs for the cheap HF driving lights or add another mount. I decided on another mount. During the research I came on to some LED replacement headlamps. They were expensive so I continued looking for mounts. Finally decided on Detours USA A-Pillar mounts. After ordering those I went back the internet and looked for better replacement headlights. The Detours mounts came and they got put on a shelf, for then I found what was a D.O.T. approved replacement LED headlamp with Hi/lo beam. Found them at http://www.automotivelightstore.com/productssection.aspx . They are made by Oracle in Texas. Oracle normally sells to the tuner and hotrod crowd, so lots of neon and interior and exterior led's.
One of the sections had LED off road lighting and I found the replacement light there. There's only one problem, they are 5x7 inch and my XJ uses a 6x8 rectangle light.

No problem, I ordered them anyway! :rolleyes: So they came and I set about making them fit.

First I had to make a reducing type ring for them to mount in to the stock bucket housing. I came up with these


After inserting into the retaining ring

 
At this point, It was just a plug 'n play operation. Or so I thought! After getting them installed and the retaining ring tightened down, I realized that it still rattled around! They are not as deep! Another problem to solve. After looking at the bucket I saw two tabs folded outward at the back, so I just bent them in and use them as a type of spring pressure to keep the headlights in place.


After that it WAS just a plug 'n play operation!


So now you all want to see them!


Now for some comparisons:

This is my old lowbeams


Old High Beams


And now for the new LED low beams


The LED low beams with the Warn fogs on


And the new LED high beams

 
Back
Top