So I got tired of fumbling with my sliders on my jeep and decided it was time to replace them with something a bit more modern. While I was in a JY looking for a 98 TCU I spotted a set of AC Controls in a 97 that had a mechanically actuated blend door. Without delay, I snagged the knob set and about 1 foot of both harness and vacuum. The cluster sat on my desk untouched for almost 6 months, till the blower speed switch on my 92 XJ finally shorted and melted most of the factory wiring harness.
After many beers and some studying the factory service manual diagrams I figured out that the vacuum setup between 1997 and 1992 was exactly the same, with some minor color differences.
Description | Old | New
(up to 96) (97-01)
Recirc Door | Orange | Green
Panel Door | Brown | Red
Floor Door | Yellow | Brown
Defrost Door | Green | Yellow
Part Defrost | Blue | Blue
Vacuum Sup | Black | Black
So I went to O'Reilley's and bought a spool of heat shrink tubing. With some patience you can get all 6 spliced in about an hour without burning any fingertips.
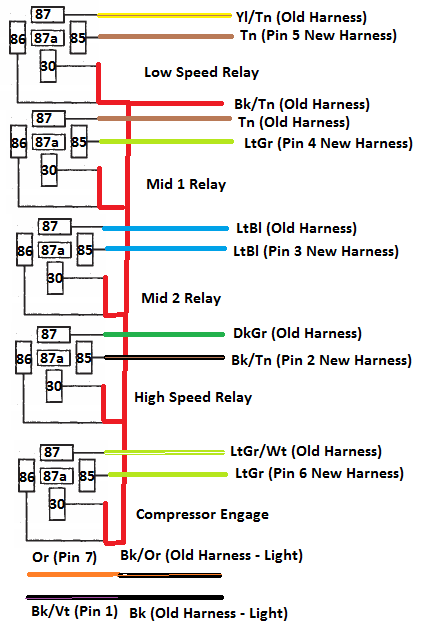
Next is the wiring nightmare, In the old setup, everything was positive switched at the switches, and in the new setup, everything was negativity switched. Prepare to spend some time with a soldering iron and 5 relays. I used crimp style female spades as a platform to solder on in the case I need to replace a relay down the road. It takes a while.

Here is the final wiring result:

After that , you need to either use a blend door cable out of a 97 (no modification necessary) or thin down the C loop on the end of your <96 cable with a Dremel or other sort of sanding/grinding tool. A nut and bolt will be necessary to hold the C loop in the door actuator lever arm.
Now to make the whole thing fit into your dash, you need to hack off the 1/2" lip between your middle vent and the factory AC controls, and 1/2" - 3/4" off the bottom of the 97+ AC control. Call it clearancing if you will...
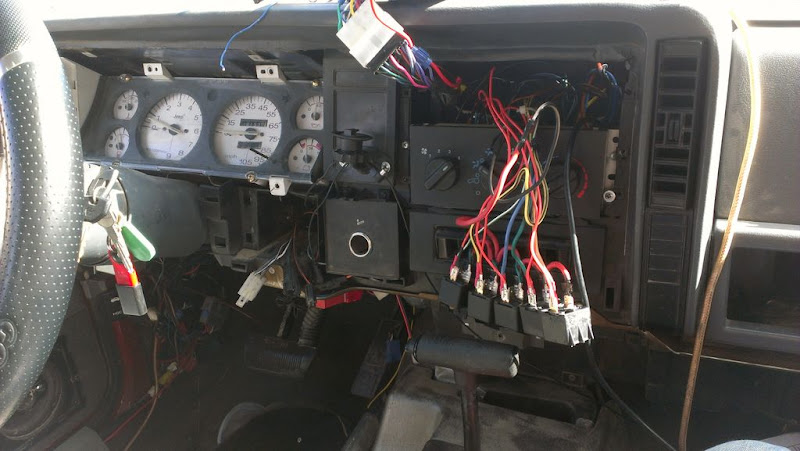
At this point , use your imagination to figure out how to soundly mount the new control in the dash, I used 4 1" self tappers with spacers and washers to allow me to control the backspacing and put the face of the new controls right where they need to go. The relays should also be thoroughly electrically 'isolated' with wire tape and or liquid tape. I used heat shrink and liquid tape to seal everything, then tucked the cluster of relays behind the glove box inside the dash.
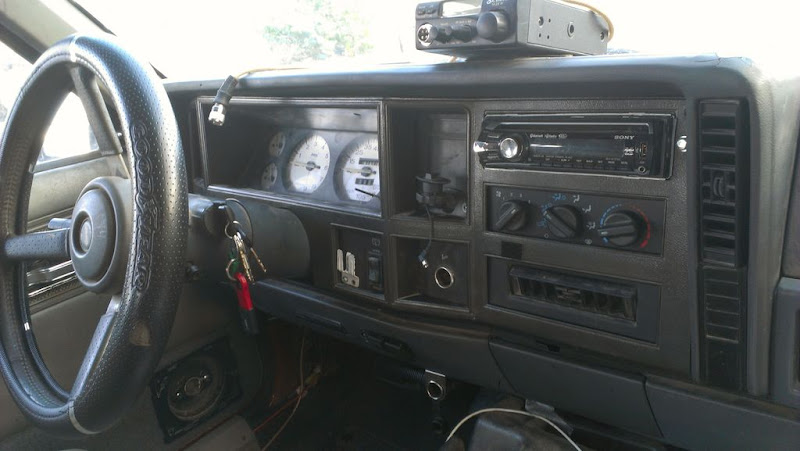
Here is the final result, and I must say three weeks after I am really liking the new knobs. I'm betting gloves + those knobs = easy.

After many beers and some studying the factory service manual diagrams I figured out that the vacuum setup between 1997 and 1992 was exactly the same, with some minor color differences.
Description | Old | New
(up to 96) (97-01)
Recirc Door | Orange | Green
Panel Door | Brown | Red
Floor Door | Yellow | Brown
Defrost Door | Green | Yellow
Part Defrost | Blue | Blue
Vacuum Sup | Black | Black
So I went to O'Reilley's and bought a spool of heat shrink tubing. With some patience you can get all 6 spliced in about an hour without burning any fingertips.
Next is the wiring nightmare, In the old setup, everything was positive switched at the switches, and in the new setup, everything was negativity switched. Prepare to spend some time with a soldering iron and 5 relays. I used crimp style female spades as a platform to solder on in the case I need to replace a relay down the road. It takes a while.
Here is the final wiring result:
After that , you need to either use a blend door cable out of a 97 (no modification necessary) or thin down the C loop on the end of your <96 cable with a Dremel or other sort of sanding/grinding tool. A nut and bolt will be necessary to hold the C loop in the door actuator lever arm.
Now to make the whole thing fit into your dash, you need to hack off the 1/2" lip between your middle vent and the factory AC controls, and 1/2" - 3/4" off the bottom of the 97+ AC control. Call it clearancing if you will...
At this point , use your imagination to figure out how to soundly mount the new control in the dash, I used 4 1" self tappers with spacers and washers to allow me to control the backspacing and put the face of the new controls right where they need to go. The relays should also be thoroughly electrically 'isolated' with wire tape and or liquid tape. I used heat shrink and liquid tape to seal everything, then tucked the cluster of relays behind the glove box inside the dash.
Here is the final result, and I must say three weeks after I am really liking the new knobs. I'm betting gloves + those knobs = easy.
 )
)